Volume texture
Volume Parameters
From, To
The extension number of the first (From) and last (To) file in the sequence. The valid range is 0 to infinity. The slider range is 1 to 16. The default value is 1.
Pix Sequence
The name of any image file in the sequence (for example, pixfile.4).
Light parameters
To set light parameters, double-click a light within the Multi-lister.
Light type
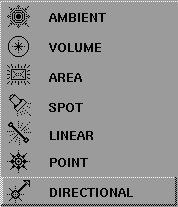
Controls how a light illuminates a scene.
Active Effects
Most Active Effects parameters are common to all light types. Some parameters are limited to specific light types.

Light
Controls whether a light actually emits light and illuminates surfaces. This parameter has no effect on the Glow, Halo, or Fog parameter settings. For example, a light can glow, but it will not illuminate surfaces. The default setting is ON for lights.

Renderer Shadows
Controls whether a light casts shadows during raytracing. (Only spot lights can cast shadows during raycasting.) If Renderer Shadows is ON, the Shadow Parameters become available. The default setting is OFF.
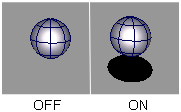
Toggle Shade Shadows
Controls whether a spot or directional light casts ground shadows during hardware shading (WindowDisplay > Hardware Shade  ). If Toggle Shade Shadows is ON, the Shadow Parameters become available. The default setting is OFF.
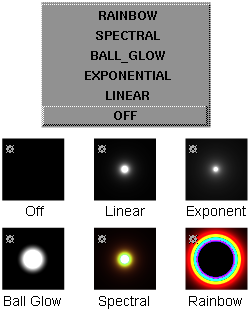
Glows
The type of glow that the light produces when viewed directly. A light without glow can illuminate objects when the scene is rendered; however, a light needs glow to be seen by the camera when the scene is rendered. You can assign glow to all types of light except ambient lights.
If Glow is set for a light, the Glow, Radial Glow Effects, and 2D Glow Noise Glow Effects parameters become available. The default setting is OFF.
| OFF | No glow |
| LINEAR | Glow slowly diminishes from the center of the light |
| EXPONENTIAL | Glow quickly diminishes from the center of the light |
| BALL_GLOW | Glow diminishes faster towards a distance (from the light center) specified by the glow Spread value |
| SPECTRAL | Lower wavelengths (red) refract (or spread) more than the higher frequencies (blue) |
| RAINBOW | Simulates refraction due to water droplets in air. The glow Spread value determines the radius of the rainbow. |
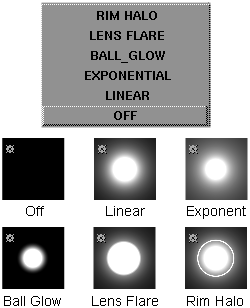
Halo
The type of halo that the light produces when viewed directly. Halo is like Glow, except that the falloff is more gradual and different falloff types are available.
The Glow Intensity value must be greater than zero for the Halo setting to have any affect. The default setting is OFF.
| OFF | No halo |
| LINEAR | Halo slowly diminishes from the center of the light |
| EXPONENTIAL | Halo quickly diminishes from the center of the light |
| BALL_GLOW | Halo diminishes faster towards a distance (from the light center) specified by the halo Spread value |
| LENS FLARE | Simulates a bright light source illuminating the surfaces of several camera lenses. The intensity of the flare is determined by the halo Intensity value. The size of the flare circles is relative to the field of view of the camera. |
| RIM HALO | Forms a circular ring with a soft central glow. The size of the ring is determined by the halo Spread value. |
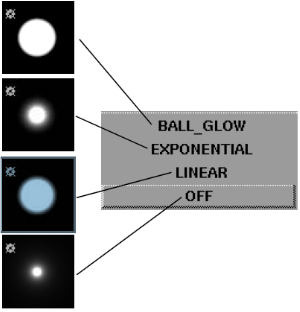
Fog
The type of fog that the light appears to be shining through. You can assign fog to point lights and spot lights to simulate light scattered from either a sphere of fog (for point lights) or a cone of fog (for spot lights). The default setting is OFF.
| OFF | No fog |
| LINEAR | Fog slowly diminishes from the center of the light |
| EXPONENTIAL | Fog quickly diminishes from the center of the light |
| BALL_GLOW | Fog diminishes faster towards a distance (from the light center) specified by the fog Spread value |
BALL_GLOW provides sharper thresholds at the edge when the fog Opacity value is non-zero. In spot lights, the Decay value determines how fast the light falls off from the center of the light. Shadows can be cast into volumes of fog by using spot lights when Shadows are set ON and the Fog type is LINEAR.
Use fog to simulate effects such as smoke or fog in the air. Light scatters diffusely and creates a radiance around light sources. This type of radiance fills a volume of space, and can show shadows of objects. Objects can immerse into the glow or stand in front of it, unlike retinal glow, which is always in front of objects. Fog glows can be visible even if the light source is totally obscured.
Use fog to simulate illuminated fog. Smoky fog can be simulated by using the 2D Noise parameters (this noise is also available for glow). The smoke can be animated by using the u and v offset parameters. Dark smoke can be specified by using the opacity parameter and making the color of the light black or negative.
Note the following when using fog:
- Fog glow is 3D: a cone for spot lights and a sphere for point lights. The camera can fly though fog glow.
- If shadowing is on for shadow casting spot lights, the fog glow displays the proper shadowing. For example, if the spot light shines through a trimmed hole, then the glow assumes the shape of the hole.
- Objects cast shadows into the volume of the fog. This can cause striking effects when combined with the 2D noise and glow effects.
For example, imagine the light on a police car in fog. As the light cuts through the smoke, objects cast shadows into the fog. When the light is pointing towards the camera a flash occurs (glow for spots only occurs when the eye is inside the spot light cone). The flash can have star and perhaps lens flare effects. The only animation needed to accomplish this is rotating the spot light.

Lens Flare
Simulates a bright light source illuminating the surfaces of several camera lenses. The intensity of the flare is determined by the halo Intensity value. The size of the flare circles created is relative to the field of view of the camera. The Lens Flare parameter is not available for ambient lights. The default setting is OFF.
Common Light Parameters

Color
The color of the light. If you map a texture to this parameter, the light projects the texture. (The exact method of projection depends on the Light Type.) The default setting is white.

Intensity
The brightness of the light. If the light exerts a force, this value sets its strength. A light with an Intensity value of 0 produces no light. A light with negative Intensity value removes light from a scene in the area of the light’s influence. The slider range is 0 to 100. The default value is 1.
Use a negative Intensity value to reduce or remove hot-spots or glare.
Exclusive Link
Makes the light only illuminate objects that are linked to that light. A light with Exclusive LinkOFF illuminates objects that have no light links. The default setting is OFF.

Light Radius
The size (radius) of the light (in world space units). The Light Radius value influences surface shading and determines the separation of the shadows. (Shadows are generated to match a globe shaped light with the specified radius.) The slider range is 0 to 1. The default value is 1.
Light Type Parameters
The Light Type Parameters are different for each light type. Only the Decay parameter is common to most light types.

Decay
Controls how quickly light intensity decreases with distance. The Decay setting has no effect at distances less than 1 unit.
The Decay parameter works differently for volume lights. Valid settings are 0, 1, 2 or 3. The default setting is 1.
| 0 | no decay; light reaches everything |
| 1 | light intensity decreases directly (linearly) with distance (slower than real world light) |
| 2 | light intensity decreases proportionally with the square of distance (the same as real world light) |
| 3 | light intensity decreases proportionally with the cube of distance (faster than real world light) |
Shadow Parameters
The Shadow Parameters are only available if Renderer Shadows or Toggle Shade Shadows is ON under Active Effects. The Ray Tracer Soft Shadows parameters are not available for area lights or linear lights.

Shadow Color
The color of shadows produced by the light. For example, you can use Shadow Color to simulate shadows produced by colored glass.
Ray Tracer Soft Shadows

Soft Shadows
Makes the light produce soft shadows during raytracing.
The nature of soft shadows which are created is determined by the distance of the light from the object casting shadows combined with the Light Radius value. Shadows are generated to match a globe shaped light with the specified radius (in world space units). If the light source is small or far away, hard-edged shadows will result. Shadows become softer-edged as the light's radius increases, as happens in the real world. However, because of super-sampling, the region of partial shadow (penumbra) can become noisy. To correct this, increase the number of samples, adjusting either the Shadow Samples value (on light) or the global anti-aliasing level.
If you use a blending function, Soft Shadows can be useful even when the Light Radius value is 0 and the Shadow Samples value is 1. This method helps avoid jagged shadow boundaries.
Use Shadow Map
Toggles the Shadow Map method ON or OFF.

Shadow Samples
The minimum number of shadow feeler rays per sample (used to create raytracer soft shadows). A large Shadow Samples value increases rendering times but produces smoother soft shadows. The valid range is 0 to 100. The slider range is 1 to 40. The default value is 2.
Glow
The Glow parameters control the appearance of the light’s glow, and are only available when Glow is set (that is, not OFF) under Active Effects.

Glow Color
The color of the light’s glow. The default setting is white.

Intensity
The brightness of the glow. As the Intensity value increases, so does the apparent size of the glow effect. A negative Intensity value subtracts from other glows. (The Decay value controls how the glow brightness decreases with distance.) The slider range is 0 to 5. The default value is 1.

Spread
Controls the size of the glow effect. Negative values can have odd but useful effects. The slider range is 0 to 5. The default value is 1.

Star Level
Simulates camera star filter effects. The slider range is 0 to 4. The default value is 0.
Use the Star Points parameter to set the number of points on the star. Use the Rotation parameter to rotate the star.

Radial Noise
Randomizes the spread of the glow to simulate starburst effects and eyelashes refracting light. The slider range is 0 to 1. The default value is 0.
Negative values of Radial Noise produce thicker noise. Use the Noise Freq. parameter (under Radial Glow Effects) to control the smoothness of this effect.

2D Noise
The strength of two-dimensional noise applied to the glow. The noise is generated on a plane that is centered at the location of the light and always oriented towards the camera. The slider range is 0 to 1. The default value is 0.
To create the illusion of illuminated smoke around a glowing light source, set the 2D Noise value to about 0.5 and slowly animate the Uoffset and Voffset values. The smoke will appear to slowly drift by the light.
Generally fog illumination (2D Noise under Fog Illumination) is better than glow for creating smoke and fire effects, because fog is a 3D effect (for example, glow 2D noise cannot be occluded by objects).

Opacity
The amount that the light’s glow obscures objects behind it. Opacity can be thought of as the opposite of transparency. The slider range is 0 to 0.5. The default value is 0.
Halo
The Halo parameters control the appearance of the light’s halo, and are only available when Halo is set (that is, not OFF) under Active Effects.

Halo Color
The color of the halo. The default setting is white.

Intensity
The brightness of the halo. As the Intensity value increases, so does the apparent size of the halo effect. (The Decay value controls how halo brightness decreases with distance.) The slider range is 0 to 5. The default value is 1.

Spread
Controls the size of the halo effect. The Spread value also controls the size of the glow if Glow is RIM HALO. Halo size is generally larger than glow size when the halo Spread and glow Spread values are the same. The slider range is 0 to 5. The default value is 1.
Fog Illumination
The Fog Illumination parameters control the appearance of the light’s fog, and are only available for point lights and spot lights when Fog is set (that is, not OFF) under Active Effects.

Fog Color
The color of the fog. The default setting is white.

Intensity
The brightness of the fog. (The Decay value controls how fog brightness decreases with distance.) The slider range is 0 to 5. The default value is 1.
Combine Glow or Halo with Fog to give a bright, focused center to the fog.
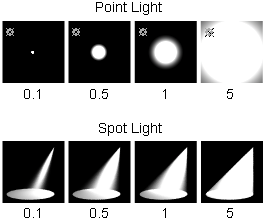
Spread
The fog Spread value has a different effect on point lights and spot lights. For point lights, it determines the size of the glowing spherical volume of fog. For spot lights, it determines how the fog brightness varies across the spot light beam. A high Spread value produces fog with uniform brightness. A low Spread value produces fog which is brighter at the center of the spot light beam. The spot light Decay value controls how fog brightness decreases with distance from the light source. The slider range is 0 to 5. The default value is 1.

Radial Noise
Randomizes the spread of the fog to simulate starburst effects and eyelashes refracting light. The slider range is 0 to 1. The default value is 0.
Negative values of Radial Noise produce thicker noise. Use the Noise Freq. parameter (under Radial Glow Effects) to control the smoothness of this effect.

2D Noise
The strength of two-dimensional noise applied to the fog. The noise is generated on a plane that is centered at the location of the light and always oriented towards the camera. The slider range is 0 to 1. The default value is 0.

Opacity
The amount that the light’s fog obscures objects behind it. (Opacity can be thought of as the opposite of transparency.) The slider range is 0 to 0.5. The default value is 0.
Adjust the Opacity value to simulate fire and smoke effects, which frequently do not let all the light in a scene pass through. To simulate black smoke, set the light color near black and the Opacity value high (around 10).
Lens Flare
The Lens Flare parameters control the appearance of the light’s lens flare, and are only available when Lens Flare is ON under Active Effects.

Flare Color
The color of the lens flare circles. If you map a texture onto this parameter, each lens flare circle contains the texture scaled to fit inside it. The default setting is RGB 160, 160, 255.
Use a circular Ramp texture to create a colorful rainbow flare effect.

Intensity
The brightness of the flare effect. (The Decay value controls how the lens flare brightness decreases with distance.) The valid range is 0 to infinity. The slider range is 0 to 5. The default value is 1.

Num Circles
The number of circles in the lens flare effect. The valid range is 0 to infinity. The slider range is 0 to 30. The default value is 20.
If the Num Circles value is very large, rendering times may be long, especially if the MinSize and Max Size values are large and the Flare Color is textured.
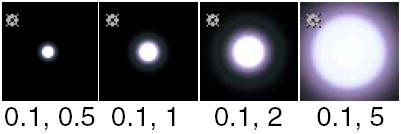
Min Size, Max Size
The size of the circles is randomized between these two values. The valid range is -infinity to infinity. The slider range is 0 to 5. The default value is 0.1 for Min Size and 1 for Max Size.

Color Spread
The amount that the hue of individual circles is randomized about the Flare Color. The Color Spread value has no effect if the Flare Color is not at least partially saturated (for example, not white or grey). The slider range is 0 to 1. The default value is 0.5.

Focus
The sharpness of circle edges. The valid range is 0 (very blurry) to 1 (totally sharp). The default value is 0.6.

Vertical, Horizontal
Controls the axis of the flare effect relative to the center of the image. If the light source moves, the flare appears to rotate through this point. The slider range is -1 to 1. The default value is 0.

Length
The length of the flare effect relative to the light location. If Length is small, all circles overlap the light. If Length is large, the circles spread out across the image. The Length value has no effect if the Vertical and Horizontal values are both 0. The slider range is 0 to 1. The default value is 1.

Hexagon
Makes flare elements shaped like hexagons (instead of circles).
To create lens flares having shapes other than circles or hexagons, apply a texture map onto Flare Color using an image of the desired shape (white on black).
Radial Glow Effects
The Radial Glow Effects parameters control the appearance of glow and fog radial effects (2D Noise, Radial Noise, and Star Level), and are only available when Glow or Fog is set (that is, not OFF) under Active Effects.

Rotation
Rotates glow and fog noise and star effects (2D Noise, Radial Noise, and Star Level) about the center of the light. The slider range is 0 to 360 (degrees). The default value is 0.

Star Points
The number of points on glow star filter effects. A Star Points value of 1 produces a comet-like effect. A non-integer Star Points value could render with a seam or hard line at the top of a star effect. The slider range is 0 to 10. The default value is 4.
Set the Star Points value to 1, the Star Level value to 1, and the Glow type to RAINBOW to produce a rainbow arch.

Noise Freq.
Controls the smoothness of glow and fog radial noise. The slider range is 0 to 5.The default value is 0.5.
2D Glow Noise
The 2D Glow Noise parameters control the appearance of glow and fog 2D noise, and are only available when Glow or Fog is set (that is, not OFF) under Active Effects.

Threshold
The cutoff value for the 2D noise. As the Threshold value approaches 0, fog and glow 2D noise breaks up into smaller patches. The slider range is 0 to 1. The default value is 1.
You can use Threshold to simulate globular clusters, ejecta from explosions, snow and rain effects, especially when the Uscale and Vscale values are high. You can also use it to make flames and smoke more patchy.

Uscale, Vscale
Scales glow and fog 2D noise in the horizontal (Uscale) and vertical (Vscale) directions. The slider range is 0 to 5. The default value is 1.
You can use Uscale and Vscale to create layered fog or tall flames. Animate the Uscale and Vscale values from high to low values to make the noise appear to fly apart like an explosion.

Uoffset, Voffset
Offsets glow and fog 2D noise in the horizontal (Uoffset) and vertical (Voffset) directions. For example, you can animate the Uoffset and Voffset values to simulate smoke, rain, or snow moving past a light. Noise repeats after an offset of 1. The slider range is 0 to 1. The default value is 0.