Move or scale an image plane
How to move an image plane horizontally, vertically, or in front of or behind 3D objects, or scale it.
You can move an image plane to change its position relative to its view. You can also scale an image plane to change its size relative to its view. Moving or scaling an image plane in this way changes the actual image plane (that is, it changes the number of pixels per inch [ppi]), but it does not change the absolute size of the image plane (measured in pixels). This enables you to make the image plane a "real world scale" -- for example, you can create an automobile-sized image plane, with a defined resolution in pixels.
If you only want to change your view of an image plane, do not move or scale it. Track or dolly into the view instead (using  +
+ with the
  or
or  .
.
You can also move an image plane so that it appears behind (background) or in front of (foreground) the grid and 3D objects.
Move or scale an image plane interactively (using the Move or Scale tools)
-
Choose Pick > Object Types > Image Plane
 .
. -
Choose Transform > Move
 or Transform > Scale
  .
. -
Click the image plane in the view.
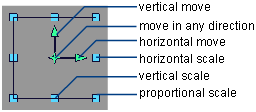
A manipulator appears on the image plane.
 Note:
Note:The manipulator does not appear if objects other than image planes are selected (for example, surfaces).
-
Drag a manipulator handle to move or scale the image plane, or click a manipulator handle to select it (the handle becomes white) and either:
-
drag anywhere in the view
-
press the arrow keys
-
type the horizontal and vertical values you want to move or scale the image plane by and press
 .Note:
Choose Edit > Undo while the manipulator is still active to undo the image plane transformation.
Note:If you transform an image plane, the transformation is applied as you drag the manipulator.
Note:The manipulator is centered on the image plane’s pivot point. To adjust the position of the pivot point, use the Transform > Local > Set Pivot
 tool. To position the pivot point in the center of the image plane, use the Transform > Local > Center Pivot
  tool.
tool.
-
Move an image plane horizontally or vertically (using the Camera Editor)
- Choose Windows > Editors > Cameras to open the Camera Editor.
- At the top of the Camera Editor, set Camera to the view that contains the image plane you want to move.
- In the Image Planes section of the Camera Editor, select the swatch of the image plane you want to move.
- In the Image Plane Parameters : Image Placement section of the Camera Editor, set the following parameters:
- Bottom Left – The location of the bottom left corner of the image plane (in the main linear unit). If you set the Bottom Left X (or Y) value, the Top Right X (or Y) value automatically updates.
- Top Right – The location of the top right corner of the image plane (in the main linear unit). If you set the Top Right X (or Y) value, the Bottom Left X (or Y) value automatically updates.
Scale an image plane (using the Camera Editor)
-
Choose Windows > Editors > Cameras
 to open the Camera Editors
 -
At the top of the Camera Editor, set Camera to the view that contains the image plane you want to scale.
-
In the Image Planes section of the Camera Editor, select the swatch of the image plane you want to scale.
-
In the Image Plane Parameters : Image Placement section of the Camera Editor, set the horizontal or vertical Size value (measured in the main linear unit) for the image plane.
If you set Image XY Ratio Lock to ON, the image plane is scaled proportionally when you set one of the Size values; that is, when you set the X value, the Y value automatically updates (and vice versa).
Move an image plane behind or in front of the grid and 3D objects
-
Choose Windows > Editors > Cameras
 to open the Camera Editor window.
 -
At the top of the Camera Editor, set Camera to the view that contains the image plane you want to move.
-
In the Image Planes section of the Camera Editor, select the swatch of the image plane you want to move.
-
In the Image Plane Parameters : Image Placement section of the Camera Editor:
-
Set the Depth parameter to Priority (ensuring that the Priority value is a positive number) to move the image plane in front of the grid and 3D objects.
-
Set the Depth parameter to Off, or set the Priority value to zero or a negative number, to move the image plane behind the grid and 3D objects.
The priority value that you assign to different image planes also determines the order in which the image planes appear in the view. The plane with the largest priority value appears in front of all others, and so on.
See Windows > Editors > Cameras
for more details.
-