Align or flatten subdivision edges to a plane
-
In the Subdivision tool palette, select the
 tool, then the
  icon to open the control window.
 -
Select the Plane Type to specify the plane projection you want to use planarize the edges. Select one of the following:
- View Based - Lets you planarize edges based on the current view in the viewport. Using this method, you can tumble the view to find the appropriate plane for alignment.
- Best Fit - Works well in situations where you want to maintain the curvature of the existing edge while bringing CVs into alignment with each other.
- Z, Y, X let you align CVs perpendicular to the selected axis.
-
Select a Projection Type.
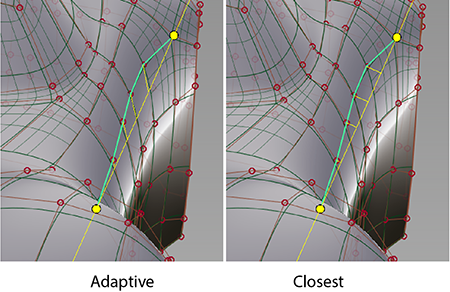
- Adaptive projection positions the plane to best follow the shape of the topology.
- Closest projection places the plane an averaged distance from the affected CVs.
-
Turn on Lock Ends if you want the plane to pass through the first and last CVs of the selected edge or edge loop. This way the position of the end CVs remain fixed, while CVs in between are aligned to the plane.
-
Select the edge or edge loop to planarize by doing any of the following:
-
 select to pick a single edge or edge loop (with Pick Edge Loop turned on).
 -
Press Shift +
 the first and last chain CVs to chain-select an area along an edge.
 -
Box-select CVs connected to the edges. Note that when you box-select, both CV ends of an edge must be selected to include the edge.
After selecting the edges, a yellow preview plane appears showing the orientation of the alignment. Short yellow lines show the direction and distance that the affected CVs will be moved.
-
-
If you use a View Based plane, tumble the view to find the appropriate plane for alignment. Then, select Update View in the viewport to readjust the preview plane to your new view.
-
To planarize the edge, press the spacebar or click Planarize in the viewport.