Surfaces > Skin
![]()
Creates a surface across a set of curves.
Skin Control Options
Crown Mode
![]()
This option lets you raise or lower midpoint of the surface between two input curve sets using a crown. Choose between adding a Proportional Crown or an Absolute Crown. You can also switch between the crown modes using the in-canvas manipulator. Click below the Crown label and choose between Proportional Crown, Absolute Crown, or Off.
Proportional Crown
Select this option to create a crown with a height that is proportional to the distance between the curves. The setting makes the surface degree 2 with a single row of CVs in the center.
Absolute Crown
![]()
Select this option to create a crown that has a consistent height across the section regardless of the section width or distance between the curves.
Crown Mode is set to off when you load a WIRE file that includes history results for Absolute Crown into versions previous to Alias 2022.2 Update.
Crown Flip
Flips the direction of the crown.
Click the arrow on the crown manipulator to flip the crown direction directly on the model.
Crown Value
Proportional Crown Value - The value corresponds to a percentage of the distance between the two rails. The slider ranges from 0.0 to 0.1, but larger values can be entered into the field.
Absolute Crown Value - Sets the crown height to an absolute value based on the set measurement units. The slider ranges from 1 to 10, but larger values can be entered into the field.
To change the Crown Value using the in-canvas manipulate, drag the arrow. The value adjusts in 0.005 increments. Use the left mouse button for adjustments, the middle mouse button for fine adjustments.
For Absolute Crown, the manipulator displays Crown Value with numbers that differ from the real value by a factor of 10. For example, a Crown Value of 4.0 displays as 0.40 in the manipulator.
Crown Shape
Increase the degree of the surface from 2 to 3, giving two central rows of CVs. Shape values less than 1 move these CVs closer to the edges of the surface, positive values move them closer to the center.
Crown Position
Controls the position of the crown shape from the middle of the skin surface to either edge. When set to 0, the crown shape is at the middle of the surface. Increasing or decreasing this value moves the crown shape towards either edge of the skin surface. Crown Shape must be set to a value greater than 0 before Crown Position has any effect.
Explicit Control
Select this option to specify the exact degree and number of spans in the new surface(s).
Explicit Control Options
These options are available only when Explicit Control is selected.
U/V Degree
The degree of the new skinned surface in the U and V directions. Values range from 1 to 7.
Explicit
Turn on to specify the number of U spans to insert. Use the U span control or enter a value to specify the number of spans to insert.
Max U Spans
Turn on to insert as many spans as needed to achieve continuity or until the Max U spans limit is reached. Use the Max U spans limit to control to specify a limit value. The default values is 100.
U Spans
Sets the number of spans for the skin surface in the U direction.
This option is available when Explicit is turned on
Max U Spans
Sets the maximum number of spans for the skin surface in the U direction.
This option is available when Max U Spans is turned on
V Spans
The number of spans for the skin surface in the V direction.
Curve Coupling Tolerance
When Explicit Control is selected, the skin surface may have an irregular structure. Increase the value of this option to improve the structure.
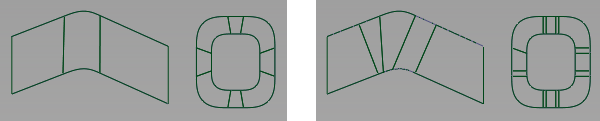
Left: Explicit Control not selected, Right: Explicit Control selected
Rebuild
![]()
Rebuilds the skin surface by using the CV layout of the input curves to influence the resulting surface shape. This option simplifies the topology of the skin surface by removing unwanted spans or multi-knots that can be generated by the Skin tool. In some instances, each input curve is modified to produce the optimal output results.
You can make further changes by turning on Explicit Control to set the degree span manually to get the desired results.
In some cases, turning on Rebuild may not produce visible changes in the skin surface.
Flow Control
Start/End
Defines the extent of the surface through a snapping point on each input curve set. You can define the range manipulator snapping points to be at the following locations:
Default – The extent of the surface is defined as the closest point from one curve set endpoint to the second curve set. This maintains the control layout "normal to curve sets.
Extend – The end of the surface can be extended to match the endpoint of the opposite surface. This also maintains the control layout "normal" to curve sets.
Connect Ends – The endpoint of the initial curves set is connected to the endpoint of the second curve set. This is the default construction.
Modify Range
Select this option to use range manipulators to define a portion of each curve set as input for the surface.
Surface Structure
Surface Type
Single Surface – A single skin surface is built.
Multiple Surfaces – A separate surface is created for each of the input curves you selected, and the surfaces are grouped.
Bezier surfaces
This option only appears if Surface Type is set to Multiple Surfaces. If it is selected, each surface will be a Bézier patch.
Bézier patches have a single span, and their maximum degree in the U direction is set through the Explicit Control section.
Min Span Length/Min Edge Length
In the case of cross-knot insertion, the system will not allow spans of a length smaller than the Min Span Length/Min Edge Length.
When a regular surface is created, this option is named Min Span Length. When a Bezier surface is being created, the option is named Min Edge Length.
Topology
Open – Leave the resulting surface open.
Closed – Connect the first curve to the last curve to create a closed (periodic) surface.
Control Options
Auto Update
Automatically update the surface as curves are added.
Create History
Save the history of the new surface for later editing. If you turn Create History on, when you modify the curves that were used to create the surface, the surface updates.
Show In Canvas Locators
Displays the in-canvas control text on the manipulator. The text controls can sometimes get in the way of picking edges. Turn this option off to hide the controls.
Continuity Check
Select this option to see the level of continuity between the newly created surface(s) and the original surface(s).
P – Positional continuity
T – Tangent continuity
C – Curvature continuity
Deviation
Select this option to display the maximum deviation indicator (displays only if Deviation is not 0).
Chain Select
If this option is selected, selecting a surface curve also selects all other surface curves that are tangent continuous with it.
Create Metadata
Specifies whether or not the Skin tool creates history metadata.
The Create Metadata option is available only with Autodesk Alias 2019.2 or later.