![]()
Alias VR lets explore models in virtual reality. Immerse yourself in the environment and experience your designs closer than ever before. Connect a virtual reality device and view your Alias scene in VR. Any changes to your scene in Alias appear in automatically View in VR. Alias VR features:
- Support for Alias variants, including camera, shading, geometry, and layer visibility masks.
- Viewing modes, including teleport and a 360 degree turntable animation.
- Different display modes including shading, wireframe, and zebra.
Requirements
VR Devices
Alias VR supports:
- HTC VIVE Cosmos, HTC VIVE and VIVE Controllers
- Oculus Rift S, Oculus Rift, and Touch Controllers
- WinMR Controllers
You no longer need to install the Steam® Client to install Steam® VR, which provides the application drivers for displaying to a HTC Vive headset. See the HTC's support pages for information about installing Steam VR without creating a Steam Client account.
Video card/GPU
High performance is critical to a pleasant VR experience and is essential to reduce any discomfort. It is important to use an NVIDIA or AMD VR ready graphics card, with the amount of graphics power increased to meet your content demands.
PC
VR-ready PC that meets or exceeds device manufacturer's specifications.
OS
Windows only.
DirectX
Latest version of DirectX 11.
Physical Space
Desk or room scale.
Controller mapping
In the VR environment, the controllers display tooltips that show that function of each button. The tooltips dynamically change based on the active tool. You can toggle the controller tooltips on and off in the VR environment menu.
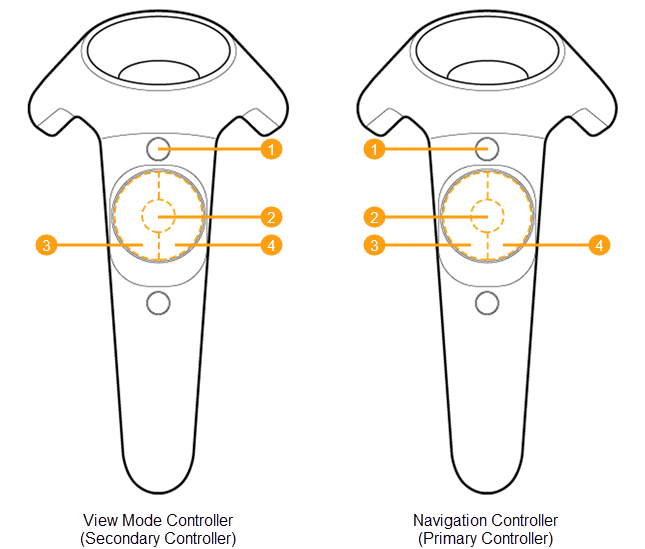
HTC VIVE Cosmos controllers
![]()

| View Mode Controller (Secondary Controller) | Navigation Controller (Primary Controller) |
|---|---|
| 1 Y Button: Toggle Menu visibility | 1 B Button: Toggle Menu visibility |
| 2 X Button:Display Mode cycle, Stop Turntable | 2 A Button: Teleport (with fade) |
| Joystick Left/Right (if your scene contains Variants): | Joystick Left/Right (if your scene contains Variants): |
| 3 Left (on click or hold) - Previous Variant, Turntable rotate clockwise - click to increase speed | 3 Rotate View left (on click 15 degrees, on hold smoothly but slowly) |
| 4 Right (on click or hold) - Next Variant, Turntable rotate counter-clickwise - click to increase speed | 4 Rotate View right (on click 15 degrees, on hold smoothly but slowly) |
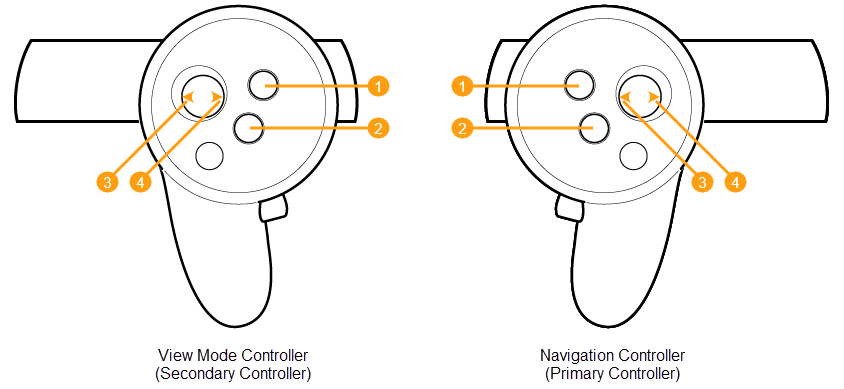
HTC VIVE controllers
| View Mode Controller (Secondary Controller) | Navigation Controller (Primary Controller) |
|---|---|
| 1 Menu Button: Toggle Menu visibility | 1 Menu Button: Toggle Menu visibility |
| 2 Touchpad Middle Button: Display Mode cycle, Stop Turntable | 2 Touchpad Middle Button: Teleport |
| Touchpad Left/Right Buttons: | Touchpad Left/Right Buttons: |
| 3 Left (on click or hold): Previous Variant, Turntable rotate clockwise - click to increase speed | 3 Rotate View left (on click 15 degrees, on hold smoothly, but slowly) |
| 4 Right (on click or hold): Next Variant, Turntable rotate counter-clickwise - click to increase speed | 4 Rotate View right (on click 15 degrees, on hold smoothly, but slowly) |
Oculus Rift controllers
| View Mode Controller (Secondary Controller) | Navigation Controller (Primary Controller) |
|---|---|
| 1 Y Button: Toggle Menu visibility | 1 B Button: Toggle Menu visibility |
| 2 X Button:Display Mode cycle, Stop Turntable | 2 A Button: Teleport (with fade) |
| Joystick Left/Right (if your scene contains Variants): | Joystick Left/Right (if your scene contains Variants): |
| 3 Left (on click or hold) - Previous Variant, Turntable rotate clockwise - click to increase speed | 3 Rotate View left (on click 15 degrees, on hold smoothly but slowly) |
| 4 Right (on click or hold) - Next Variant, Turntable rotate counter-clickwise - click to increase speed | 4 Rotate View right (on click 15 degrees, on hold smoothly but slowly) |
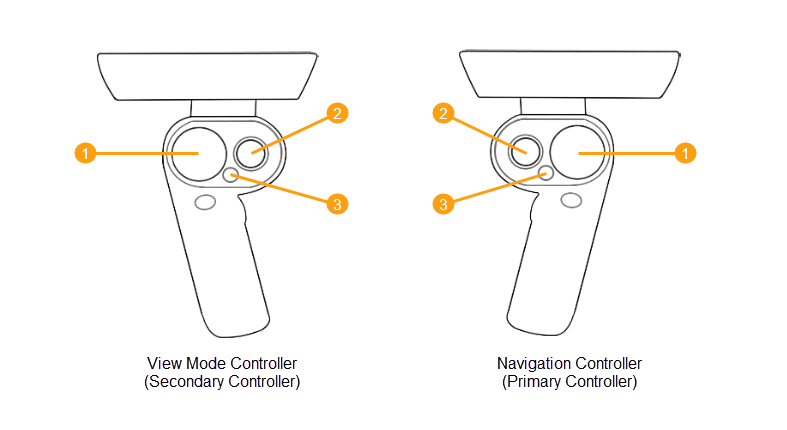
Windows Mixed Reality controllers
| View Mode Controller (Secondary Controller) | Navigation Controller (Primary Controller) |
|---|---|
| 1 Display Mode cycle, Stop Turntable | 1 Teleport |
| 2 Previous and Next Variant, Turntable clockwise and counter clockwise | 2 Turn Left and Right |
| 3 Toggle Menu visibility | 3 Toggle Menu visibility |
Safety Notice
- Always follow the health and safety (including any regulatory information) and operating directions from the device manufacturer.
- To help prevent any possible injury only use View in VR with the health and safety guidance and operating directions included with your supported VR device.
- Stop use if you experience any discomfort or health reactions.