Use this procedure to add a wall modifier of an existing wall modifier style to a wall. You can apply the modifier to one or both sides of the wall or the component. The left and right sides of the wall are determined from the start and endpoints of the wall.
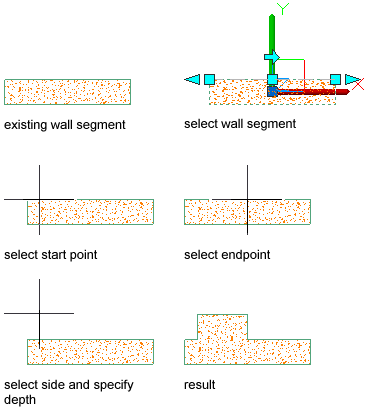
- Select the wall to which you want to apply a wall modifier
- Click
 .
. 
- Select the start point for the wall modifier.
After you select the first point, a temporary line is displayed to show you the length of the modifier.
- Select the endpoint for the modifier.
- Select the side of the wall to draw the modifier.
- Enter the depth for the wall modifier.
- Select the wall modifier style.
- Select the name of the component to apply the modifier to.
- To offset the opposite face of the selected component in the shape of the wall modifier, select Offset Opposite Face.
Adding a wall plan modifier
- Specify the vertical position of the modifier on the wall component:
If you want to … Then … specify the beginning height of the wall modifier enter a value for Start Elevation Offset, and specify whether the offset occurs from the wall top, the wall base height, the wall justification line, or the wall bottom. specifying the ending height of the wall modifier enter a value for End Elevation Offset, and specify whether the offset occurs from the wall top, the wall base height, the wall justification line, or the wall bottom. Enter a negative offset value to specify a location toward the ground.

Wall plan modifier location parameters
- Click OK.
After you add a wall modifier, you can edit its geometry or adjust its placement.