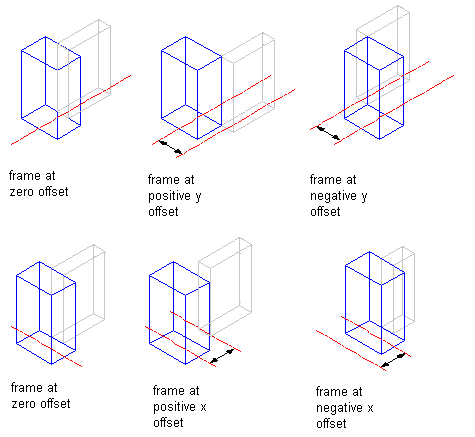
Use this procedure to define the distance that a curtain wall frame is from the floor line, roof line, or baseline. By default, the outside edges of the frame align with the start and end of the floor line and the start and end of the roof line. When you adjust the width of the frame, the frame expands inward. However, you can use offsets to expand or contract the frame away from these default limits or to shift the frame away from the baseline in either the X or Y direction.
| Offset | Description |
|---|---|
| X | Positive X offset moves the frame edge outward beyond the end of the curtain wall, while a negative X offset moves the frame edge inward toward the center of the curtain wall. |
| Y | In Plan view, a positive Y offset moves the frame edge above the baseline, while a negative Y offset moves the frame below the baseline. |
| Start | Negative Start offset lengthens the frame beyond the start point, while a positive Start offset shortens the frame. The start point for vertical edges is the baseline, and the start point for horizontal edges (drawn left to right) is the left side. |
| End | Negative End offset lengthens the frame beyond the end point, while a positive End offset shortens the frame. The end point for vertical edges is the base height, and the end point for horizontal edges (drawn left to right) is the right side. |

Specifying frame offsets in the x and y directions
Tip: To quickly identify the start and end of a curtain wall, select the curtain wall. The Reverse Direction grip is displayed near the center of the curtain wall and points toward the end of the curtain wall.
- Click

 .
. 
- Expand Architectural Objects, and expand Curtain Wall Styles.
- Select a curtain wall style.
- Click the Design Rules tab.
- In the left pane, select Frames under Element Definitions.
- Select a frame definition from the list.
- Specify an offset distance for the frame edge.
- Click OK.