Use this procedure to add a U-shaped stair with settings that you specify. U-shaped stairs have two equal-length runs joined by a half-landing. The justification setting controls where the points that define the stair fall within its width.
When drawing the stair, the flights are shown with lines for each tread. Flat landings have no tread lines, while turn-type landings show tread lines through the entire turn. For turn-type stairs, these temporary lines do not necessarily represent the actual locations of tread lines in the final stair.
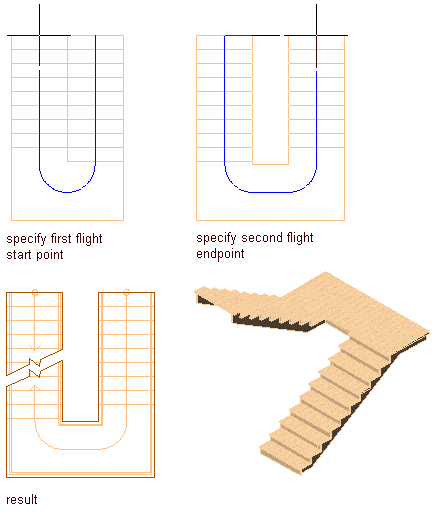
Creating a U-shaped stair


 Properties.
 - Open the tool palette that you want to use, and select a stair tool.
If necessary, scroll to display the tool that you want to use.
Note: Alternatively, click

 .
. 
- On the Properties palette, click the Design tab, expand Basic, and expand General.
- Select a style.
- For Shape, select U-shaped.
- Specify the turn type:
If you want to… Then… create a flat landing where the stair run turns back in the opposite direction select 1/2 landing for Turn type. create stairs where the stair run turns back in the opposite direction with treads throughout the run select 1/2 turn for Turn type. - Specify the horizontal orientation of the stair:
If you want to… Then… draw the U-shaped stair so that the right is the outer edge of the stair and left is the inner edge select Counterclockwise for Horizontal Orientation. draw the U-shaped stair so that the left is the outer edge of the stair and right is the inner edge select Clockwise for Horizontal Orientation. 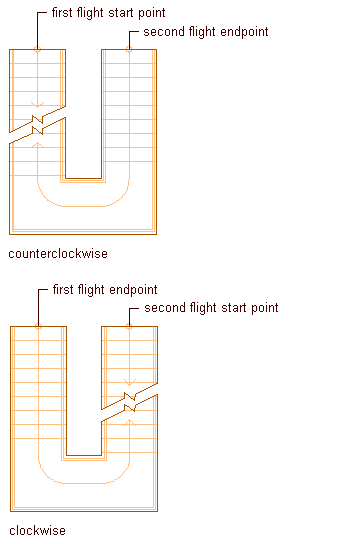
Specifying the horizontal direction for U-shaped stairs
- Specify the vertical orientation of the stair:
If you want to… Then… draw the stair from this floor to the floor above select Up for Vertical Orientation. draw the stair from this floor to the floor below select Down for Vertical Orientation. - Expand Dimensions.
- Specify stair width, height, and justification:
If you want to… Then… specify the width of the stair enter a value for Width. specify the floor-to-floor height of the stair enter a value for Height. specify the justification of the stair enter a value for Justify. The Justify value you select controls the insertion point when you place the stair (inside, center, or outside) at the beginning of the stair run. - Specify the stair termination:
If you want to… Then… end the stair run with a riser select Riser for Terminate with. 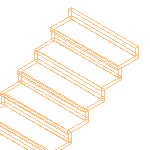 Note: Stairs that end with a riser will have an overall height that is one tread thickness less than the floor-to-floor height specified.
end the stair run with a tread select Tread for Terminate with. 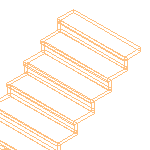
end the stair run with a landing select Landing for Terminate with. 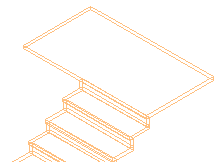
- Click
 next to Calculation rules, and
if you want to… then… specify the overall linear length of the stair enter values for Straight Length and Riser Count, then click OK. - When Straight Length is set to
 (automatic), the value is calculated based on the tread size and riser count.
 - When Straight Length is set to
 (user-defined), the stair length is equal to the dimension entered, and the other three values are adjusted within the code limits.
 - When Riser Count is set to
 (user-defined), the tread depth is increased or decreased to accommodate the stair.
specify the total number of stair risers enter a value for Riser Count, then click OK. - When Riser Count is set to
 (automatic), the number of risers is based on the overall length and overall height of the stair and the code limits specified on the Design Rules tab. The Straight Length value of the stair is adjusted automatically.
 - When Riser Count is set to
 (user-defined), you can specify a value that is used to calculate the tread depth and riser height. If these values fall outside the stair limits, an error message is displayed.
specify the height of each riser in the stair flight set all fields to  (automatic), click the icon for Riser to change it to
  (user-defined), and enter a value for Riser. Click OK.
 specify the tread depth for each tread in the stair flight set all fields to  (automatic), click the icon next to Tread to change it to
  (user-defined), and enter a value for Tread. You can also specify the Riser count when you set the tread depth. Click OK. Note: If a value is set to user-defined on the Calculation rules worksheet, it can be modified directly in the Properties palette. If
 is displayed next to a field in the Calculation Rules dialog box, that field can’t be changed until another field is changed from
  (user-defined) to
  (automatic).
 - When Straight Length is set to
- Expand Advanced and specify the Constraints:
If you want to… Then… place the treads and risers with the minimum landing extension select Free for Alignment. align the tread of the up flight to the tread of the down flight select Tread to tread for Alignment. align the tread of the up flight to the riser of the down flight select Tread to riser for Alignment. align the riser of the up flight to the riser of the down flight select Riser to riser for Alignment. - Specify a value for Alignment offset.
When you select Tread to tread, Tread to riser, or Riser to riser, you can specify an offset value. A positive offset value means that the down-flight tread location is closer to landing than the up-flight tread location.
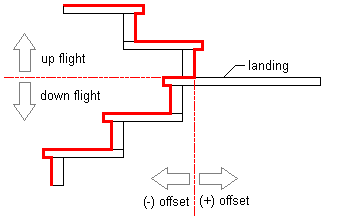
Specifying tread to riser alignment offsets
- Specify a value for the Extend alignment (Lower flight or Upper flight).
- Specify a value for Uneven tread to determine which flight will be longer if the total number of treads is uneven. Select Upper flight to place the Uneven tread on the upper flight. Select Lower flight to place the uneven tread on the lower flight.
- Specify floor settings:
If you want to… Then… change the thickness of the floor finish material at the top of the stair enter a value for Top offset. change the depth of the structure at the top of the stair enter a value for Top depth. change the thickness of the floor finish material at the bottom of the stair enter a value for Bottom offset. change the depth of the structure at the bottom of the stair enter a value for Bottom depth. - Set the minimum height or number of risers in a stair flight, or specify *NONE*.
- Set the maximum height or number of risers in a stair flight, or specify *NONE*.
- In the drawing area, specify the insertion point of the stair.
You can move or hide the Properties palette to expose more of the drawing area.
- Specify the endpoint of the stair.
- Continue adding stairs, or press Enter.