Use this procedure to add project standard tools to an existing tool catalog.
- Click

 .
. 
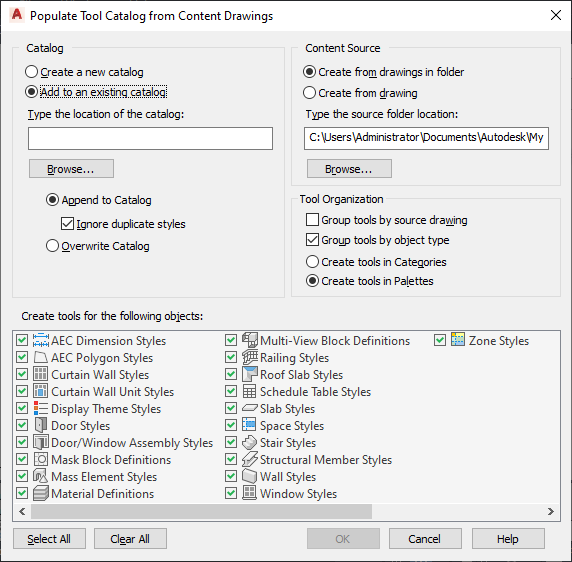
- Under Catalog, select Add to an existing catalog.
- Enter the name and the path of the catalog.
- Click Append to Catalog and select Ignore Duplicate Styles if you want to prevent existing styles from being overwritten by styles with the same name and file path from the appended drawing.
If you clear Ignore Duplicate Styles, existing styles are overwritten with styles from the appended drawing if they have the same name and file path.
- If you want to overwrite the existing catalog, click Overwrite Catalog.
This deletes the whole catalog and replaces it with the palettes, categories, and tools from the source drawing(s).
Danger: You should use that option with great caution, as it will delete the complete existing catalog. If you just want to overwrite tools with their up-to-date versions from a content drawing, select Append to Catalog instead, and verify that Ignore Duplicate Styles is cleared. - Under Content Source, select a project standards drawing or standards folder to use as source for the new tools.
If you want to… Then… add tools from multiple drawings in a folder select Create from drawings in folder, and then enter the path and folder name under Type the source folder location. add tools from a single drawing select Create from drawing, and then enter the path and drawing name under Type the source drawing. - Specify how the tools should be ordered in the catalog.
- To order the resulting tools by their source drawing, select Group tools by source drawing.
This option is well suited for a tool catalog that is generated from a number of styles drawings. The resulting tools could be placed in categories or palettes named “Wall Styles - Concrete (Imperial)”, “Wall Styles - CMU (Imperial)” and so on.
- To order the resulting tools by their object type, select Group tools by object type.
This option is well suited if you want to merge styles from various drawings into the catalog. The resulting tools will be placed in categories or palettes named after the style type, for example “Walls”, “Doors,” and so on.
Note: If both options are enabled, then the tools are first grouped by the drawings and then by the object type, generating categories from the drawings, and palettes from the object types. This is implemented because palettes cannot be nested. In this case the radio buttons below are disabled and the Create tools in palettes option is selected for the tools.Note: If neither of the two options are enabled, all new tools will be generated in the top category of the catalog. - To place the new tools in categories, select Create Tools in Categories.
If you selected to group tools by their source drawing, then for each source drawing a category will be created. If you selected to group tools by their object type, then for each object type a category will be created.
- To place the new tools in palettes, select Create Tools in Palettes.
If you selected to group tools by their source drawing, then for each source drawing a palette will be created. If you selected to group tools by their object type, then for each object type a palette will be created.
- To order the resulting tools by their source drawing, select Group tools by source drawing.
- Under Create tools for the following objects, select which object styles should appear as tools in the catalog.
By default, all available style types are selected. Use the Select All and Clear All buttons as needed to make your selections.
- Click OK.
A progress bar in the application status bar indicates the progress of the tool generation. When a large number of tools are being added, the process can take a few moments.
Note: Each category and each palette is created in its own ATC file. The category and palette ATC files are stored in the Palettes or Categories subfolders in the folder in which the new catalog is created.