To Create Multiple Model Space Viewports
- Click
 Viewport Configurations drop-down arrow .
 - Click the viewport configuration that you want to use.
Tip:
Viewport controls are displayed at the top-left corner of each viewport, which that might look like the following:
[-] [Top] [2D Wireframe]
Click the - or + control, and then the Viewport Configuration List to change the number and arrangement of viewports.
Press CTRL while dragging viewport boundaries to display the green splitter bar and create new viewports. Alternatively, you can drag the outermost splitter controls.
To Make a Model Space Viewport Current
- Click anywhere within the viewport borders.
To Cycle Through Viewports Without Clicking
- Press Ctrl+ R repeatedly.
To Reset Model Space to a Single Viewport
- Click ViewportsViewport Configurations ListSingle.
To Join Two Model Space Viewports
Note: To join two viewports, they must share a common edge of the same length.
- Click Viewports, Join.

- Click in the model space viewport you want to keep.
- Click in an adjacent viewport to join it to the first viewport.
Tip: Alternatively, you can drag an interior boundary of any model space viewport, joining it to another viewport with a common edge of the same length.
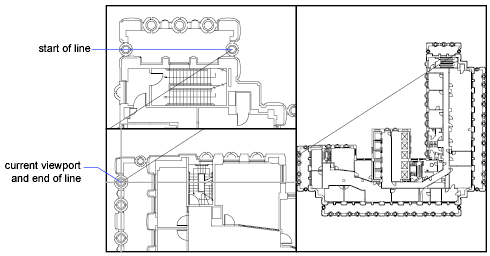
To Draw Across Two Model Space Viewports
In a large drawing, you can use this method to draw a line from a detail in one corner to a detail in a distant corner.
- Start the line in the current viewport.
- Make another viewport current by clicking within it, and then specify the second endpoint of the line.