With this method, you use the Table command to specify the number of rows and columns, stretch and resize the columns, rows, or the entire table. If you use layout tabs for annotation, create your table directly on a layout tab. The scaling is automatic. If you use model space for annotation, you will need to scale the table. Tables do not support annotative scaling.
- Enter TABLE at the Command prompt.
- In the Insert Table dialog box, enter 4 columns and 3 data rows. Specify a location for the table.

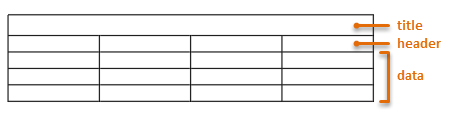
By default, there are three styles of cells that appear when you use the Standard table style:
- Click outside the table, and then select it on an edge to display its grips.

- To change the size and shape of the table, click the dark blue triangular grips. You can click the square grips to adjust the width of the columns. You can also use object snap tracking to align the grips to existing geometry.
At this point, you could explode the table to convert it into simple lines. This is not a best practice, but is still much faster than creating the lines from scratch. Instead, let's take this table further.
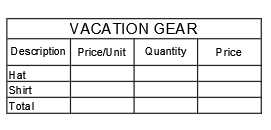
Adding Information to a Table
- Click into each cell and enter the text as shown.
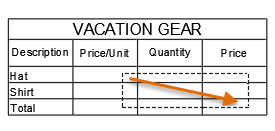
- Next, click and drag to select all nine data cells, and choose Bottom-Right from the Alignment button on the ribbon.
- In the same way, click and drag to select the three cells under Price/Unit. Right-click, choose Data Format, and then choose Currency.
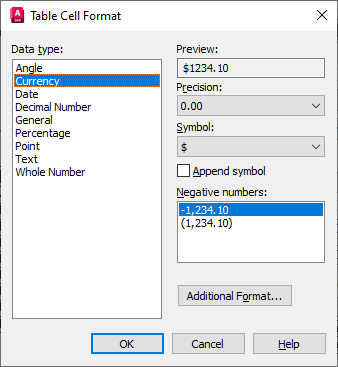
- Do the same for the data cells under the Quantity and Price headers. For the cells under Quantity, choose Whole Number, and for the cells under Price, choose Currency again.
The term, headers, is used in Excel rather than headings, so we will continue this standard.
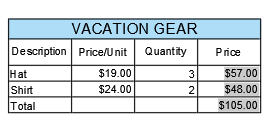
- Enter the values in each cell as shown below.
If you assigned the data format as Currency, the $ symbol will appear automatically. The $0.00 entries are needed as placeholders for the format. If the values for the currency columns don't display the $ symbol, right click and then choose Data Format to change the cell data format to Currency.

- In the first cell under Price (D3), enter
=B3*C3. The cells are automatically multiplied.
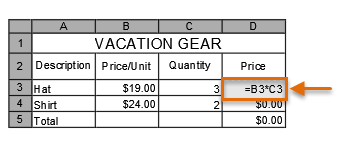
- Similarly, in cell D4, enter =B4*C4.
- Next, in cell D5 enter
=SUM(D3:D4).
The colon between D3 and D4 indicates a range of cells between D3 and D4 inclusive.
- Finally, for some color, click within the Title cell, right-click, and click Background Fill. Choose a background color for the title of the table.
That's it, but there's plenty more to explore when you're ready. For example, you can define table styles to control the text formatting for the various cell types. You can also create a table automatically from a Microsoft Excel spreadsheet, and you can link the data between them.