You can include the motor symbol tag number assignment in connected wire number assignments. It requires coordination between the motor symbol insertion and the wire number insertion. The motor symbol must insert before the wire number. The order of insertion is controlled by the ORDER attribute value on the marker blocks within the circuit template drawing. The marker block ORDER attribute value for the motor symbol must be a lower number than the ORDER value of the marker block for the wire number in the circuit template drawing. When the wire number is inserted, the motor tag value can be incorporated in to the wire number.
- Open the Circuit Builder spreadsheet, ace_circuit_builder.xls.
- Find the circuit CATEGORY and TYPE, for example CATEGORY: 3ph Motor Circuit and TYPE: Horizontal - FVNR - non reversing.
- Open the circuit code sheet with the same name as the SHEET_NAME value, for example SHEET_NAME: 3ph_H.
- Find the motor symbol, for example CODE: MTR03, COMMENTS: Motor symbol, UI_PROMPT_LIST: 3ph motor.
There can be multiple selections within the group. For example, there is a selection for the type of disconnecting means, and a selection to include an auxiliary contact. Each selection is assigned a numerical value from the UI_VAL field. The values are added together to determine the appropriate action for this combination of selections. The sum is matched to a value in the UI_SEL field. Once this match is made, the COMMAND_LIST value, ANNOTATE_LIST value, and so on, are used to insert and annotate the selections.
- Edit the API call in the ANNOTATE_LIST column for this component. For example, it might look like this with two API calls concatenated:
(c:ace_cb_anno #data 0)(c:ace_cb_save "@MOTOR_NUM@" "TAG1*" nil 1)
The second one, c:ace_cb_save, saves the TAG1 attribute value on the motor in to memory under an index tag of “@MOTOR_NUM@”. This value can be referenced when the subsequent wire number marker blocks are processed.
Note: See the API documentation for more information on c:ace_cb_save. - Save the spreadsheet.
- Find the marker blocks for the wire numbers that are tied to the motor tag. These could be on the main circuit template or on a nested template drawing. Open the circuit template drawing.
- Find the correct marker block for the wire number.
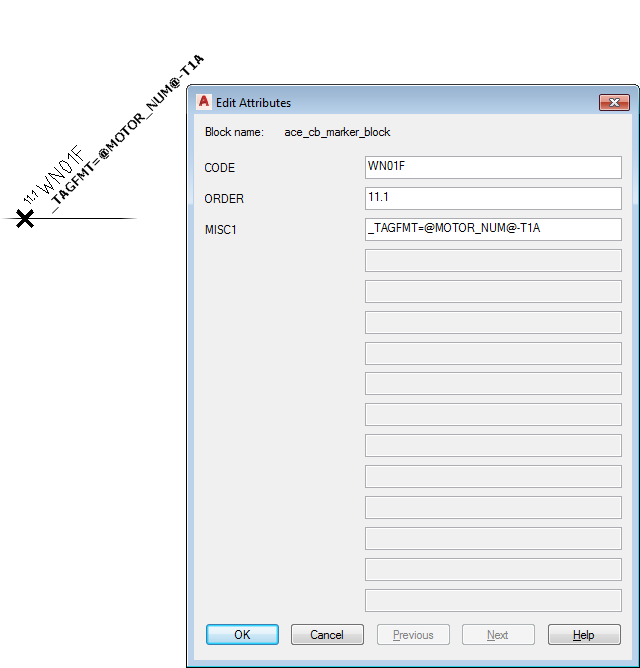
- Edit its MISC1 attribute value using the @MOTOR_NUM@ in the format where you want the motor tag value. For example, “_TAGFMT=@MOTOR_NUM@-%N” or to predefine a wire number, “_TAGFMT=@MOTOR_NUM@-T1A”.
 Note: The MISC1 attribute value can contain multiple special text flags which direct Circuit Builder to handle the component or underlying wire in a special way. When you add new values, do not overwrite any other special flag values. Separate each one with a semicolon.
 - Save the circuit template drawings.