Use this procedure to add individual part sizes to the model. You create individual part sizes by adding parameter values. Values can be a list or table of values, constant values, or calculations.
You can also create unique part size names. Each part size name is generated using a calculation—a formatted string of parameter values and text.
- To add part sizes to the part, in the part browser, right-click Size Parameters, and click Edit Configuration.
The Size Parameters dialog box is displayed.
Note: Calculated values set in the model cannot be edited in the Size Parameters dialog box. To change these values you must edit the model. - To add a table of available sizes for the diameter and height of the tank body, click
 to change the data storage type of ND1 and LenB1 to Table.
 - In the Size Parameters dialog box, select Values from the drop-down list.
The parameter values are displayed.
- To add a new size, click the first row in the table, and then click
 on the toolbar.
 A new part size row is added to the Size Parameters dialog box. Repeat for each part size you want to add.
- For each part size, double-click ND1 and LenB1 and enter values.
The software automatically retrieves an appropriate physical diameter based on the nominal diameter that you specify and the connection type. For more information, see Specifying Connector Sizes for Pipe Connectors
Tip: You can copy and paste values from other part families using standard Microsoft® Windows copy and paste functionality (Ctrl+C for Copy and Ctrl+V for Paste). You can copy and paste values from another part open in Content Builder, from a part open in Catalog Editor, or from a Microsoft® Excel spreadsheet. For connector parameters, you can also insert the corresponding values for the segments used by default during layout. - To specify a unique part size name, in the Size Parameters dialog box, select Calculations from the list.
The calculation strings are displayed.
- Double-click PrtD in row 1.
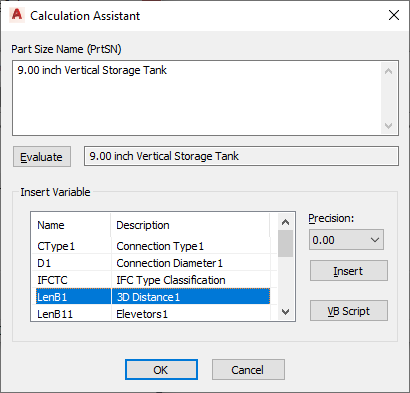
The Calculation Assistant dialog box is displayed.
- In the Calculation Assistant dialog box, define the part size name.
- Under Precision, select 0.
- Under Insert Variable, select LenB1, and click Insert (to the right).
- At the top of the dialog box, click the value for Part Size Name (PrtSN), and enter inch Vertical Storage Tank.
- Click Evaluate to see the result.

Calculation Assistant dialog box showing values entered
- Click OK twice.