You can move devices and panels using Alignment grips (![]() ). Unlike the AutoCAD MOVE command, you can optionally use the grips to align the device or panel perpendicular to the object to which you snap, such as a wall.
). Unlike the AutoCAD MOVE command, you can optionally use the grips to align the device or panel perpendicular to the object to which you snap, such as a wall.
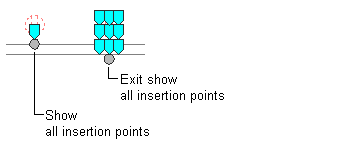
By default, Alignment grips are displayed at the electrical connector points on devices and panels. However, you can toggle on additional grips by clicking the Show all insertion points grip. The additional grips are located at the justification points available when adding devices and panels, for example, Top Left, Bottom Center, and Insertion Point. In the following image, one receptacle displays the default Alignment grip. The other also displays the additional grips.
Note: When you move multiple devices or panels at the same time using Alignment grips, you must select a base grip on one device or panel (the base device or base panel) for the move action. If you align the base device or base panel to an object, the other devices in the selection set inherit the same angle of rotation. They also maintain their position relative to the base device or base panel.
To move a device or panel
- Select the device or panel.
- Select the Alignment grip to use to move the device or panel:
If you want to move the device or panel relative to… Then… its electrical connector point select the default grip. another point on the device or panel click the Show all insertion points grip, and select the grip. Note: To move multiple devices or panels at the same time, while pressing Shift, select the same Alignment grip on each of the devices or panels to create the selection set. Then, on one device or panel, reselect the grip to use it as the base grip. - Specify how you want to align the device or panel:
If you want to… Then… snap to an object using object snaps and have the software align the device or panel perpendicular to the object proceed to the next step. When you select an Alignment grip, this behavior is active by default. Note: The software can align the device or panel perpendicular to a wall, ceiling grid, space boundary, line, polyline, spline, arc, or circle in the current drawing or in a referenced drawing (xref).place the device or panel using its current angle of rotation press Ctrl. This toggles off the alignment behavior, but you can still snap to an object. - Move the device or panel:
If you want to… Then… use the base grip point as the base point for the move specify the second point (the insertion point) by doing one of the following: - specify a point in the drawing. For example, you can snap to a point on a wall.
- enter the coordinates, and press Enter.
specify a base point and then a second point enter b (base point), specify the base point, and then specify the second point. Note: If you have difficulty snapping and aligning to an object, zoom to the area, or modify the size of the AutoSnap aperture as needed. The aperture size determines how close to a snap point you can be before the magnet locks the aperture box to the snap point. You can modify the size on the Drafting tab of the Options dialog box. - Press Esc.