You can insert any number of raster images into an AutoCAD drawing. Each image is placed in a frame, and a link is created between the drawing and the image file.
When you click Raster menu  Insert (or enter
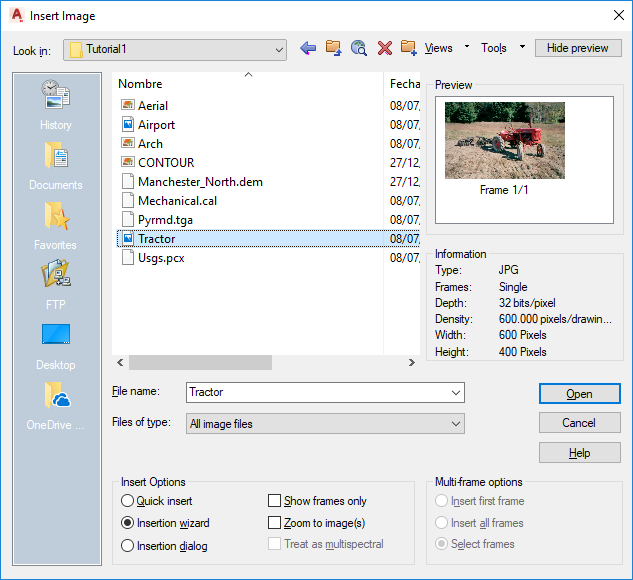
iInsert on the command line), the Insert Image dialog box is displayed. Here you can preview the image and information such as file type, color depth, and density. The column of folders along the left side of the Insert Image dialog box is called the Places List. It contains shortcuts to local folders, such as your Favorites folder or My Documents folder.
Insert (or enter
iInsert on the command line), the Insert Image dialog box is displayed. Here you can preview the image and information such as file type, color depth, and density. The column of folders along the left side of the Insert Image dialog box is called the Places List. It contains shortcuts to local folders, such as your Favorites folder or My Documents folder.
You can open image files from the Internet in several ways:
- Click the Search The Web icon at the top of the dialog box to display the AutoCAD Web browser, with which you can specify an Internet location and select an image to insert.
- Click the FTP icon to browse FTP sites and select an image to insert.
An inserted image must be correlated in the drawing. Correlation is simply a means of positioning the image using known coordinates. If you want to display the image, you must also assign it a color map, which specifies how to use the available colors to show image data.
You can configure your inserted image in three different ways during the insertion process:

- Quick Insert applies automatic correlation and color mapping during image insertion. No additional options are required with this choice.
- Insertion Wizard is recommended for the new AutoCAD Raster Design toolset user, as it proceeds through the insertion process step by step.
- Insertion dialog box is intended for intermediate and experienced users, as it presents the insertion options on separate tabs.
During insertion, you can change some attributes, such as the image scale, the color of the image frame, and the foreground color of bitonal images.
The following sections explain the additional concepts involved in image insertion.