The NC Format Manager
The default NC formats included with Autodesk CAMplete TruePath allow most users to get started. You may want to customize the format and output codes in your G-Code programs. This can be done through the NC Format Manager.
-
To access the NC Format Manager, click NC Formats on the Manage tab:

-
This accesses the NC Formats page of the Resource Manager. Alternatively, you can access the Resource Manager using the Resources button at the bottom of the Project Navigator view:

-
The Resource Manager > NC Formats page lets you view and manage your NC Formats:

Each item in the NC format tree represents a block of formatted NC codes (G-Codes, M-Codes and comments) to be inserted when a condition matching the block’s type is encountered. For example, “Generic Fanuc Format: Start Program Block” is applied at the beginning of each NC Program, and “Generic Fanuc Format: Tool Change Block” is applied for each tool change.
Basic NC Format Edits
The following section guides you through copying an existing format (it can be locked or unlocked) and adding a comment to be output at the beginning of each tool path. Making your edits in a new copy allows you to maintain the standard format as a reference (since it is locked by default).
To copy an existing NC Format and rename the new subsections
-
Select the main format (root item) in the tree.
-
Click Copy.
-
In the Copy dialog box type a new name for the format. For this example, use “Custom Demo Format”.
Note: NC Format item names must be unique within the NC Format database. -
Make sure that the Copy Sub Sections and Automatically Update Copy Names options are both checked. These will copy the children and apply the new name correctly to all of the copied child items:

-
Click OK to complete the copy process.
-
The new format will appear in your list of formats.
To edit a section in your new NC Format
For this example, you will add a new comment to the beginning of each tool path. This is controlled by “Start Path Block” of the NC Format.
-
Expand the NC Format tree for your NC Format.
-
Find and select the item “Custom Demo Format: Start Path Block” in the format tree.
-
Click Edit to open the NC Format Editor

-
The editor shows the current command codes that will be applied at the beginning of every tool path. In this example, there is a code that disables the line numbering output during post processing. Your editor might show something different depending on the construction of the default NC Format supplied with your Install CD.
To add a new line and comment code to the NC Format
-
Click Insert New Line.
-
You can see a new line has been added to the Start Path Lines grid.
-
Click New Codes Window to open the New Command Codes dialog box:

This dialog box shows you a list of all available codes that can be used in this NC Format. This list varies depending on the controller you are currently working with.
-
Select the Auto Comment: Tool Name entry in the list and hold down the left mouse button. Drag the mouse into the Code Layout column of the line you previously added.
-
As you move the mouse, the cursor changes to show you the insert point for the new code. If you are editing a format with multiple lines and codes, you can use the Code Layout column to move codes to a new location. If you hold down the CTRL key while dropping a code, you can copy rather than move the original code.
-
The new code should now appear in the NC Format:

-
Close the New Command Codes dialog box.
-
Click Finish to apply your changes.
You will now see a history dialog for the NC format section that you edited. Autodesk CAMplete TruePath maintains a history of edits made to your NC formats. Every time you save an NC format section, Autodesk CAMplete TruePath prompts you to add a history item. You can choose not to add a comment to the history item, but the application still maintains a record of the edit.
-
Type an appropriate comment to describe your edits (for example, “Added Tool Name auto-comment to the start of each path”).
 Note: Some special characters are not permitted in history comments. There is also a limit on the length of history comments. Autodesk CAMplete TruePath warns you of problems with history comments and does not let you proceed until they are corrected.
 -
After entering a history comment click OK.
-
When you have finished editing your NC format, close the resource manager to return to the main Autodesk CAMplete TruePath screen.
To Apply the new NC Format to your Program
Now that you have created a new custom NC Format you can apply it to a program through the CAM Wizard.
-
To access the NC Format page of the CAM Wizard, NC Format on the Manage tab:

-
Alternatively, you can launch the CAM Wizard using the button at the bottom of the Project Navigator view:

-
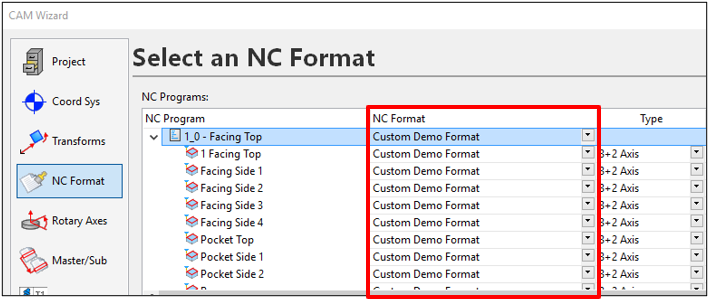
On the NC Format page, switch the format the NC Format column to the new NC Format:

-
Make sure that you switch it for the Program object and it will change it for the path objects.
-
Click Finish to commit this change.
-
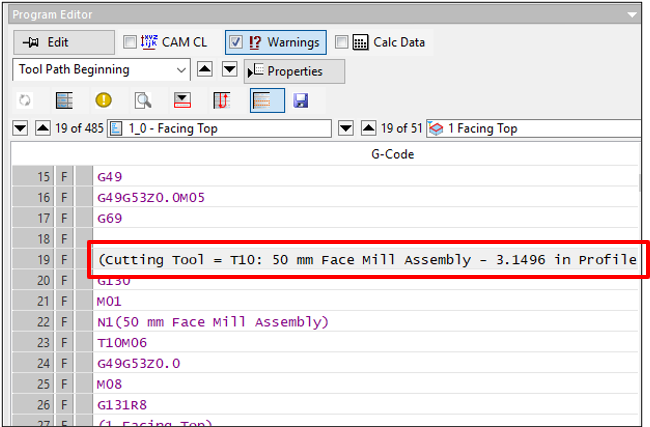
After regeneration, the new comment for the tool name should appear for every tool path:

Locking an NC Format
-
To lock an NC Format, right click the root item and select Lock. Or you can click on the gold lock icon in the tree.
-
You will be prompted to enter a password (twice to confirm that it’s correct).
-
You can also enter a user message that will be displayed to the user when attempting to edit the NC Format item:

-
Once matching passwords have been entered, click OK and the format will be locked.
-
When a user attempts to edit the NC Format, they will be prompted with this dialog:

Note that the user message appears in the dialog.
-
If the user does not enter the correct password, they will be able to view the NC Format item. However, they will NOT be able to save any changes to it. The Finish button will be disabled.
Deleting an NC Format
-
Select the NC format in the tree and click Delete.
-
You will be prompted to confirm the deletion:

-
Click OK to continue with the deletion.
-
At this point, the main format will be deleted from the tree. However, the sub-sections of the format have not been because they could potentially have been shared by other formats. Click Analyze to find any of these un-used sections.
-
The NC Format Alerts dialog will be displayed with any NC format sub-sections that do not currently belong to an NC format.
-
Click Select All to make sure all items are selected for deletion:

-
Make sure that Automatically Delete Children is checked ON.
-
Click OK and the orphaned sub-sections will be permanently deleted.
-
If you click Analyze again, no sub-sections will be found:

Exporting and Importing NC Formats
You can export NC Formats from your system to be imported on another computer running Autodesk CAMplete TruePath.
-
Click the format to be exported.
-
Click Export.
-
Save the format as a CAMplete CS4 file.
-
To import the format on another system, go to the NC Format manager and click Import and select the CS4 file that was exported.
Re-Applying the NC Format to Existing Programs
When you make changes to the NC Format in the NC Format editor, you can re-apply those changes to programs in existing projects (that use the edited format).
-
When you close the NC Format manager and you have a document loaded, you will be prompted to re-apply the format:

-
The dialog will list any programs in the grid that used the edited format.
Name – The name of the program.
NC Format – The name of the NC Format.
Re-Apply – Check this option ON to re-apply the format.
Status – Show the status of the format. If the database NC Format is newer than the document format, this will say New Version Available In Database.
Overrides – Shows any local edits that were made to the program. This might be changes to the tilt preference and other options that the NC Format controls.
Select All – Will select all programs in the grid for re-application of the NC Format.
Clear All – Will de-select all programs in the grid.
Select All By Default – Controls whether all out-of-date programs will be selected for re-application by default
Reset User Overrides – Will reset any user initiated overrides (see the overrides column). When this option is checked, anything that was overridden by the user will be restored to the NC Format settings.
Re-Apply Format(s) – Click this to re-apply the NC Format to the selected program(s).
Cancel – Close the dialog without re-applying the NC Format.
-
Select the programs for re-application and click Re-Apply Format(s).
-
The NC Format will be re-applied and the program will be regenerated.
-
The NC Format can be forced to be re-applied by clicking Re-Apply NC Formats on the Programs tab of the Ribbon. This will show the Re-Apply NC Formats dialog:

-
This dialog functions the same as Documents Are Out Of Date dialog. Note that is your format is up-to-date, the Status will be listed as OK.