In this exercise, you will create a label style.
In most cases, the easiest way to create a style is to find an existing style that is similar to the format that you want, create a copy, and then modify the copy.
In the following steps, you will create a design speed label style. You will learn various ways to create and edit label styles using the Autodesk Civil 3DToolspace.
To create a label style
- Zoom in to station 0+000 of the Main Street alignment.
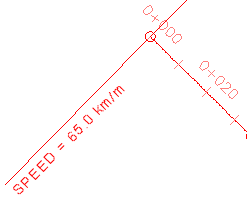
Examine the design speed label. You will use this label style as a basis to create a new label style that will display the design speed without the station label. The design speed labels will be placed at locations where the stations are already labeled.
Note:Design speed information, including the station at which the design speed has been applied, is available in the Alignment Properties dialog box on the Design Speeds tab.
- Select the design speed label. Right-click. Select Edit Alignment Labels.
- In the Alignment Labels dialog box, in the Design Speeds row, in the Style column, click
 . Note:
You use the Alignment Labels dialog box to create and edit label sets or to import an existing label set.
- In the Pick Label Style dialog box, click the arrow next to
 . Click
  Create New. Note:
 Copy Current Selection uses the format of the current style as a basis for the new style. You will learn about the
  Create Child Of Current Selection option in Exercise 2: Using a Child Label Style.
 - In the Label Style Composer dialog box, on the Information tab, specify the following parameters:
- Name: Design Speeds - Inline
- Description: Small design speed label perpendicular to the alignment
- Click the General tab.
On the General tab, you can specify the settings for the overall label style, including the visibility, layer, and plan readability. For this exercise, accept the default settings on this tab. You can turn on or off the visibility of the individual label components on either the Summary or Layout tab.
- Click the Layout tab.
On the Layout tab, you specify the content of the label style. A label can be made up of one or more components, each of which can have separate properties.
- Examine the contents of the Component Name list.
Each component is shown in the Preview pane on the right side of the dialog box. You can use the buttons to the right of the Component Name list to create, copy, or delete label style components. These components were copied when you created the style from the existing Station Over Speed style.
- In the Component Name list, select
Station
. In the General collection, change the Visibility to False.
Notice that your change is shown immediately in the Preview pane. This pane is useful when you are designing a label style. If you do not like what you see in the preview, you can change it before saving the style.
Note:To delete the Station component, select it from the Component Name list, and then click
 .
. - In the Component Name list, select Design Speed. Specify the following parameters:
- Anchor Component: Line
- Anchor Point: End
General
- Attachment: Bottom Right
- X Offset: 0.0 mm
- Y Offset: 1.0 mm
Text
- In the Text collection, for the Contents property, click the Value column. Click
 .
. You can use the Text Component Editor dialog box to define the content and format of a label style text component. The Properties list displays the available properties that can be displayed in a label component. When you select a component from the list, the applicable values are displayed in the table below.
- In the Text Component Editor dialog box, in the preview pane, select the DESIGN text. Press Delete.
- Click the <[Design Speed(P3|RN|Sn|OF|AP)]> property block.
After you have selected the property block in the Preview pane, you can modify the specific values that will be applied to the property.
- In the Properties list, select Design Speed. Change the Precision value to 0.1. Click
 to apply the new Precision value to the block in the Preview pane.
 Notice that in the block of code, P0 has changed to P1.
- In the Preview pane, select the SPEED text.
- Click the Format tab.
You can change the style, justification, font, and color of each text component.
- With the text in the Preview pane selected, change the Font to
Times New Roman
. Click OK.
In the Label Style Composer, notice that the SPEED font is different from the design speed value. The design speed value font did not change because it was not selected when you changed the font.
- Click OK to close the Label Style Composer, Pick Label Style, and Alignment Labels dialog boxes. Pan along the Main Street alignment to view the format of the new label style.

Label style created from an existing style
This exercise uses Labels-4b.dwg with the modifications you made in the previous exercise, or you can open Labels-5a.dwg from the tutorials drawings folder.
To continue this tutorial, go to Exercise 2: Using a Child Label Style.