In this exercise, you will assign elevations to the feature lines you created from AutoCAD lines in the previous exercise.
This exercise continues from Exercise 1: Creating Feature Lines.
Edit feature line elevations
- Click
tab
 panel Find.
- Click the feature line that stretches from circles C, D, E, to F.
In the Grading Elevation Editor, you see the length of each segment and elevations at each vertex. Notice that as you specified in Exercise 1: Creating Feature Lines, the elevation of the first point is 688.000 and the elevation of the last point matches the elevation of the surface. The elevation values of the two intermediate points are automatically interpolated based on the beginning and end-point values. You can use this table to edit the elevation and grade values. Now you will assign elevation values to line AB.
- Click
 , and then click the feature line between circles A and B. The
Grading Elevation Editor now displays the elevations along the feature line between circles A and B.
, and then click the feature line between circles A and B. The
Grading Elevation Editor now displays the elevations along the feature line between circles A and B.
- Double-click the elevation value for the starting station (0+00.00), and change it to
630.00’. This value puts it a few feet below the surface. Change the elevation of the end point to
690.00’.
In the next few steps, you will insert an elevation point on the feature line.
This exercise uses Grading-2.dwg with the modifications you made in the previous exercise.
Insert an elevation point on a feature line
- In the
Grading Elevation Editor, click
 (Insert Elevation Point).
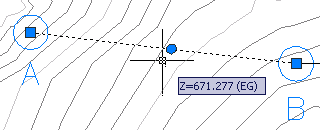
On feature line AB, you see a small circle and a tooltip that shows the station value and elevation of the point. You can use the cursor to move this point to a new location.
- Move the point to a location near the middle of the feature line, then click.
- In the
Insert PVI dialog box, optionally move the elevation point to a specific station. Click
OK.
The point is added to the table in the Grading Elevation Editor, where you can edit the station, elevation, grade, and length (distance between points).
- Click feature line AB.
Editing grips are displayed for the endpoints and elevation point. You can click the elevation point and slide it along the feature line. You can also click one of the endpoints and move it to a new location. When you do any grip editing, values in the Grading Elevation Editor update.
- Move the cursor over the surface near the elevation point to see the surface elevation displayed.
- In the
Grading Elevation Editor, set the elevation point to an elevation that is at or below the surrounding surface.
In the next few steps, you will drape feature line BC across the existing ground surface. This command assigns an elevation to each vertex of the feature line.
Drape a feature line on a surface
- If necessary, press Esc once or twice to deselect feature line AB.
- Click
tab panel Find.
- In the
Set Elevations From Surface dialog box,
ensure that
Insert Intermediate Grade Break Points is selected and that
Relative Elevation To Surface is cleared. click
OK.
Note: For more information about using the Relative Elevation To Surface option to make a feature line relative to a surface, see About Relative Feature Lines.
- Click feature line BC, then right-click and click Enter to end the command.
- Click feature line BC again. An elevation point has been added wherever the line crosses the edge of a triangle in the TIN surface.
- Right click and click
.
The Elevation Editor displays data for each elevation point along feature line BC, including its elevation, and the distance and grade to the next point. A feature line on the surface like this can be a useful starting point for a grading. You can use controls along the top of the Grading Elevation Editor to add and delete elevation points, and to adjust their elevations. You can select multiple points within the table for group operations, such as raising or lowering them the same amount, or “flattening” their elevations to the same value.
- Click
 to close the
Grading Elevation Editor.
to close the
Grading Elevation Editor.
To continue this tutorial, go to Exercise 3: Creating a Grading.