In this exercise, you will use layers to change the color and visibility of labels.
The components that make up a label object get their color, line weight, and line type property settings from either the label style or the layer to which the label style refers. When a label style refers to a specific layer, any label style components that are set to either ByLayer or ByBlock inherit the properties of that specific layer. However, if the label style refers to layer 0, then any label style components that are set to either ByLayer or ByBlock inherit their properties from the layer on which the label resides.
A label is an independent Autodesk Civil 3D object that can be on a separate layer from its parent object. However, the visibility of a label is linked to the layer of the parent object. Turning off or freezing the layer of an object also hides the labels of that object, even if they reside on a different layer.
This exercise continues from Exercise 2: Using a Child Label Style.
Examine how parent object layer state affects label visibility
- On the West Street alignment, zoom and pan to the area between stations 0+100 and 0+120.
- Click station label 0+120 to select all major station labels. Right-click. Click Properties.
On the Properties palette, notice that the alignment station labels are on layer C-ROAD-TEXT. If you look at the properties for the alignment itself, you will see that it is on the C-ROAD layer.
- Click Home tab
 Layers panel
  Layer list. Next to the C-ROAD layer, click
  to turn off the C-ROAD layer.
 - On the command line, enter REGEN.
The alignment and its labels are hidden. This happened because, while labels are independent objects on a separate layer, their visibility is linked to the layer of the parent object, C-ROAD. Turning off the layer of an object also hides the labels of that object, even if they reside on a different layer.
Note:The blue line that remains in place of the alignment is the polyline in the externally referenced drawing, from which you created the alignment in the Adding Labels In Groups exercise.
- Click Home tab
 Layers panel
  Layer list. Next to the C-ROAD layer, click
  to turn on the C-ROAD layer and the station labels.
 - On the command line, enter REGEN.
This exercise uses Labels-5a.dwg with the modifications you made in the previous exercise, or you can open Labels-5b.dwg from the tutorials drawings folder.
Create a label style that is not affected by the parent object layer
- Select label 0+120 to select all major station labels. On the Properties palette, under Labeling, click the field next to Major Station Label Style. Click Create/Edit.
- In the Major Station Label Style dialog box, click
 Edit Current Selection.
 In the Label Style Composer dialog box, on the General tab, in the Label category, notice that the Layer is 0. If a label style is set to layer 0, any of its color, line type, and line weight properties that are set to ByLayer or ByBlock will inherit the corresponding properties of the layer on which the label resides.
- Click the Layout tab.
In the Text category, notice that the Color property for the Station component is ByLayer. This means that the major station label text inherits the color of the layer to which the style refers. Because the label style refers to layer 0, the major station label text inherits the color of the label object layer, which is C-ROAD_TEXT.
- In the Color row, click the Value cell. Click
 and change the Station component color to blue.
 Notice that the text color updates in the Preview pane.
Note:For greater control of color, lineweight, and linetype, keep all style components set to either ByBlock or ByLayer, and the label style layer set to 0. Then, you can use the layers to modify these properties. This tutorial uses a specific color setting to demonstrate how layer settings affect styles.
- In the Component Name list, select Tick.
In the Tick category, notice that the Color property for the Tick component is ByLayer.
- Click OK to apply the change in color to the Major Station component and exit the Label Style Composer and Major Station Label Style dialog boxes.
- Press Esc to deselect the labels.
- On the command line, enter REGEN.
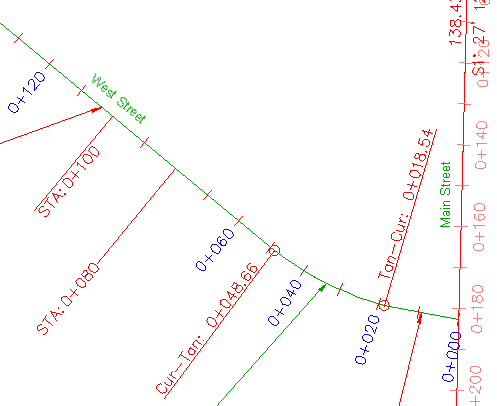
Notice that while the ticks still inherit the red color from the C-ROAD-TEXT layer, the text is blue.

Label style that uses color that differs from referenced layer
Add another label
- Click tab
 panel
panel  menu
menu 

 .
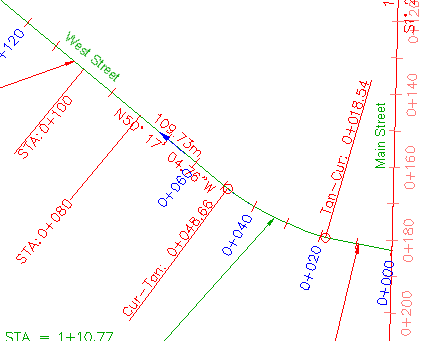
. - When prompted to select a segment to label, click the alignment between stations 0+060 and 0+080. When a label appears on the alignment, press Enter to end the command.

Segment label added to alignment
- Select the new label. On the Properties palette, notice that the label is on C-ROAD-TEXT.
When labels are created, they are placed on the layer specified for the label object in the Drawing Settings dialog box on the Object Layers tab. The drawing settings for this drawing specify that alignment labels are created on the C-ROAD-TEXT layer.
- On the Properties palette, click the field next to Line Label Style. Click Create/Edit.
- In the Line Label Style dialog box, click
 Edit Current Selection.
 In the Label Style Composer dialog box, on the General tab, in the Label category, notice that the layer style is C-ROAD-BRNG. This means that if any of the color, line type, and line weight properties are set to ByLayer or ByBlock, they inherit the corresponding properties of the C-ROAD-BRNG layer, no matter what layer the label object is on.
- Click the Layout tab.
Use the Component Name list to examine the properties of the various label components. Notice that the Color of all the components is ByLayer, except for the Direction Arrow component.
The label components that have their Color property set to ByLayer are red because the color property of the C-ROAD-BRNG layer is red. The direction arrow is blue because its Color property is blue.
- Click Cancel to exit the Label Style Composer and Line Label Style dialog boxes.
Examine the affects of layer visibility on the labels
- Click Home tab
 Layers panel
  Layer list. Next to the C-ROAD-TEXT layer, click
  to turn off the C-ROAD-TEXT layer.
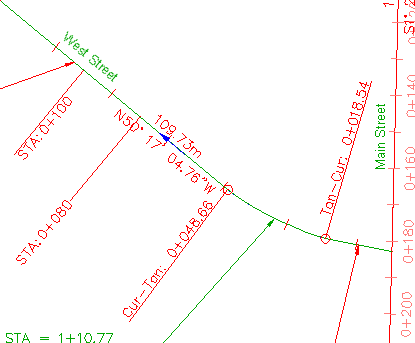
 The major station labels and ticks are hidden, but the tangent label you added is not. The station labels were hidden because they are on the C-ROAD-TEXT layer and their style refers to the C-ROAD-TEXT layer, which you turned off. The tangent label is still visible because, while you turned off the layer it is on, its style components refer to the C-ROAD-BRNG layer, which is still visible.

Station labels hidden
Notice that the STA:0+080 and STA:0+100 labels you changed in Exercise 2: Using a Child Label Style are also still visible. This is because the rest of the major station labels use the Perpendicular With Tick style, which refers to layer 0. Labels STA=0+060 and STA=0+080 use the Perpendicular With Line and Station Emphasis styles, which refer to the C-ROAD-LABL layer.
- Click Home tab
 Layers panel
  Layer list. Next to the C-ROAD-TEXT layer, click
  to turn on the C-ROAD-TEXT layer and the station labels.
To continue this tutorial, go to Exercise 4: Changing the Dragged State of a Label.