Add a floating reverse curve with spirals in situations where you need two back-to-back reverse transition spirals and the curve geometry must pass through a specified point.
![]() Tutorial Exercise: Adding Floating Curves to an Alignment
Tutorial Exercise: Adding Floating Curves to an Alignment
To add a floating reverse curve with spirals (from curve, radius, through point) off a curve
Add a floating reverse spiral-spiral-curve group, with a specified radius and pass-through point, to a curve.
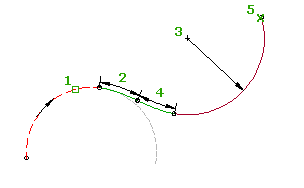
The two spirals bend in opposite directions. The curve bends in the opposite direction of the attachment curve. When the attachment curve (1) is edited, the spiral lengths (2, 4), curve radius (3) and pass-through point (5) do not change. The attachment point and the length of the reverse curve adjust to accommodate edits to the attachment curve.
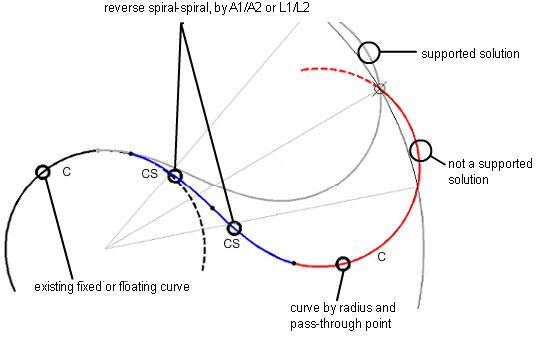
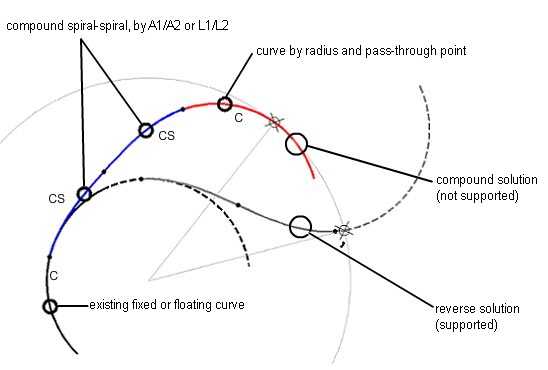
This entity does not support either of the following solutions:
- Solutions that require a floating curve angle greater than 180 degrees. The following illustration shows both the supported and unsupported solutions:
- Compound solutions. The following illustration shows an unsupported compound solution:
- Click the alignment. Click
 Find.
Find. - On the Alignment Layout Tools toolbar, click
 Floating Reverse Curve With Spirals (From Curve, Radius, Through Point) to add a floating reverse curve with spirals off a curve.
 The current spiral definition is displayed at the command line.
- Specify the fixed or floating curve entity to attach to.
- Specify either the spiral in length or the A value.
Specify a new value, or press Enter to accept the value that is displayed on the command line.
- If the alignment has design criteria applied to it, the minimum value for the current design speed is displayed.
- If the alignment does not have design criteria applied to it, the default value specified in the curve and spiral settings is displayed.
- Specify either the spiral out length or the A value.
- Specify the radius, or enter D to specify the degree of curvature. Note: To calculate the radius or degree of curvature using other known curve parameters, enter 'CCALC to open the Curve Calculator.
- Specify the pass through point.
To add a floating reverse curve with spirals (from curve, two through points) off a curve
Adds a floating reverse spiral-spiral-curve group, with two specified pass-through points, to an existing curve.
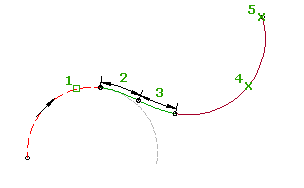
The two spirals bend in opposite directions. The curve bends in the opposite direction of the attachment curve. When the attachment curve (1) is edited, the spiral lengths (2, 3) and pass-through points (4, 5) do not change. The attachment point and the radius and length of the reverse curve adjust to accommodate edits to the attachment curve.
- Click the alignment. Click Find.
- On the Alignment Layout Tools toolbar, click
 Floating Reverse Curve With Spirals (From Curve, Two Points) to add a floating reverse curve with spirals off a curve.
 The current spiral definition is displayed at the command line.
- Specify the fixed or floating curve entity to attach to.
- Specify either the spiral in length or the A value.
Specify a new value, or press Enter to accept the value that is displayed on the command line.
- If the alignment has design criteria applied to it, the minimum value for the current design speed is displayed.
- If the alignment does not have design criteria applied to it, the default value specified in the curve and spiral settings is displayed.
- Specify either the spiral out length or the A value.
- Specify the pass through point.
- Specify the second pass through point (end point).