This shows you how to add Holes to the face of the part.
- Select View tab > Appearance panel > Line Display menu > Turning 2D View to switch to a simplified 2D representation of the part.

- Create a Hole.
- Select Home tab > Part Program panel > Features.
- In the New Feature wizard, select the Turn/Mill option, and click Next.
- In the From Dimensions field, select Hole and click Next.
- In the
Dimensions dialog:
Enter a Chamfer of 0.0.
Enter a Depth of 1.0.
Enter a Diameter of 0.25.
- Click Finish and Create More.
- Create a Pattern from feature:
- In the New Feature wizard, select the Turn/Mill option, and click Next.
- In the From Feature field, select Pattern, and click Next.
- Select the hole you just created and click Next.
- Select Radial in the setup XY plane, and click Next.
- On the
Pattern - Dimensions page:
Enter a Number of 3.0.
Enter a Diameter of 2.0.
Enter a Spacing Angle of 120.
Enter an Angle of 60.
- Click Finish.
- Click Cancel.
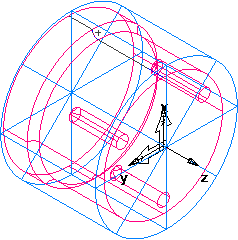
- View the 3D wireframe representation of the part:
- Deselect View tab > Appearance panel > Line Display menu > Turning 2D View to return to a 3D view of the model.
- Click View tab > Views panel > ISO menu > ISO 1.