You can use Interactive Feature Recognition to create features from surfaces that represent the shape and depth of the feature. You can recognize Holes, Slots, Pockets, Bosses, Sides, and Faces.
To recognize Holes from surfaces
- Select Features & Manufacturing tab > Features panel > Features.
- In the New Feature wizard, select Hole.
- Select Extract with feature recognition, and click Next.
- On the Hole Recognition Method page, select Extract a single hole or pattern of holes and click Next.
- Select the surfaces in the Graphics window that represent the sides of the Holes, and click
 to add them to the list.
- To remove a surface from the list, select it and click
 .
.
- Click Preview to display a wireframe preview of the Holes in the Graphics window.
- Click Next.
- On the Dimensions page, select the hole type and enter the dimensions.
- Complete the wizard to edit the feature, or click Finish to use the default settings.
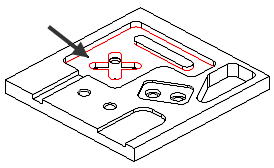
To recognize Slots, Pockets, Bosses, Sides, and Faces from side surfaces
- Select Features & Manufacturing tab > Features panel > Features.
- In the New Feature wizard, select a feature type.
- Select Extract with feature recognition, and click Next.
- For Pockets, Bosses, and Sides, on the Feature Extraction page, select Select side surfaces and click Next.
- Select the surfaces in the Graphics window that represent the sides of the feature, and click
to add them to the list.
- To remove a surface from the list, select it and click
.
- Click Preview to display a wireframe preview of the features in the Graphics window.
- Click Next.
- On the Location page, pick or enter the Top and Bottom to specify the height and location of the feature.
- Complete the wizard to edit the feature, or click Finish to use the default settings.
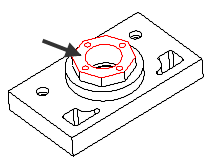
To recognize Pockets, Bosses, and Sides from top or bottom surfaces
- Ensure your part is in the correct alignment so that the surfaces that represent the features are facing toward the Z axis.
- Select Features & Manufacturing tab > Features panel > Features.
- In the New Feature wizard, select a feature type.
- Select Extract with feature recognition, and click Next.
- On the Feature Extraction page, select Use horizontal surface and click Next.
- Select a surface in the Graphics window that represents the top or bottom of the feature, and click
to add it to the list.
- For Bosses and Sides, select the flat top surface.
- For Pockets, select the flat bottom surface.
- For Bosses and Sides, select the flat top surface.
- To remove a surface from the list, select it and click
.
- Click Preview to display a wireframe preview of the features in the Graphics window.
- Click Next.
- On the Location page, the Top and Bottom are calculated from the surfaces you selected, but you can pick or enter new values to change the height and location of the feature.
- Complete the wizard to edit the feature, or click Finish to use the default settings.
Notes for surface selection
- It is often easiest to select the surfaces from the top view after clicking Hide all nonvertical surfaces from the Hide menu.
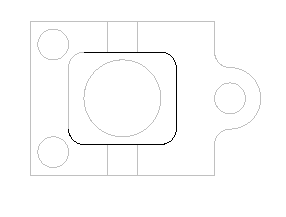
- Pockets require a closed curve. After you select your surfaces, view them from the top. The selected surfaces should form a loop as shown in this example. If you don’t see a loop as in this example, you must select additional surfaces to fully define the Pocket.
- For Pockets there is no automatic island detection. Do not include island surfaces in your selection. Instead create your Pocket without the island and then add the island separately by editing the feature.
- Chamfers and draft angles are not recognized, but you can add these parameters to the feature in the Dimensions page of the New Feature wizard.
- If you select surfaces that define more than one cavity, a single Pocket feature is created that contains multiple pocket cavities. The collection of features is then milled one z-level at a time.
- Only straight-walled surfaces are recognized. If a single surface also contains the bottom radius or a chamfer it is not recognized.
- Tapered surfaces are not recognized.
- The current Setup must be oriented so that the vertical walls of feature surfaces are parallel to the Z-axis.
- You can include surfaces other than straight walls and they are used to calculate the depth of the feature. These surfaces are not used in determining the feature shape.