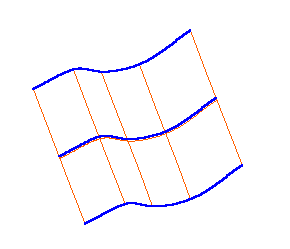
Surfaces are defined using a rectangular array of points arranged in rows and columns; these points are not displayed. For any location on the surface, curves exist that travel from one surface boundary to another. These curves are called isolines. In this image, the 3 blue curves are row isolines and the 5 orange curves are column isolines.
To create an isoline curve:
- Select Construct tab > Curves panel > From Surfaces > Isoline to display the Surface Isoline dialog.
- Optionally enter a curve name in the Name field, or leave the default name.
- Select the surface you want to use from the
Surface menu, or use the
Pick Surface
 button to select it in the Graphics window.
- Select Row or Column. The selected part of the surface is highlighted in the graphics window.
- Select Multiple to create more than one isoline curve or Pt. to create one isoline curve that passes through a specific point.
- If you selected Multiple, enter the Count number of isolines you want. Optionally select Include boundary to additionally create curves from the boundary isolines.
- If you selected
Pt, enter the coordinates of the point that you want the isoline to pass through, or use the
Pick point
 button to select the point in the graphics window.
- Click OK.