A Linear Pattern arranges the specified number of objects in a line, at the specified distance apart, starting at the specified XYZ location.
Use the treeview pane to control whether you are looking at the pattern, the object, or the manufacturing operations for the pattern. Simply highlight your choice with the mouse. The rest of the dialog changes to reflect your choice.
|
|
|
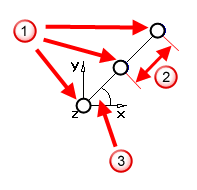
 Number of objects in the linear pattern
 Spacing between objects in the linear pattern
 Angle of the linear pattern position
Angle — Enter the angle of rotation around the Z-axis, measured counter-clockwise from the X-axis, for the first object in the pattern.
Local offset — This controls whether the initial position of the object of the pattern is ignored. The position of the object is determined by its position in the pattern. If Local offset is selected, the feature's position influences the created pattern.
Using an object's position in a pattern can be tricky. For example, use local offsets to create a pattern of profiled features, such as a radial pattern of profile pockets.
The recommended procedure is:
- Create the profile relative to the UCS.
- Enter the center of the pattern as XYZ coordinates.
- Enter 0.0 as the radius.
The pockets share the relative position to their center as the initial curve did to its UCS.
Object list — This highlights the name of the object repeated in the pattern. To change the object, click the down-arrow, then select the object to use in the pattern.
Number — This sets the number of objects in the pattern.
Spacing angle — This sets the space between the objects specified in degrees.
XYZ — This sets the location of the lower left-hand object of the pattern, or click to pick a point with the mouse.