When you add a Stereo or Mono Analyzer in Action, a number of nodes are added to the schematic.
To add an analyzer to a scene:
- From the Media list, select the back or front/matte media that you want to analyze. If you want to analyze a stereo clip, select the left clip, then press Ctrl and select the right clip (you cannot select Back media for a Stereo Analyzer).
- Do one of the following:
- Drag the Analyzer Mono or Analyzer Stereo node from the node bin and place it in the schematic.
- Double-click the Analyzer Mono or Analyzer Stereo node. You do not need to be in Schematic view to add a node in this manner.
Note: If you accessed Action as a Timeline FX, Analyzer Stereo is not available.The image window automatically switches to an analyzer view to help you view the interactive result of your analysis.
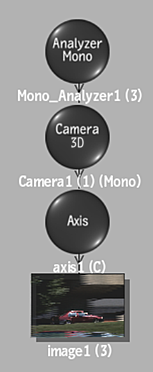
In the schematic view, you can see that an Analyzer node is added to the scene. The number in brackets next to the name of the Analyzer node indicates the media used for the analyzer (a zero (0) indicates Back media). The Analyzer node is parented to a 3D Camera node, which is synced to the analysis of the Analyzer node, as well as an Image (or Stereo Object) node with an axis.
To specify different media as the analyzer source, with the Analyzer node selected in the schematic, select the new media in the Media list, then click Apply.
- To display the Analyzer menu, double-click the Analyzer node in the schematic, or click the Analyzer button.
In the Analyzer menu, you can access Camera and Object tracking settings.