To align an object with a perspective grid:
- Click Media.
- In the Media menu, select the media you want to use for the perspective grid.
This media becomes the reference for the perspective grid alignment.
- Do one of the following:
- Drag the Perspective Grid node from the node bin and place it in the schematic.
- Drag the Perspective Grid node from the node bin and place it where you want it in Result view.
- Double-click the Perspective Grid node. You do not need to be in Schematic view to add a node in this manner.
The Perspective Grid object is added to the schematic. In the Schematic view, the number in brackets next to the name of the node indicates the media used for the perspective grid reference (0 refers to the back clip).
To specify different perspective grid reference media, select the media in the Media menu, then click Apply.
- With the Perspective Grid object selected in the schematic, select Action Object Solo view from the View box (or press F8) to see the grid and the selected media.
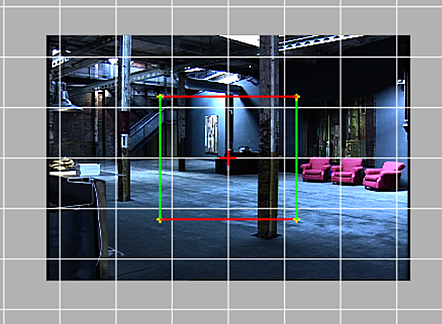
- From the Perspective Grid menu's Grid tab, select whether you want a 3D or 2D grid mode.
- While in Action Object Solo view, drag each of the four corners of the rectangle to the desired location. The grid automatically aligns to the new perspective.
 Tip: If the Magnifier button is active in the Display tab of the Perspective Grid menu, each corner is magnified as you drag it, helping you to find the exact location to place it.
 - Set other Grid Settings, as needed.
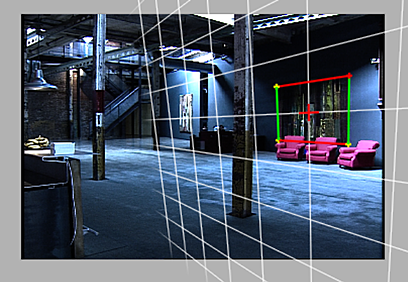
- Once you are satisfied with the alignment of the perspective grid rectangle, parent an object to the Perspective Grid node. The object inherits the perspective transformation of the Perspective Grid node. Switch to Result view (F4) to see the complete scene. Note: You can also manipulate the perspective grid in the Result view, provided that Lock is not selected in the FOV Adjustments box of the Perspective Grid menu, or the perspective grid camera is the same as the Result camera.
Working with FOV
The FOV Adjustments box in the Perspective Grid menu allows you to animate the perspective grid by positioning corner points in other frames. To create an animated transform, place the grid in the first frame, then select Lock in other key frames. You can also select Lock if the camera FOV does not change over the length clip.
If you select Dynamic in the FOV Adjustments box, Action will solve for the FOV in each frame on which you edit the corners. The target camera FOV and position adjusts to fit the perspective set by the perspective grid. If Lock is selected, the perspective grid does not adjust the target camera. To use the existing value in the camera and not solve for it, regardless if you animate the perspective grid, you should select Lock before positioning in the first frame.