After you have added a GMask object to the scene, you can now create the mask itself.
To create a mask:
- In the Tools box, select Add Points (this is set by default when you first add the GMask node).
- Do any of the following to draw the mask:
- Click to add vertices.
- Shift-click to hide vertices and tangents as you add them.
- Shift-drag to draw the mask freehand. Vertices and tangents are hidden as you add them. After closing the mask, you can use the Lasso Fit field (in the Vertices tab of the GMask menu) to increase or decrease the number of vertices that define the freehand segments of the mask.
- Click and drag out the tangents to adjust the curvature of the spline at the current vertex.
- Complete the mask by:
- Closing the mask shape while drawing (by clicking on the first created vertex). You can also enable the Closed button (in the GMask menu Mask tab) to connect a spline from the last point in the mask to the first control point (it is enabled automatically if you close the mask gesturally).
- Leaving the mask as an open spline, and clicking Finish at the bottom right of the image window.
You can edit the mask after it is closed or finished.
Editing the Mask
Editing operations, such as adding and removing vertices, can be effected whether or not the mask is completed. You can edit the mask by gestural action on a single vertex or by using the Edit Box on multiple vertices, or by modifying the numerical settings in the GMask Vertices menu tab.
To add points to a mask:
- Do one of the following:
- In the Tools box, select Add Points, then click on a spline between two existing vertices to add a new vertex.
- With Select mode selected, click on the first or last point of an open spline mask, then switch to Add Points mode and click where you want to add a new point to continue drawing the mask.
To delete points from the mask:
- In the Tools box, select Delete.
- Click on a vertex to delete it.
If the vertex is in a mask that is a closed shape, the splines that connected it to adjacent vertices will be replaced by a single spline.
To adjust the mask (one vertex at a time):
- Do one of the following:
- Click and drag any of the points to adjust the mask.
- Select a vertex and use the available settings in the Vertices menu tab.
In either method, you can see the mask and the menu settings update accordingly.
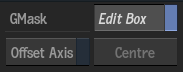
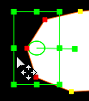
To edit multiple vertices with the Edit Box:
- Click the Edit Box button at the bottom right of the image window (or press
Ctrl+E).
- Press
Ctrl and select multiple vertices that you want to edit.
An edit box appears around the selected vertices with a centred pivot point.
 Tip: You can also use the GMask: Select All Vertices keyboard shortcut when using the Edit Box. This shortcut is based on the default User Profile for the application, and may change if you select a different profile.
 - Use the available settings in the Vertices menu tab to apply transformations to the selection, or perform the following gestural actions, as needed:
- Hover over the pivot point to enable to pivot widget, and move the pivot point.

Press Ctrl+Alt and click the pivot point to re-centre it.
- Hover over the pivot arm or outside of a corner point of the Edit Box to enable the rotate widget, and drag left or right to rotate.

- Hover over an Edit Box point to enable the scale widget.
- Press Alt and drag the Edit Box to scale symmetrically.
- Use Shift + Alt to drag the Edit Box proportionately from the centre.
- Hover just outside the Edit Box to enable the shear widget, and drag to shear.

Tip: You can also click and drag inside the Edit Box to move (translate) the complete Edit Box. Press Shift and drag to constrain the translation to the X and Y axes. There are also a number of other keyboard shortcuts to work with the Edit Box (including for making minor adjustments). Search the keyboard shortcut editor for Edit Box to see the shortcuts for your chosen profile. - Hover over the pivot point to enable to pivot widget, and move the pivot point.
- Click the Edit Box button again, to deselect the vertices after you have completed your edit.