Set the attributes for text in a drawing or sketch.
Access
-
Modeling environments:
Ribbon: Sketch tab
 Create panel
 Text
Text
 or
Leader Text

-
Drawing environment:
Ribbon: Annotate tab
 Text panel
 Text
Text or
Leader Text

Right-click a dimension or hole note, and click Text.
Ribbon: Annotate tab
 Text panel
 Text
Text or
Thread note

After creating a thread note, save the file. Then, double-click the thread note. The text editor opens.
 Style
Style
Specifies the text style to apply to the text. Click the arrow and select from the list of available text styles.
Text and Font Attributes
Specifies the paragraph attributes for selected text.
 Bullets and Numbering
- Creates a bulleted or numbered list.
 Justification
-
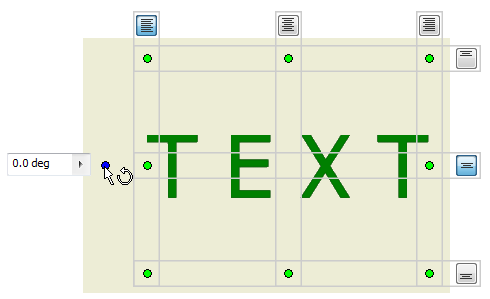
Positions the text within the text box. The following image illustrates the relationship between justification choices and text box points.

 Baseline Justification
-
Available when Single Line Text is selected and when creating sketch text.
 Single Line Text
-
Removes all line breaks from multiline text. Available only for sketch text.
 Line Space
- Sets the distance between text lines.
Spacing Value specifies the value for line spacing, when you set line spacing to Exactly or Multiple.
 Fit text
-
Sizes the text to fit the designated space, such as a text box. Available only for sketch text.
 Stretch(%)
-
Specifies the text width. Enter 100 to display the text as designed, enter 50 to decrease the width of the text by 50%.
- Rotation Angle, Rotate
-
Rotates the text around the insertion point. For example, if text is top and left-justified, the text rotates around the top left corner.

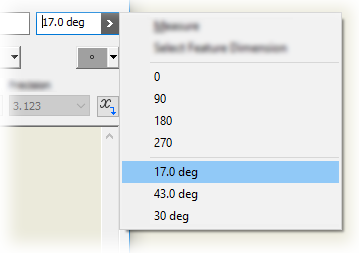
For a drawing note, click the arrow to select the rotation orientation or enter the angle of rotation in the edit box. For sketch text, select a Rotate option from the list, or create a new UCS to orient the text.
- Font
-
Specifies the text font. Click the arrow and select from the list of available fonts.
- Font Size
-
Sets the height of the text in sheet units (inches or millimeters). Enter the size or click the arrow and select a size from the list.
Tip: Edit the standard settings to customize the list of pre-defined font sizes. Open the Style and Standard Editor and click the current standard. Then add or remove font sizes in the Preset Values list on the General tab. - Color
-
Specifies the text color. Click the Color command, and then select a color from the Color dialog box. In the Color dialog box, select the By Layer check box to set the color specified by the text layer. Clear the check box to select a color. The color command shows the selected color or layer color.
-
 Text Style
-
Sets the style. Click Bold, Italic, Underline, or Strikethrough to apply the style to the text.
 Stack
Stack
-
Stacks strings to create diagonal or horizontal stacked fractions, and superscript or subscript strings. Available if the selected string is in a correct stacking format.
Examples of correct stacking format:
- 1#2 stacks as a diagonal fraction.
- 1/2 stacks as a horizontal fraction.
- 1^2 stacks as a tolerance (1 over 2).
Tip: To edit properties of stacked text, select a stacked text in the edit field, right-click, and select Properties.  Text Case
- Converts selected string to UPPERCASE, lowercase, or Title Case.
 Text box
-
Allows constraining and dimensioning to text. Available only for sketch text.
- Background Fill
- Specifies a background color for a text string.

 Text Border/No Text Border
-
Specifies border or no border around text or leader text. Resulting text is wrapped in a border when Text Border is selected.
 Symbol
- Inserts a symbol into the text at the insertion point. Click the arrow and select the symbol from the palette. The top three symbols are diameter, degree and plus-minus, and they use the active font. All other symbols use the AIGDT font. In drawings, the available symbols are determined by the active Feature Control Frame style.
At the bottom of the symbol list, the Windows Character Map command accesses characters not available as standard keyboard characters. In the Character Map, click a character, and then click Select and then click Copy. In the Format Text pane, right-click and select Paste.
Model, Drawing, and Custom Properties
When retrieving model properties, the model source depends on the sketch type:
-
Sheet or Draft View sketch
Top-level model of the first view on the sheet. If the first base view on the sheet is deleted, the next base view on the sheet becomes the data source for properties.
-
View sketch
Top-level model of the view.
- Type
-
Specifies property and parameter types from the drawing, the source model, or the custom property source file (for external and model custom properties) specified on the Drawings tab of the Document Settings dialog box.
Note:
- Parameters - Model lists the named parameters automatically added to the model when you add dimensions or features.
- User Parameters lists the user parameters added to the model.
- Standard Properties are the property sets defined in either the drawing or the model file.
- Custom Properties populate the list If the source model or drawing contains at least one custom property.
- Drawing Properties populates the list with the number of sheets parameter.
- Sheet Properties populates the list with the sheet properties.
- In sheet metal drawings, select the Sheet Metal Properties type to add the Flat Pattern Extents Area, Width, or Length in text.
- Selecting Prompted Entry enables access to the Edit Field Text context menu option where you can edit the values of the prompted entries.
- Select the
Physical Properties - Model property type to add the model Mass, Density, Volume, and Area in the text. If the displayed value of a physical property is N/A, physical properties of the model are out of date. To update the model, open the model file and choose
Manage tab
 Update panel
 Update Mass.
- All values of physical properties are displayed with the unit string.
- Source
-
Lists the available sources for the properties and parameters associated with the selected Type. Select the origin of the properties or parameters you will use.
- Property
- Specifies a property associated with the selected Type and Source. Available when creating or editing all drawing text, including text properties in notes, leader text, sketch text, symbol text, title block, and border text.
- Parameter
-
Specifies the parameter, associated with the selected Type and Source, to insert into the text. Click the arrow and select from the list.
- Precision
-
Specifies the precision for numerical properties displayed in the text. Select the desired precision from the list.
 Add
Add
-
Inserts the selected property or parameter based on the Type, Source, and Property or Parameter into the text at the insertion point.
Zoom
To zoom the edited text, place the cursor in the editing field, hold the CTRL key on your keyboard, and scroll the mouse wheel.
Spell Check
With Spell Check enabled, Inventor checks spelling automatically as you type in the Format Text dialog box.
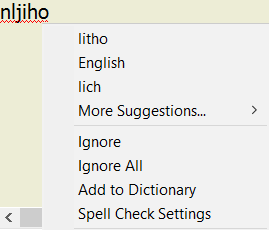
Words entered in the Format Text dialog box are matched to the words in the default and the active custom. A red squiggly line indicates a potential spelling issue. Right-click on a flagged word to access options for resolving the spelling issue:
- Select an alternate word from the list.
- Click Ignore or Ignore All to leave a word unchanged
- To leave a word unchanged and add it to the dictionary, click Add to Dictionary.

Use the settings on the General tab in the Applications Options dialog box, (Tools tab  Options panel
  Application Options) to manage Spell Check and custom dictionaries. By default, Spell Check is turned on.