- On the Annotate tab, Dimension panel, click a Dimension command.
- In the graphics window, click the midpoint or intersection and another line, edge, or point, as required.
- Drag the dimension to the appropriate location and click to place.
- Continue to create and place dimensions as needed, right-click, and select Done.
Notes:
- A midpoint is shown for nonclosed geometry.
- An intersection is shown only for model edges on different objects.
- A midpoint is indicated by a green dot and an intersection is indicated by a yellow dot.
- You can create or reattach dimensions to the physical intersection of projected edges, but not to an intersection of their extensions.
- Midpoints and intersections must exist in the same view.
Add dimensions to intersections of extension lines

- On the ribbon, click
Annotate tab
 Dimension panel
 Dimension .
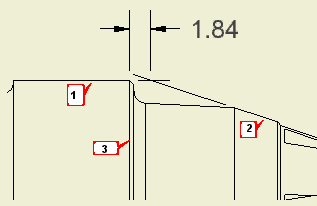
- Select the first line (1) to define the intersection.
- Right-click and select Intersection from the menu.
- Select the second line (2) to define the intersection. The lines are extended as needed, and their intersection becomes the first point of the dimension.
- Select a model edge (3) to define the dimension. Alternatively, perform steps 2-4 to define another intersection, or select a point in the drawing view.
- Drag the dimension to the desired position.
- Click to place the dimension in the drawing.
Note: All geometry that specifies the dimension must belong to the same drawing view.