Learn a range of strategies such as setting static values, and saving changes from the parts list back to the assembly BOM.
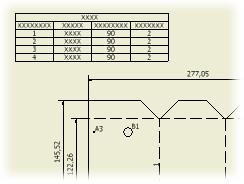 |
When you add a parts list to a drawing, it displays values derived from the bill of materials (BOM). You can edit the values in the cells of a parts list. To edit parts list values or set up, right-click the parts list, and then select Edit Parts List. Use the options in the Edit Parts List dialog box to make the changes. |
| Color Key: | |
|---|---|
| A cell with blue font & bold rectangle outline ( the cell contains a static value ) does not update on property change in the GBOM (Global Bill of Material). | |
| A row with gray background color - the row is invisible. | |
| A column, row, or cell with blue background color - the cell contain a read-only value. | |
| Cells in the ITEM column with yellow background color - indicates duplicate or conflicting item numbering. | |
Tips
- Substitute the value of one property with the value of another property in the parts list from the Substitution tab in the Format Column dialog box.
- You can override a value in the parts list. The overridden cell is set as Static Value and is not updated when the value is changed in the parts list source file. Overridden values appear in blue and bold text in the Edit Parts List dialog box.
- You can save Part List changes back to the assembly Bill of Materials with the Save Item overrides to bill of materials.
- Select one or more entries in the parts list or Bill of Materials editor and right-click to open the associated component file.
About parts lists in model states
A parts list references a model state and can be shared on multiple sheets. When you edit a view and change the source model state, parts lists referencing the original view model state are affected.
An information box is presented so you can decide how to resolve the parts lists.
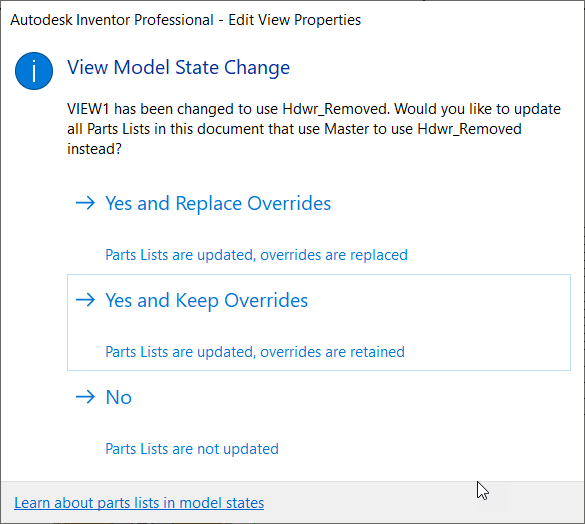
- Yes and Replace Overrides Select this option if you want the parts lists to reference the new model state BOM and discard existing override values.
- Yes and Keep Overrides Select this option if you want the parts lists to reference the new model state BOM and continue to use existing overrides.
- No Select this option if you do not want to change the parts lists.
Edit the data in the bill of materials
You can open the Bill of Materials dialog box from the drawing environment, and edit the assembly BOM. All changes are saved in the assembly and corresponding component files.
- Right-click a parts list in the Model browser or in the graphic window, and then select Bill of Materials.
- In the Bill of Materials dialog box, perform the edits.
- Click Done to close the Bill of Materials dialog box. All changes are submitted in parts lists and balloons (with exception of the values which are overridden in a parts list or balloon).
Display or edit members in an iAssembly
By default, the parts list of an iAssembly file displays the member specified in the Drawing View dialog box (the default is the active member). You can change the display of a factory-based parts list to show all or different members within the Edit Parts List dialog box. To change the display, use the Members command.
- In the Edits Parts List dialog box, select Member Selection.
- In the Select Member dialog box, select the members to include in the parts list.
Alternately, select Yes to All or No to All to add or exclude all members.
- Select the Hide Rows of Zero Quantity option to automatically hide rows for components with zero quantity. To unhide these rows, clear the check box.
Note: The option works for QTY property only, it does not work for ITEM QTY or any custom property.
- Click OK to close the Select Member dialog box.
Save Part List changes back to the assembly Bill of Materials.
Items appearing in dark blue indicate the changes made have not been saved to the assembly Bill of Materials.
- Right-click the parts list, and then select Edit Parts List from the menu, or double-click a parts list.
- In the Edit Parts List dialog box, perform one of the following:
- To save all item number overrides in the parts list back to the assembly Bill of Materials, click Save Item overrides to BOM on the toolbar.
- To save specific changes, right-click on a cell and select Save Item overrides. Hold down the CTRL key and click to select multiple cells.
Substitute Part Number with Stock Number
Sometimes, multiple components have the same Part Number, but must be treated as separate components. It is common for cut-length items such as tube and pipe, flexible hose, wires, and tape. A new BOM property, Stock Number, is added to all components to accommodate this intention.
Sometimes, multiple components have the same Part Number, but must be treated as separate components. A new BOM property, Stock Number, is added to all components to accommodate this intention.
The Part Number column is substituted by Stock Number column for parts lists to support the workflows of cut length items. You change the substitution setting in the Format Column dialog box.
- Select the parts list, right-click, and then select Edit Parts List.
- In the Edit Parts List dialog box, right-click the Part Number column heading, and then select Format Column.
- In the Format Column dialog box, select the Substitution tab to set the substitution:
- Select Enable Value Substitution.
- Select the arrow and Browse Properties.
- In the Parts List Column Chooser dialog box, select Stock Number, and then click OK.
- Click OK to close the Format Column dialog box.
Group rows in a parts list
You can group part list rows. You specify parts list columns to be used as grouping keys. The parts list rows which have the same value in the key columns, are grouped into one row. You can select to display the grouping participants in the parts list.
In the structured parts list, the nested components which match the grouping key are promoted to a higher level. The QTY of promoted components is multiplied by the QTY of the parents which are the components promoted through.
- In the Edit Parts List dialog box, select Group Settings, or right-click a column heading, and choose Group Settings.
- In the Group Settings dialog box, select the Group box to enable grouping.
- Set the grouping keys from the lists: Select a property from the list, or Browse Properties to select a part list column in the Parts List Column Chooser dialog box.
- To show the rows which participate in groups, select the Display Group Participants option.
- If needed, select the Display Item Numbers option to display item numbers of group participants in the Item column of the grouped row.
- Click OK to close the Group Settings dialog box.
Merge rows in a legacy parts list
You can merge parts list items into a single row.
- In the Edit Parts List dialog box, select Row Merge Settings or right-click a column heading.
- In the Row Merge Settings dialog box, select Merge Similar Components.
- Select the arrow to select the Component Types to Merge. Select Parts only, Parts and Assemblies separately, or Parts and Assemblies together.
- In the First Key box, select the down arrow to select a property to merge.
- For further filtering, select another property in the Second Key box.
- For even further filtering, select another property in the Third Key box.
- Click OK and then click Apply. Continue to edit the parts list as needed or click OK to close the dialog box.
Add or remove custom parts in the parts list (Note on Virtual Parts)
You can add parts that are not contained in the model. After adding custom parts, you can add balloons for custom parts.
- In the Edit Parts List dialog box, select a row in the table to set the location for the new part.
- Right-click a row, and select Insert Custom Part.
The custom parts are added to all parts lists with the same source. To remove a custom part from the table, select the row, right-click, and then choose Remove. The custom part is removed from all parts list with the same source. To hide a custom part in a parts list, turn off the Visibility option for the custom part row.
Change the value in a parts list cell
The values in parts list cells are determined by the data in the model. You can override the values in parts list cells.
- In the Edit Parts List dialog box table, click to select the cell to edit.
- Type the new value into the cell. If you change the item number for the row, the item number in any associated balloons change as well.
- Changes to the model automatically update the parts list. To keep overrides in the parts list, the Static Value option must be selected for corresponding cells in the parts list.
- When you override a value, the Static Value option is selected automatically.
- To remove the override, right-click the cell and unselect the Static Value option.
Set a parts list cell as Static Value
To protect the values in parts list cells from inadvertent updates, set them as a Static Value.
- Right-click a parts list and select Edit Part List.
- In the Edit Parts List dialog box, select a row or cells to make static.
- Right-click the selection, and then choose the Static Value option.