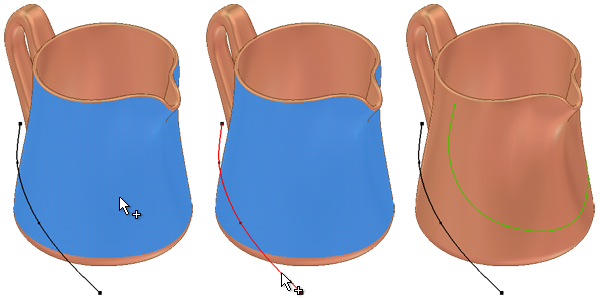
The Include Geometry command lets you associatively copy existing model edges, 2D sketch geometry, and imported wireframe data into a 3D sketch.
After copying, you can connect new 3D sketch geometry to endpoints of the included geometry, which is converted to 3D geometry.
If you edit the original 2D geometry, the segments included in the 3D sketch also update. Included geometry remains in a 3D sketch even if the original geometry is deleted from the 2D sketch.
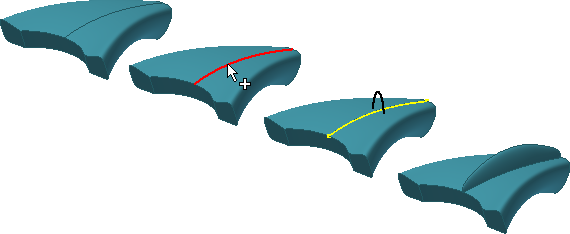
Use Include Geometry to copy edges in place and include them in a 3D sketch.
In a 3D sketch, you can also project points, curves, edges, or faces onto a surface or solid. The projected geometry is associative to the parent geometry and the projected face. Use Project to Surface to wrap geometry to a 3D face.
Include Geometry
- In an active 3D sketch, click
3D Sketch tab
 Draw panel
Include Geometry
Draw panel
Include Geometry
 .
.
- In the graphics window, click the model edges, 2D sketch geometry, or wireframe data that you want to include.
- To finish, right-click and choose OK. The 2D sketch that contains the original geometry must be above the 3D sketch in the browser.
Edit Included Geometry
- To break projected association, select the projected geometry in the graphics window, right-click, and choose Break Link.
Project Curves to Surface
- In an active 3D sketch, click
3D Sketch tab
Draw panel
Project to Surface
 .
.
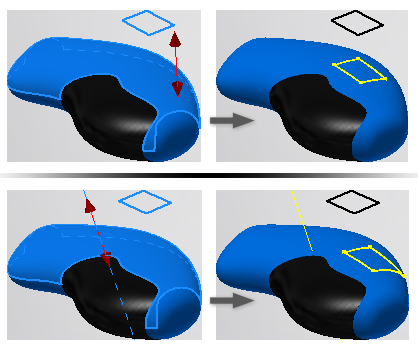
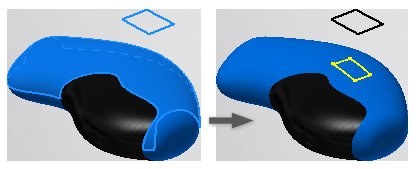
The Project Curve to Surface dialog box opens and the Faces selection tool is active by default. Faces lets you select one or more faces of a surface or solid on which to project geometry. Selections can include faces of surface bodies or solids, a part, or a work plane.
- In the Project to Curve dialog box, under Output, select how you want to project the geometry:
- Project Along Vector
 . (Default) Projects the geometry along a specified vector. Allows you to also select a Direction for the vector.
- Project to Closest Point
. Projects along the surface normal to the closest point.
- Wrap to Surface
 . Wraps curves or points from a 2D sketch onto a developable face or faces. This type of projection preserves the curve length. The sketch must be tangent or parallel to a plane that is tangent to one of the selected faces. The wrap starts from the tangency. You can’t wrap 3D sketch curves and points, model edges, or surface edges.
Tip: A developable face is one that can be wrapped with a plane without stretching or compressing the plane. Planes, cones, and cylinders are all developable faces.
. Wraps curves or points from a 2D sketch onto a developable face or faces. This type of projection preserves the curve length. The sketch must be tangent or parallel to a plane that is tangent to one of the selected faces. The wrap starts from the tangency. You can’t wrap 3D sketch curves and points, model edges, or surface edges.
Tip: A developable face is one that can be wrapped with a plane without stretching or compressing the plane. Planes, cones, and cylinders are all developable faces.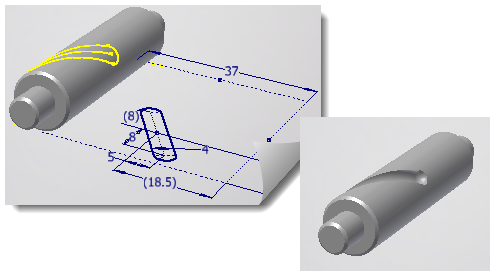
- Project Along Vector
- In the graphics window, click to select the face onto which you want to project.
Tip: You can also select surface features in the browser or by right-clicking and choosing Select Other.
- In the Project Curve to Surface dialog box, click the Curves the selection tool.
Curves selections can include 2D or 3D curves, vertices or work points, sketch points, or part or surface edges.
- In the graphics window, click to select the curve or curves to project. Ctrl+click to remove geometry from the selection set.
- If projecting along a vector, click Direction in the Project Curve to Surface dialog box and then click in the graphics window to specify the vector.
- When done, click Apply to finish the projection and create more or click OK to quit.
Edit Projected Curves
- In the graphics window, right-click a project-to-surface feature and choose Edit Projected Curve. Use the options in the Project to Surface dialog box to modify the selection set, add or remove faces, and change the Direction.
- To break projected association, right-click a project-to-surface feature in the browser and choose Break Link. Then, edit the unconstrained 3D sketch geometry.