Video Producer enables the creation of a more cinematic animation through the combining of camera shots coupled with the use of shot transitions. In Video Producer, you drag and drop shots and transitions onto the timeline and edit their handles to create a composited video for output. Preview rendering the result and refining the output helps you quickly produce a compelling animation.
Create composite video output with transitions:
- On the ribbon, click Render tab
 Animate panel Video Producer
  . The software caches snapshots for all saved cameras in Studio. A progress indicator displays as each camera shot is cached. The Video Producer window displays. This process occurs once for a production unless cameras are added or modified between production editing activity.
 - On the left are the Shot and Transition tabbed browsers. In the Shot browser, right-click on an animation shot node and click Add to Timeline. Camera Shots are added to the timeline and conceptually, are placed end to end with no gaps between shots. Tip: You can drag and drop camera shots or transitions from the browser into the timeline. Faded previews are displayed during the drag and drop operation.
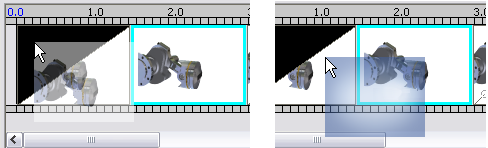
Video Producer timeline during a drag and drop operation for shots and transitions.
- Add shot Transitions in the same manner as Shots. A faded preview of the transition is displayed under the cursor as you drag, see the previous image on the right. Use transitions or fade in, fade out, fade between, and so on. There are four different transition effects: Fade, Gradient Wipe, Slide Left, and Slide Right. Attention: The entire transition time lays over the shot footage. As a result, when planning for transition, we recommend that you define and use longer footage segments so the transitions do not overlap any important visual aspects of your shot.
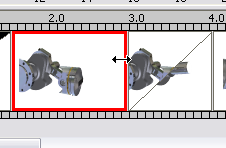
- Edit a shot or transition by selecting it in the timeline and using the handle at either end to resize the shot. This process modifies the duration of the selected shot or transition. Neighboring footage is unaffected. You can also right-click and edit through the dialog box.
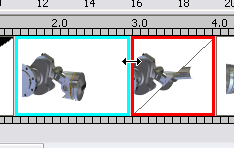
- To modify the duration for adjacent timeline objects simultaneously, select one and highlight the other. Position the cursor over the border between the timeline objects, then click and drag to modify the duration of both objects.
- Before going to preview render, ensure the length of the Video Producer animation by setting length in the Animation settings.
- When ready, Preview Render the animation using the command in the Video Producer window. Keep in mind that Video production increases rendering time in order to allow the shots and transitions to be properly blended for the specified effect.
- Once you finish the preview render, view it, then change anything needed and repeat the process.
- When ready, render a final animation with full fidelity.
Note: When active, a production is rendered rather than an animation. To render an animation only, deactivate any active production.