You can manually check out old files and save them then check in to Vault to migrate them. or you can migrate them automatically using Task Scheduler. These sections describe how to migrate your files to the new release of Inventor in Vault using Task Scheduler.
Migration guidelines
- We strongly recommend that you back up all Inventor files before migrating using the Autodesk Data Management Server Console Backup tool.
- The following files are skipped during the migration process:
- Read-only files.
- Files previously migrated.
- Files created in nonproduction versions of Autodesk Inventor. (For example, files created in a Beta version.)
- Corrupt files or files with missing references.
- Autodesk Inventor must be authorized on your system before you run Task Scheduler.
Before you begin
- Verify that your files resolve and open correctly in the existing version of Autodesk Inventor. Repair any resolution and general problems before you proceed. If the red cross (Recover) appears on the Inventor menu bar, the file is corrupt. Repair it, or it does not migrate.
- Make sure that all files are checked into Vault.
- Make sure that your customized style library is migrated. For more information, click here.
- Make sure that your customized CC library is migrated. For more information, click here.
- Close all versions of Autodesk Inventor. Use the Windows Task Manager to verify that no versions are running.
- If you migrate specific files, follow this migration order, since assemblies depend on parts, and drawings can depend on both parts and assemblies.
- Parts
- Standard parts
- Subassemblies
- Assemblies
- Presentations
- Drawings
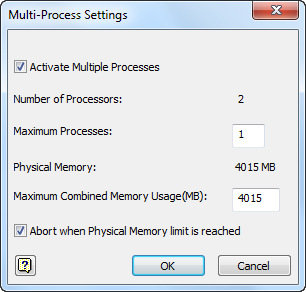
- Task Scheduler supports multiple processes to shorten migration time. In the Settings menu, click Multiple Processes… to display the Multi-Process Settings dialog box:

Migrate Inventor files from Vault
- On the Start menu, click All Programs
 Autodesk
  Autodesk Inventor <version>
  Tools
Tools  Task Scheduler. Task Scheduler opens.
 - Log in to Vault.Ideally, log in to Vault as administrator or a specific Migration user as described in Migrate Released or Locked CAD Files.

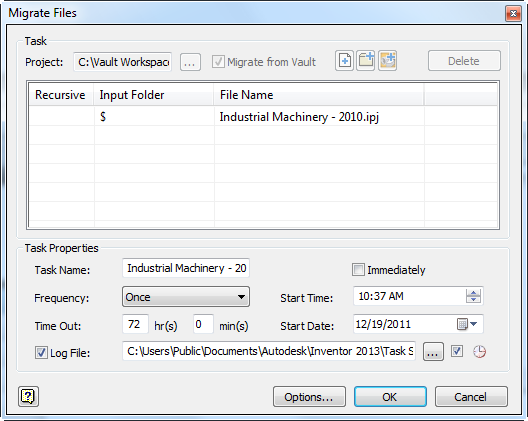
- On the Create Task drop-down menu, click Migrate Files….. In the Migrate Files dialog box, click Project Setting to select a Vault project, or click Browser... to select a vault project. Then add the project or folder or part to migrate. Recommend Add Project to migrate. Note: Ensure that Migrate from Vault is selected.

- In Task Properties:
- Select Immediately to migrate the project files at once.
- You can defer the migration until a later time, such as after-hours when Inventor is not in use. Set a time and date in the corresponding text boxes.
- Set the Log File name and location
- Click Options… For optimal performance, it is best practice not to create visualization attachments as part of the migration. If you use Vault Professional , you can use a job processor to update visualization attachments later. For best results, temporarily modify settings Visualization Management to retain existing dwf files.
Retain local copies of the files until after all migration is complete. It is best practice to add a comment so that later, you can identify each new version of the files as migrated successfully.
- Click OK to migrate files.