- Configure applications on the local server.
- Specify additional application servers.
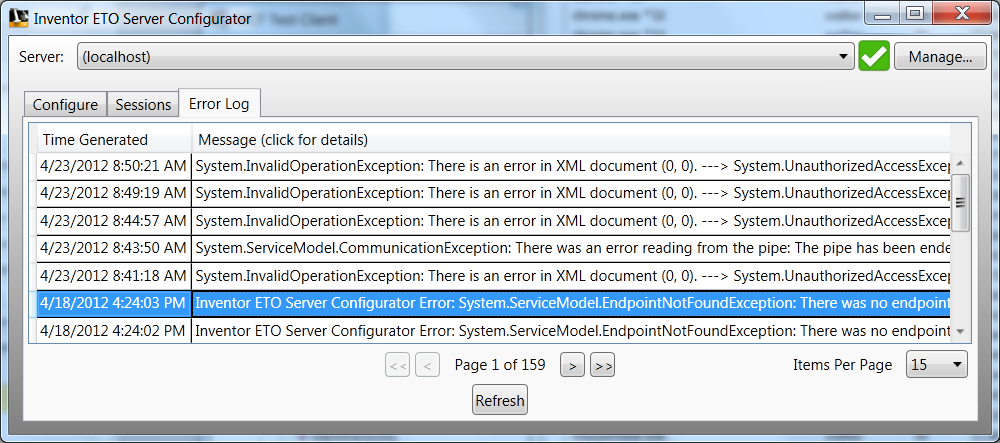
- View error logs.
- View and manage session connections to the server.
Launch the ETO Server Configurator
On the Start menu, click All programs  Autodesk Autodesk Inventor ETO Server 2013 Intent Services Configurator. Alternatively, you can launch directly from the installed location, which by default is C:\Program Files\Autodesk\Autodesk Inventor ETO Server 2013\Bin\
Manage the Server Connection
When the ETO Server Configurator initializes, the default Server is localhost. See New Server Connection following for information about connecting to another server. To display the Manage Server dialog box, click Manage…, unless you are connected to a remote server (described below). The Manage Server dialog box displays information about the server connection
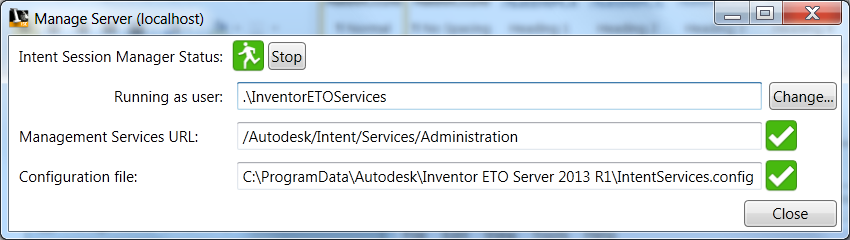
- Intent Session Manager Status Start and stop the Windows Server Session Manager Service. Run this service to make any server functionality available. The current status displays, and you can manually start or stop the service. This service displays as Intent Session Manager in the Windows Services list.
-
Running as user displays the user running the service. The ETO Server installation creates a user that is configured to run the service. Before you change the service user, make sure the new user:
- Is a real user, not a built-in service user like LocalService.
- Has permissions to your applications and service configuration files.
- Management Services URL is the WCF URL used to connect to the service. The default value is sufficient in most cases, but is provided here for the rare case, and is typically not changed. Do not change this value, so that the default works. However, very advanced users know that the information is configured in the application configuration file. Explaining how to change a WCF endpoint address is outside the scope of this document. The application attempts to read the endpoint from the configuration file, so it is not normally required to edit this URL. However, if the URL is not what you expected, you can change it here.
- Configuration File specifies the location of the file containing Application and Application Server configuration data, which is stored on the server. It is necessary that the service user has read/write access to this file.
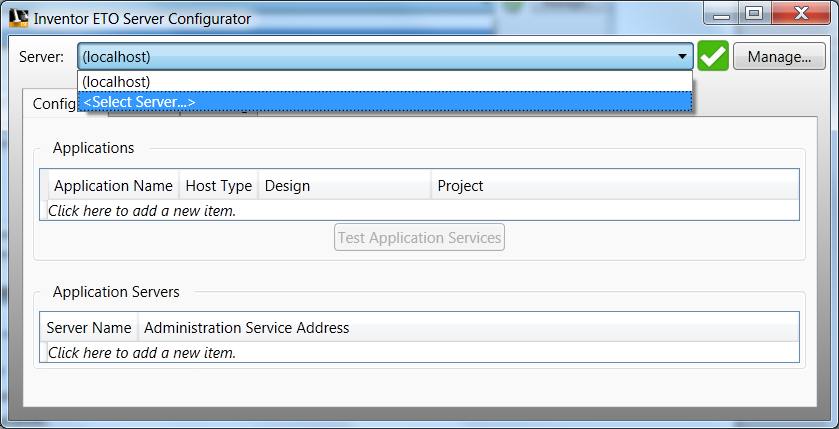
Define a New Server Connection
Inventor ETO Server Configurator provides the means to monitor remote servers. Additional defined servers display in the Server drop-down list. To define a new remote server, click <Select Server…> on the list.
Remote Server Setup
To display the Choose Server dialog box, clicking <Select Server...> . This dialog box specifies the remote server information.
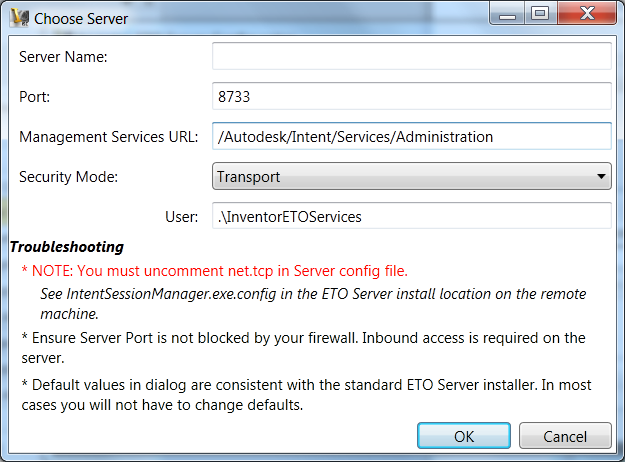
-
Server Name (required) The name of the remote server. Enable the net.tcp endpoint on the server.
Note: For security reasons, net.tcp endpoint is commented out in the server application configuration file. To enable net.tcp, edit IntentSessionManager.exe.config on the server. This file is located in the bin directory of the server installation.
- Port (required) The TCP port for the remote server. The default value is set during installation and typically does not require a change. The Server Configuration file indicates to the server the port on which to listen (see IntentSessionManager.exe.config on the remote server). Ensure that the firewall on the server does not block this port.
- Management Services URL (required)The WCF address to connect to on the server. The default value is set during installation and rarely needs a change.
- Security Mode (required) Specifies the server security mode, which defaults to transport security enabled on the server. You can disable security using IntentSessionManager.exe.config on the server (see instructions in the config file). We recommend that you do not disable security, but at times, it is useful for debugging connection problems. If you disable security, select None for the Security Mode.
- User (required for Transport Security) Available only for the Transport Security Mode. This is the user name that the application uses when attempting to connect. Usually, this user is the same as the Server Service user. The default value is the user that is used during the installation.
The Troubleshooting section of the dialog box is useful if you have difficulties connecting to your server.
Click OK to connect to the server with the specified settings. If there are no errors, the ETO Server Configurator dialog box updates with the new Server. If you get an error, address the issue and try again, or click Cancel.
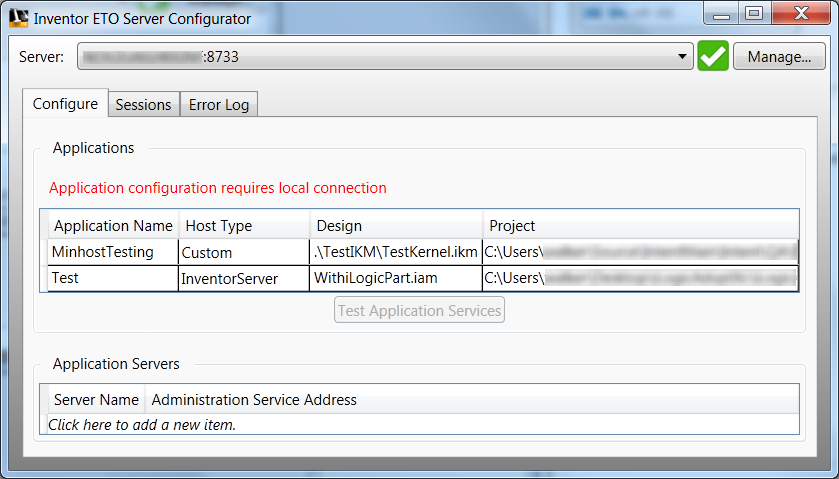
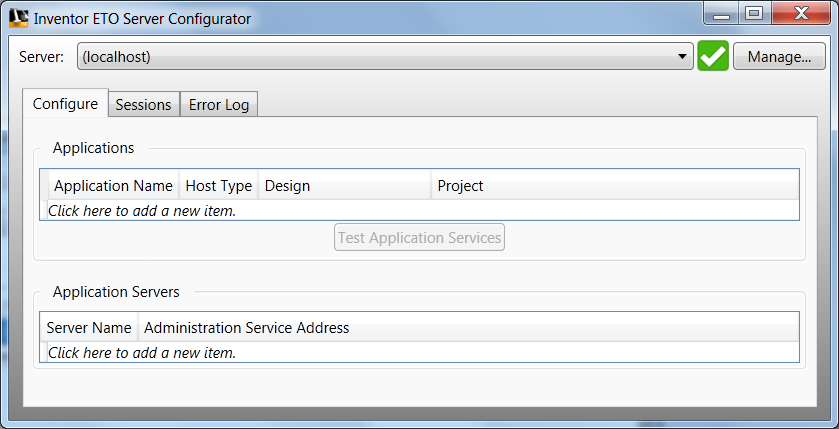
Configure tab
Every server that is configured with one or more applications is considered an application server. If you configure multiple servers with the same application, you can link a primary server with these additional (secondary) servers in the Application Servers grid control. When you configure a server with additional Application (secondary) Servers, incoming connections are forwarded to other servers using a load balancing algorithm.
Add an Application Server
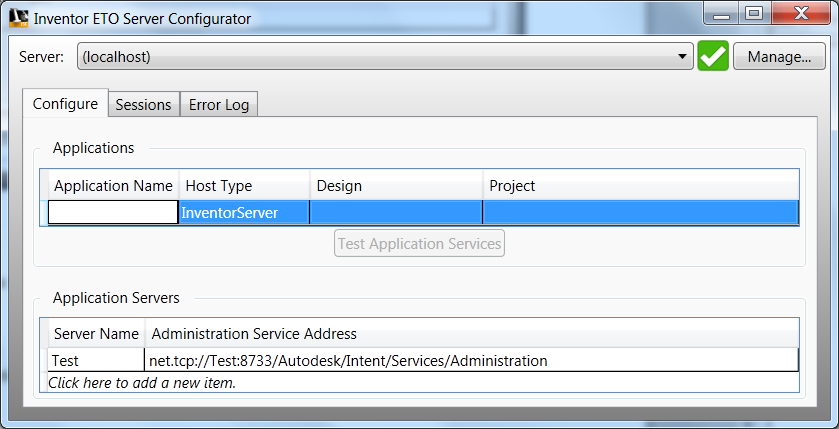
To add an Application Server, click Click here to add a new item. Enter the Server Name and Administration Service Address, as shown in the following image. Press Enter to commit the changes.
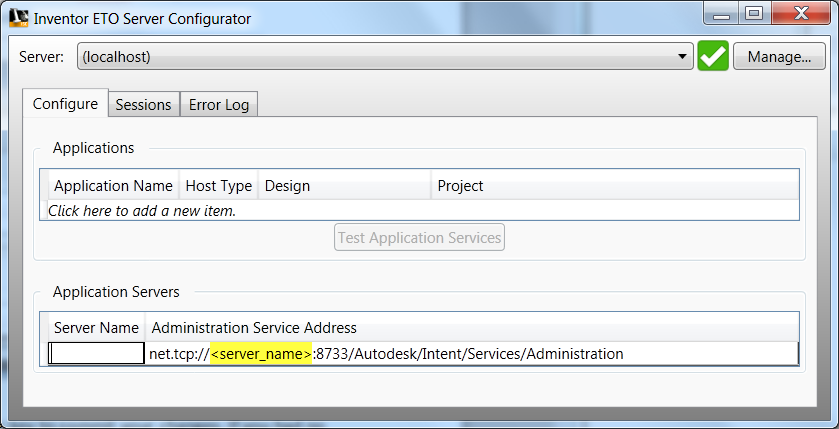
- Server Name (required) Name of the server configured with the desired application.
-
Administration Service Address (required) The WCF endpoint address of the server. Replace the <server_name> portion of the default address with the name of the server. The default address here matches the installation default address used in the server installation.
Note: For security reasons, the net.tcp endpoint is commented out in the server application configuration file by default. To enable net.tcp, edit IntentSessionManager.exe.config on the specified Application Server. This file is located in the bin directory of the server installation.
Edit an Application Server
To edit an application server, double click the cell and enter the new values. Press Enter to commit your changes.
Delete an Application Server
To delete an application server, select the server you want to delete, and Press Delete.
Test Application Services
To test your connection to any application and confirm it is configured correctly, select the application to test and click Test Application Services. The test application uses the same interface that the remote application uses, so consumes a license key on the server while running.
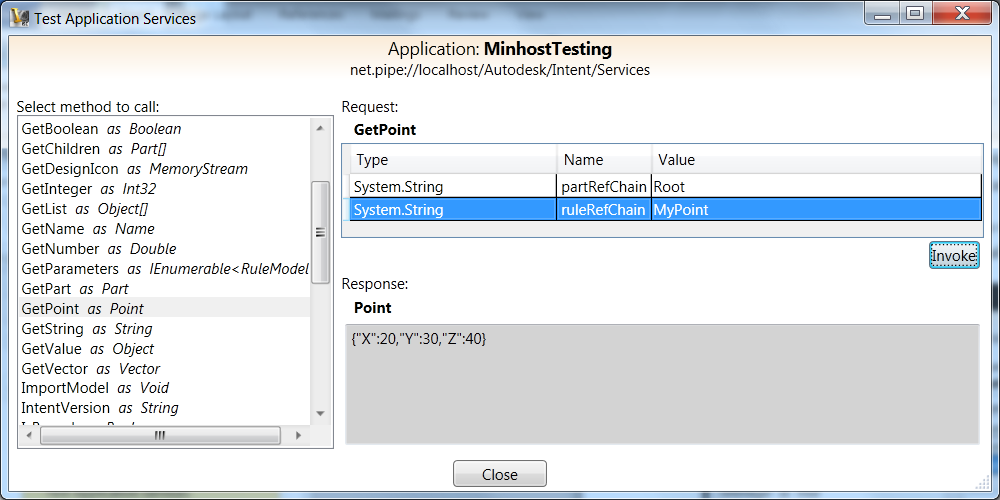
To display the Test Application Services dialogbox, click Test Application Services. Test your application using the methods available in the WCF service on the server. See IIntentServices in the API help for a description of the service. The server exposes this service so that your web (or other remote application) can communicate with Intent running on the server.
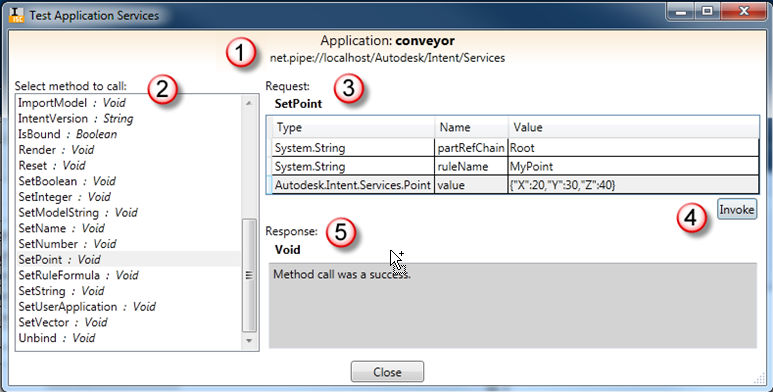
- The application being tested and the server URL.
- Select from the list of available methods to call for testing. Items are listed by the method name and return type. Some methods defined in IIntentServices are not available, specifically methods that take generic .Net Objects as parameters.
- The Request section lists the Type, Name, and Value of each parameter of the selected method. Enter appropriate values..
- Click Invoke to make the call to the selected method with the specified arguments.
- The Response section reports on the result of the invoked call.
- For methods returning nothing (methods with Void return types), a successful response is Method call was a success or the error message returned.
- For methods returning data, the result is displayed in JSON format. JSON is a text based standard for exchanging data.
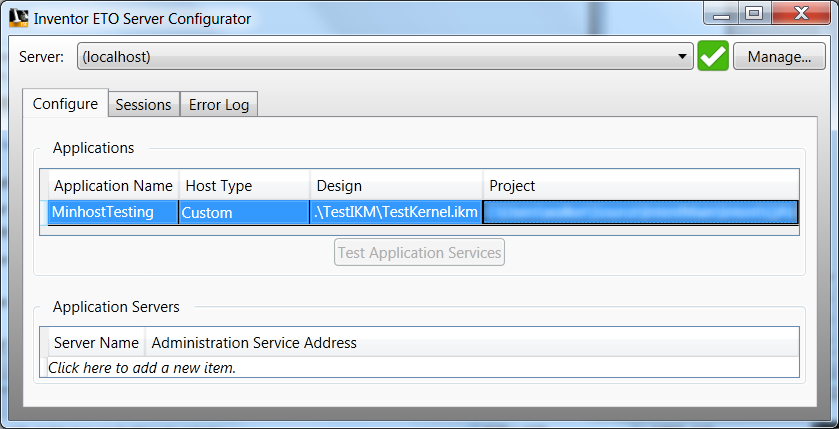
Add an Application
To add an application, click Click here to add a new item. Applications can be configured only locally.
- Application Name (required) Used in subsequent calls to SetApplication using the IIntentServices interface. See the IntentAPI documentation regarding SetApplication.
-
Host Type (required) Specifies the host for your application, which is either InventorServer or Custom:
- InventorServer Your application is an Inventor application and Inventor Server loads when the application starts.
- Custom Your application is not Inventor based, and Inventor Server does not load when the application starts.
-
Design (required) Specifies the source of the root design for the Intent Model for the application. The source depends on the Host Type.
- InventorServer Requires an Intent Assembly (*.iam) containing the initial Intent Model.
- CustomAccepts an Intent Model file (*.ikm) or a Design file (*.iks). If you specify a Design file, it is used as the root design of the Intent Model.
-
Project (required) Varies by Host Type
- Inventor Server Requires an Inventor Project file (*.ipj) used by the application.
- Custom Requires an Intent Host Configuration file (IntentHost.config) used by the application.
Edit an Application
To edit an Application, double click the cell and enter the new values. Click <Enter> to commit the changes.
Delete an Application
To delete an Application configuration, select the application and click <Delete>.
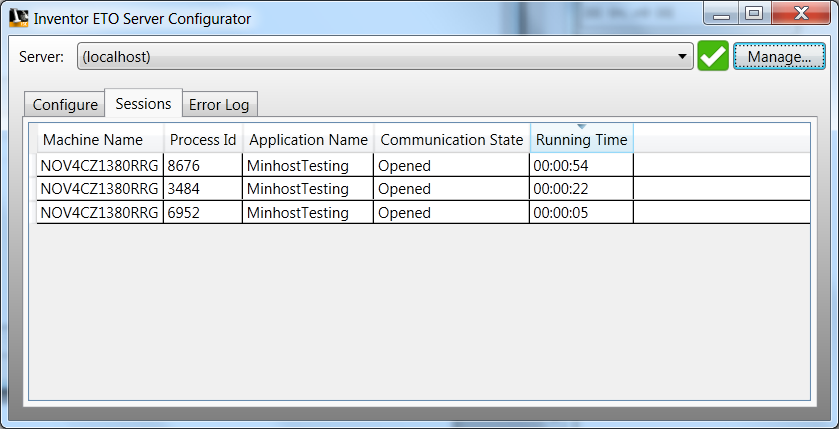
Sessions tab
The Sessions tab displays information about current sessions running on the server. The data automatically refreshes for session starts and ends. To end a session, right click it and select End Session.
Error Log tab
The Error Log tab displays the log of Intent Services errors. To Update the data, click Refresh. Errors are sorted in descending order. Click an error to expand it.