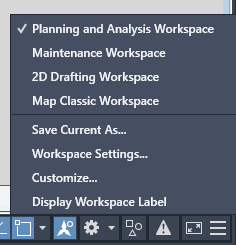
Your work environment - that is, the way the ribbon, menus, toolbars, and dockable windows are laid out - is saved in a workspace.
Using a Customized Workspace
- You can customize a workspace to look and function just the way you want, or create a workspace. You can save different workspaces for different tasks, use them to help you streamline common tasks, or set up best practices for mapping tasks and workflow. For example, you can set up a map creation workspace to streamline acquiring, integrating, and building maps, and another workspace for creating and publishing map books and atlases. You can set Map Classic or a custom workspace as your default in the Customize User Interface dialog box. That workspace becomes your default for all future sessions.
To switch between workspaces
- To switch during a session:
- Click the Workspace Switcher.

- Select a workspace from the list.
Your new selection remains in effect during the current session (unless you change it again).
- Click the Workspace Switcher.
- To use Map Classic or a custom workspace as your default
- Click the Workspace Switcher.
- Click Customize.
- Right-click the workspace you want and click Set Default.
- To switch to that workspace for the current session (in addition to making it the default), right-click it again and click Set Current.
- Click OK.
The next time you start AutoCAD Map 3D toolset, you will see the new default workspace.
- To switch to a standard default workspace:
- Click .
- Select a different default workspace.
The next time you start AutoCAD Map 3D toolset, you will see the new default workspace.
For more information, see Workspaces.
To create a new workspace
- In the Planning And Analysis Workspace, click Tools tab
 Customization panel
 User Interface.
 - In the Customize User Interface dialog box, under Customizations In All CUI FILES, right-click the Workspaces node and select New Workspace, or right-click an existing workspace and select duplicate.
- Select the new workspace.
- Under Workspace Contents, click Customize Workspace.
- In the Customizations In All CUI Files tree, check the items to include.
- Click Done.
- Click OK.
To add ribbon, menu, and toolbar options
- In the Customize User Interface dialog box, under Customizations In All CUI Files, select the workspace to modify.
- Under Customizations In All CUI Files, expand the item to customize so that you can see all the items underneath it.
For example, expand the menu to see the topology options underneath.
- Under Command List, click and drag the tool you want to include to the item in Customizations In All CUI Files.
- Click Apply.
- Click OK.
To add entire ribbon tabs, menus, or toolbars to a workspace
- In the Customize User Interface dialog box, under Customizations In All CUI Files, select the workspace you want to modify.
- Under Workspace Contents, click Customize Workspace.
- In the Customizations In All CUI Files tree, check the items you want to include.
- Click Done.
- Click OK.
To restore the default colors
- Click

 Options.
 - In the Options dialog box, click the Display tab, and then click Colors.
- In the Drawing Window Colors dialog box, select the element you want to change by clicking the images for the Model tab or Layout tabs.
As you click areas of the images, the selection is displayed in the Window Element list. You can also change an attribute by selecting it from the Window Element list. For example, for the Map background, select Model Tab Background.
- From the Color list, click Select Color.
- In the Select Color dialog box, click the Color Books tab, and then select AutoCAD Map 3D toolset Colors from the Color Book list.
The AutoCAD Map 3D toolset color book displays the default colors used in the application. You can select a color or use the color book as a reference. It does do not control the defaults in the application; do not attempt to modify it.
- Select a color by clicking a color chip.
For example, click the blue Map Background chip to use the new map background color (model tab).
- Click OK.
- In the Color Options dialog box, click Apply and Close to record the current option settings in the system registry and close the dialog box.
- In the Options dialog box, click OK.
To show the command line interface for a particular workspace
- In the Planning And Analysis Workspace, click Tools tab
 Customization panel
 User Interface.
 - In the Customize User Interface dialog box, select a workspace.
- In the Workspace Contents area, expand Palettes, scroll to the bottom of the list, and then click Command Line.
- In the Properties area under Appearance, click Show, and then select Yes from the drop-down list.
- Under Workspace Contents, click the Customize Workspace button.
- Click OK.
To hide the map status bar
- At the Command prompt, enter mapstatusbar.
- Enter hide.
To enable Update Edits Automatically by default
- At the Command prompt, enter mapeditsetautodefault
- Enter active.
To disable connection pooling by default
- At the Command prompt, enter mapconnectionpooling.
- Enter deactive.
To turn file selection dialog boxes on or off
- At the Command prompt, enter filedia.
- To turn on dialog boxes , enter 1. To turn off dialog boxes , enter 0.
If you use scripts to automate some AutoCAD Map 3D toolset functions, you may find it useful to turn off dialog boxes .
To turn other dialog boxes on or off
- At the Command prompt, enter cmddia.
- To turn on dialog boxes , enter 1. To turn off dialog boxes , enter 0.