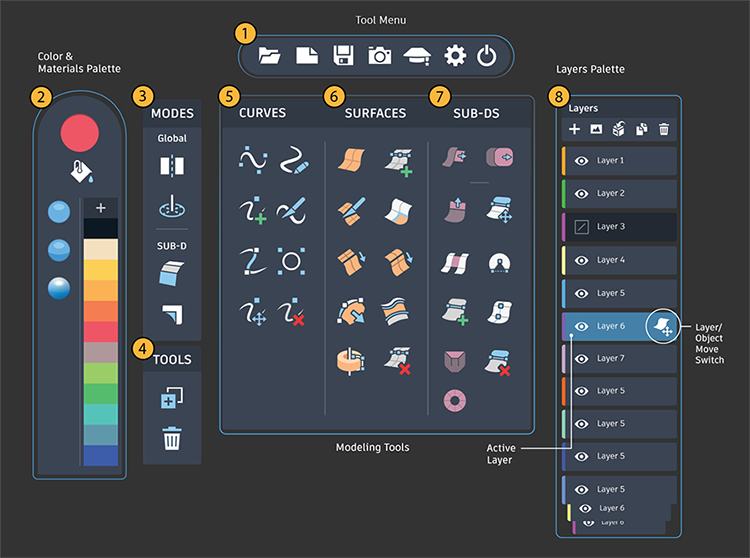
1. Tool menu
Access global options from the main menu bar.
-
 - Opens a new blank workspace.
 -
 - Opens the contents of an FBX file in the workspace.Note:
You can open FBX files containing sub-d objects, including polygon meshes, created in Maya or by other content creation applications. Meshes coming from Maya will be treated as sub-d cages which you can modify using Create VR modeling tools. In Create VR the mesh will be represented as a smoothed sub-d object. Be aware that high-resolution meshes may affect performance. For more information, see Transfer geometry between Maya and Create VR.
-
 - Saves the current scene as an FBX file in the following directory: C:\Users\Username\Documents\CreateVR\Saves. Create VR automatically names the files using the date and time of the save.
Create VR FBX files can then be imported into Autodesk Maya or other content creation applications, such as Autodesk 3ds Max, for further refinement and completion.
-
 - Takes a snapshot image of the current scene and saves it as a .png file in the following directory: C:\Users\Username\Documents\CreateVR\Pictures.
 -
 - Provides links to Create VR learning content and other resources.
 -
 - Opens the Create VR Settings. In the settings you can choose different work environments and switch the dominant hand for the controllers. By default the VR controllers are set for right handed users.
For information about the VR controller mapping, see About Create VR.
-
 - Exits Create VR.
2. Color and material palette
Provides color palette and materials.
-
 - Fills an object with the selected color. Select a material and color from the palette, and then pull the trigger on the object to apply. When using the color and material palettes, note the following:
-
The material preview displays the selected material color. This color is applied to all new geometry.

Material preview
-
You can add new colors to the palette by selecting the material preview, then choosing from the color picker that appears. Select the plus sign (
 ) to add the new color to the palette.
 -
You can choose from a Lambert, Phong, or flat material. To apply the material, select it from the materials palette, then pull the trigger on the object.

Materials palette
-
3. Modes
-
 - Adds a symmetry plane to the environment. All creation tools work with the symmetry plane. The symmetry plane has two purposes:
-
It generates a mirrored copy of a curve or surface.
-
Provides a flat surface to draw on and create with.
-
-
 - Creates a radial axis in environment for radial symmetry. Use it to create curves and surfaces around a radial axis. For example, use radial symmetry to model radial shapes such spokes for rims or wheels. All creation tools work with radial symmetry.
 -
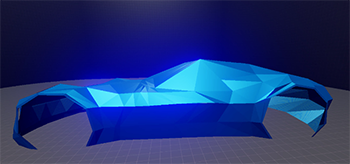
 - Turns on Box mode, which displays the sub-d at its lowest level of division. Use this mode to better detect surface quality problems, such as odd-sized faces, uneven edges, or other surface irregularities.
Box mode on

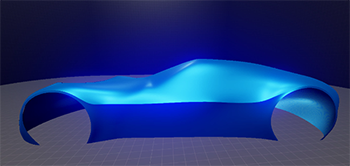
Box mode off
-
 - Turns off corner interpolation. This displays sub-d corners as rounded limit surfaces.
4. Global tools
-
 - Duplicates the selected curve, surface, or sub-d.
 -
 - Deletes the selected objects, including Create VR geometry and referenced objects.
5. Curve tools
-
 - Draws NURBs curves.
 -
 - Sketches freeform curves.
 -
 - Adds CVs.
 -
 - Cuts curves into two segments.
 -
 - Joins two separate curves together.
 -
 - Creates circles and ellipses.
 -
 - Moves CVs.
 -
 - Deletes CVs.
For more information, see Draw and sketch curves in Create VR and Modify curves in Create VR.
6. Surface tools
-
 - Creates surfaces.
 -
 - Adds CV rows.
 -
 - Divides surfaces into two pieces.
 -
 - Creates a corner patch on two adjacent boundaries.
 -
 - Extends a surface boundary.
 -
 - Extrapolates a surface boundary.
 -
 - Extends curves.
 -
 - Aligns the edge of a surface to another surface, surface edges to curves, or align two curves. For more information, see Align surfaces and curves.
 -
 - Revolves a profile curve around an axis to create a revolved shape.
 -
 - Removes CV rows.
For more information, see Create surfaces in Create VR and Modify surfaces in Create VR.
7. Sub-d tools
-
 - Creates a patch primitive. In addition to creating primitives, this tool includes several embedded tools that you can use to shape the object right away. Tool hints indicate which tool is active depending on the position of the tool sphere. The embedded tools let you:
-
Move vertices
-
Extrude edges
-
Insert edge loops
-
Weld vertices, edges, and faces
-
-
 - Creates a volume primitive. In addition to creating primitives, this tool includes several embedded tools that you can use to shape the object right away. Tool hints indicate which tool is active depending on the position of the tool sphere. The embedded tools let you:
-
Move vertices
-
Extrude faces
-
Insert edge loops
-
Weld faces
-
-
 - Extrudes edges, faces, and curves. When extruding boundary edges, the standalone Extrude tool has the same selection modes as the embedded Extrude tool. When extruding faces,it has one selection mode: Face Picking (Manual), which you can use to select one or more faces. It does not provide the same selection modes for face extrusion as the Volume tool.
 -
 - Moves sub-d CVs.
 -
 - Bridges two sub-d faces or curves by adding intermediate faces and edges between them.
 -
 - Welds vertices, edges, and faces together.
When welding vertices and edges, note the following:
- You can only weld boundary vertices that share a common third CV on the boundary. You cannot weld neighboring or adjacent CVs.
- You can weld any boundary edges where the edge arrows point in opposite directions. Otherwise, the weld either fails, or if successful, a twist in the surface results.
-
 - Inserts an edge loop.
 -
 - Splits a sub-d face at specified points along an edge. Each cut results in a new edge and two vertices. You can make cuts perpendicular or diagonal to a point along an edge.
 -
 - Applies a crease to an edge.
 -
 - Deletes sub-d components.
 -
 - Creates a disc primitive. See Create and shape sub-d disc primitives.
For more information about using the sub-d modeling tools, see Modify sub-d objects.
8. Layers and layer options
-
 - Adds a new layer.
 -
 - Adds an image layer.
 -
 - Adds a model layer.
 -
 - Duplicates the selected layer.
 -
 - Deletes the selected layer.
 -
 - Hides the selected layer.
 -
 - Switches between object-move and layer-move. Object-mode is set by default. With layer move, you can move the contents of the selected layer.
For more information, see Layer basics and Work with layers.
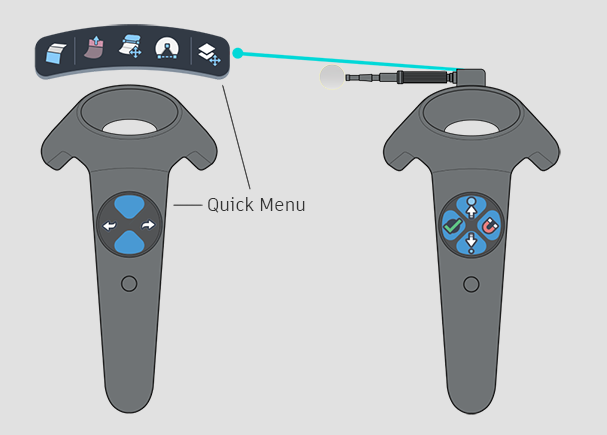
Quick Menu

The Quick Menu on the global hand displays tools that are relevant to your current selected tool and task.
There are two constant tools, toggle Box/Smooth mode on the left and toggle Object/Layer-move on the right, and three contextual tools in the middle. For example, when modeling sub-d primitives, the Quick Menu (shown in the image above) will display the Box mode icon, the Sub-d extrude tool, the Move sub-d CVs tool, the Weld tool, and the Object/Layer-move icon.
Access the Quick Menu by pressing up on the Global hand analog stick (Oculus) or D-pad (VIVE). Pointing the tool hand towards the Quick Menu will automatically cast a ray and you can select your desired tool by pulling the tool hand trigger.