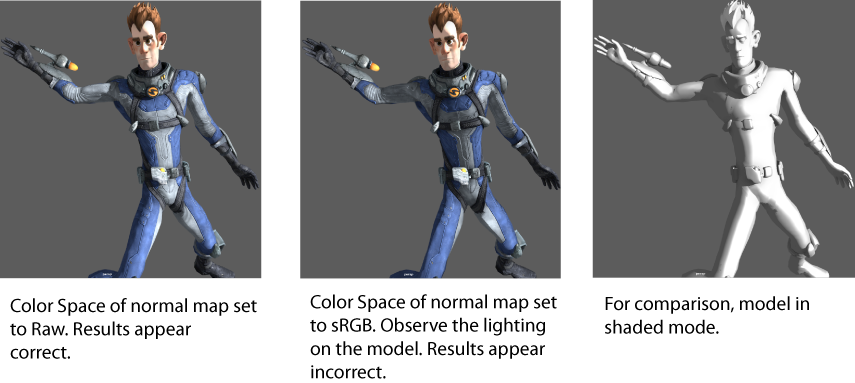
Normal map appears with seams or with incorrect lighting
When you add a normal map to a color-managed scene, you must manually set the color space for your map to Raw. This is because normal maps contain scalar data, not color data, and therefore shouldn't be color managed. When color management is enabled, image files initially use the color space determined by the Input Color Space Rules in the Color Management preferences. This is, by default, sRGB. You can set the Color Space to Raw for each normal map in its respective File Attribute Editor. See Specify the color space for textures and other image inputs.

If you have several normal maps in your scene, you can also set a rule so that all files that include "norm", for example in their file names, use an input color space of Raw. This way, you only need to use the letters "norm" in your normal map file names, and you do not need to manually set the color space of each file node individually. See Define rules for assigning color spaces to input files.
Normal maps created using Transfer Maps
The following section details troubleshooting topics for normal mapping in the Transfer Maps editor. For more information, see Transfer Maps.
Details of normal map are missing or out of place
Cause
Your source surface has non-zero transformations and you transferred your normal map in Object Space.
Solution
If your source and target objects overlap in the scene view, set the Transfer In option to World Space and then bake your map again.
If your source and target objects do not overlap in the scene view and the Transfer In Object Space option produces no result, then move your source and target objects so that they are on top of each other, freeze their transforms (Modify > Freeze Transformations), move them back to their original positions, and then bake your map again.
Map is corrupted or regions of the map are missing
Cause
Your source or target object has overlapping UVs.
Solution
Ensure that your source and target objects have clean, non-overlapping UVs and make sure that their UVs lie within the 0 to 1 UV range.
Sections of my map are missing detail or is blurry
Cause
Your map resolution and sampling quality may be too low or the affected region of your map may not occupy enough UV space.
Solution
In the Transfer Maps editor’s Maya Common Output settings, do the following:
- Increase the map’s resolution. The Map Width and Map Height values determine your map’s resolution.
- Increase the map’s Sampling Quality.
- Increase the map’s Filter Size.
- In the UV Texture Editor, increase the UV mapping coverage for the affected regions of the map.
Transfer maps are saved to the wrong project
Cause
By default, when you select Lighting/Shading > Transfer Maps, the map is always saved to the project you are currently in.
This is true even if you set a new project. When you open the Transfer Maps editor and click any of the map icons to create a transfer map, the map is still set to the previous project.
Solution
Click the Remove Map button to remove the transfer map and click the map icon again to add the map to the scene. Now the map will be set to save to the correct project folder.
Map appears pixelated or aliased
Cause
Your map resolution and sampling quality may be too low or the filter size may be too small.
Solution
In Transfer Maps editor Maya Common Output settings, do the following:
- Increase the map’s resolution. The Map Width and Map Height values determine your map’s resolution.
- Increase the map’s Sampling Quality.
- Increase the map’s Filter Size.
Sections of my map are missing
Cause
The regions of your map that are absent lie beyond the Max search depth or are excluded by the Search Envelope.
Solution
In the Transfer Maps editor Output settings, increase the Max search depth or change the Search Method.
Source surface detail appears on the wrong side of my target surface
Cause
When the Max search depth for your map is too high, then surface detail from one side of the source object is projected to the opposite or wrong side of the map.
Solution
In the Transfer Maps editor’s Output settings, reduce the Max Search Depth.
Maya runs out of memory when baking the map
Causes
- You do not have enough RAM.
- Maya has insufficient memory to complete the bake operation for your large models and maps.
Solutions
- Bake only one output at a time.
- Only load source and target meshes into your scene.
- For high resolution objects, display them in wireframe shading mode.
Map missing surface details when source has multiple layers
Cause
Your Search method may not include all the source meshes’ surface detail or your Max Search Depth may be too low to include all the layers of the source geometry.
Solution
Increase the Search method and Max Search Depth so that they include the missing detail.
Troubleshoot seam appears along UV borders when creating Transfer Maps
Cause
Not enough space between UV shells.
Solution
Ensure that there are at least a few pixels in between all UV shells, and between each UV shell and the edge of the texture. This problem is most likely to occur when creating normal maps.
Troubleshoot distortion appears in normal map
Cause 1
The target surface is larger than the source surface.
Solution
Ensure that the target surface is smaller than (recommended) or the same size as the source surface.
Cause 2
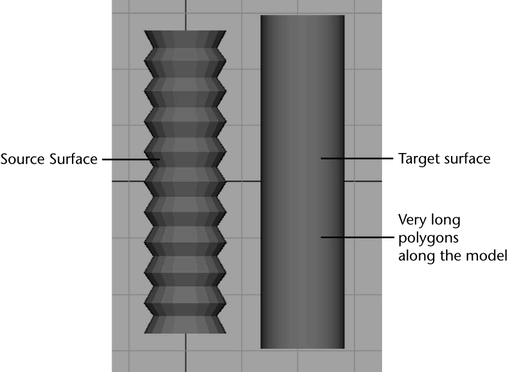
Your geometry includes very long polygons.

Solution
Remove the very long polygons by adding additional subdivisions along the polygon, or, select the Match Using: Surface Normals option in the Advanced Options section of Lighting/Shading > Transfer Maps.