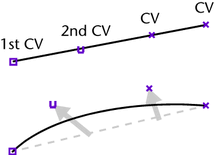
The easiest way to display and select a curve component is to right-click on an object, choose the component type, then select the component.
CVs

CVs (control vertices) control how the curve is “pulled” from a straight line between edit points. They are the most basic and important means for controlling the shape of a curve. Lines between consecutive CVs form the control hull.
The number of CVs is equal to the degree of the curve plus one. So, for example, a degree 3 curve has four CVs per span. To increase the number of CVs to gain more control over curve shape, you can increase the number of spans by inserting edit points or increase the curve’s degree.
Maya draws CVs differently to let you tell the difference between the start and the end of a curve. The first CV, at the start point of the curve, is drawn as a box. The other CVs are drawn as small dots.
Multiple spans
Longer and more complex curves require more than a single span curve. As you draw what appears to be a single long curve, the application is actually adding several curve spans together.
Edit points

You can tell when a curve is made from multiple spans in several ways. One is to look for edit points on the curve. Edit points appear as small Xs that marks connection points between spans.
Unlike the on-curve control points of Bezier curves (used in many 2D illustration programs), NURBS edit points are not usually used for editing curves. CVs control the shape of a NURBS curve, and edit points are just indicators of how many spans a curve has.
A few tasks use edit points:
- For more control in a curve, insert an edit point to increase the number of spans in the curve and give you more CVs to work with.
- To decrease the number of spans in a curve, and probably change the shape of the curve, delete edit points.
- You can move edit points to change the shape of a curve, but you should avoid doing this except for minor adjustments.
Hulls

As a curve gets more spans and edit points, you might lose track of the order of the CVs. To show the relationship between CVs, Maya can draw lines between them. These lines are called hulls.
Hulls are useful for several purposes:
- To show the order of CVs in a crowded scene.
- To show the shape of the CVs when your object is so crowded with CVs that you can’t determine exactly which adjacent CVs will be affected when you tweak part of a model.
- To select an entire row of CVs at once.