|
Straighten UVs by aligning them
|
- Select the UVs you want to align.
- In the
UV Toolkit, open the
Align & Snap section.
- Click one of the
Align buttons to align the UVs relative to the furthest one in the appropriate direction.
|
|
|
Straighten UVs by adjusting their angles to adjacent UVs
|
- Select the UVs you want to align.
- In the
UV Toolkit, open the
Unfold section.
- Next to
Straighten UVs, set the
Maximum Angle and
Axes to straighten along.
- Click
Straighten UVs.
|
|
|
Straighten UVs by matching them to a grid
|
- Select the UVs you want to align.
- In the
UV Toolkit, open the
Align & Snap section.
- Click
Match Grid.
You can Shift + click the button to open the Grid UVs Options, which allow you to alter customize the size of the grid that the UVs will align to. Note that this is not necessarily reflected by the visible grid in UV space.
|
|
|
Straighten a selected edge loop and then unfold around it
|
- Select a UV or edge loop.
- In the
UV Toolkit, open the
Unfold section.
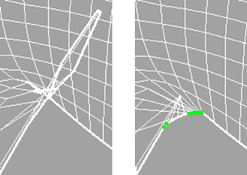
- Click
Straighten Shell.
|
|
|
Straighten a UV border
|
- In the
UV Editor, select the UVs around the tangled UV border.
It doesn’t matter if you select interior UVs along with border UVs.
Straighten UV Border only acts on the borders.
In some cases, it is difficult to select the UVs you want to straighten without selecting other UVs you want to leave unaffected. In these cases, you can leave a gap in your selection and use the
Fill Gaps in Selection option to straighten the UVs you could not select.
- Select
(or alternatively,
in the main menu bar).
- Select the polyStraightenUVBorder node and edit the attributes in the
Attribute Editor or
Channel Box.
|
|