
Distributes points into structures like rows, columns, step effects, etc. One of these nodes is created by default when you first create a MASH network.
- Number of Points
- Determines the number of points (which the Instancer then places object instances on) to create.
- Arrangement
-
Determines the method of distribution. Options include:
- Linear: Distributes points along a line.
- Radial: Distributes points around the circumference of a circle, or in a spiral / helix.
- Spherical: Distributes points randomly on the surface of an imaginary sphere. Auto-animates.
- Mesh: Distributes points along or within a polygon mesh.
- inPositionPP: Uses particle positions from nParticles / SOuP to determine distribution. To use this, connect the nParticle shape's Position attribute to this node's In Position PP attribute.
- Grid: Distributes points into a 2D or 3D matrix.
- Initial State: Allows you place points at the same position/rotation/scale as manually specified transforms.
- Paint Effects: Distributes points along a Paint Effects stroke.
- Volume: Distributes points randomly within a spherical or cubic volume.
Linear
- Center Distribution
- Distance X, Distance Y, Distance Z
- Controls the spacing between points in each of the three axes.
- Scale X, Scale Y, Scale Z
- Controls the scale of all object instances.
- Rotate X, Rotate Y, Rotate Z
- Controls the rotation of all object instances.
- Offset
- Adds an incrementing offset value to the three transforms per object.
Radial
- Radius
- Determines the radius around the center on which to distribute the points.
- Angle (degrees)
- Determines the angle around the center (in degrees) to distribute the points.
- Z Offset
- Determines the length along which to distribute the points in the Z axis. Lower values result in a circular distribution, while larger values result in a helix.
- Radial Axis
- Determines the axis on which the insances are laid out
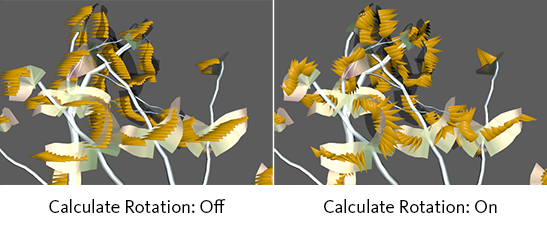
- Calculate Rotation
- Automatically rotates to face down the circumference of the circle.
- Ignore Ramps
- Allows you to mute the effect of any of the ramps in the Ramps section.
Grid
- Center Distribution
- Distance X, Distance Y, Distance Z
- Controls the spacing between points in each of the three axes.
- Grid X, Grid Y, Grid Z
- Controls the number of columns and rows in the grid.
Volume
- Volume Shape
- Determines the shape of the volume to spread points within when Arrangement is set to Volume.
- Volume Size
- Determines the size of the containing volume by edge (when Volume Shape is set to Cube) or radius (when Volume Shape is set to Sphere).
- Spherical Bias
- Determines how closely the points within a spherical volume adhere to the center versus the edge of that sphere.
Spherical
- Angle X (degrees), Angle Y (degrees)
- Determines the angle around the center (in degrees) in each axis to distribute the points.
- Radius
- Determines the radius around the center on which to distribute the points.
- Animation Speed
- Changes the speed at which the points move around the sphere within an Animation Time range.
- Animation Time
- Moves the points around the sphere according to the Animation Speed.
- Ignore Ramps
- Allows you to mute the effect of any of the ramps in the Ramps section.
Mesh
- Method
-
When Arrangement is set to Mesh, this attribute determines the method of distribution along the connected mesh. Options include:
- Scatter: Distributes points randomly on the surface of the mesh.
- Vertex: Distributes points on the mesh's vertices.
- Random Vertex: Distributes points on random vertices.
- Face Centre: Distributes points at the center of faces.
- Random Face Centre: Distributes points at the center of random faces.
- Voxel: Fills the connected mesh with points.
- Component Selection Set: Distributes points on components belonging to a connected selection set.
- Edge: Distributes points along the center of mesh edges.
- Random Edge: Distributes points along the center of random edges.
- UV Space: Distributes points on UVs.
- Push along normal
- Move the points along the normals of the connected mesh.
- Up Vector
- Specify the up facing direction of each object instance.
- Input Mesh
-
Displays the current mesh being used as input. You can middle-drag a mesh into this field or right-click to connect the selected mesh. If a mesh is already connected, you can also right-click to remove it, show it in the Outliner, or display its wireframe.
- Selection Set
-
Displays the current vertex/face/edge selection set being used as input. You can middle-drag a mesh into this field or right-click to connect the selected selection set. If a selection set is already connected, you can also right-click to remove or show it in the Outliner. Only functional when Method is set to Component Selection Set.
- Calculate Rotation
- Automatically rotates points according to the normals of the mesh.
- Flood Mesh
- Automatically fills the mesh with instances of the object, overriding the Number of Points.
- Ignore Ramps
- Allows you to mute the effect of any of the ramps in the Ramps section.
- Scatter uses Face Area
- When enabled, points are scattered based on the individual area of each face. Typically results in a more even distribution when Method is set to Scatter.
Face/Edge
These options are available when Method is set to Face Centre, Random Face Centre, Edge, or Random Edge.
- Enable Scaling
- Instances will be scaled according to the area of the face on which they are placed.
- Scale Multiplier
- Applies a multiplier to the Use Face Scale setting.
- Edge Alignment
- Determines which part of an edge to align to when Method is set to Edge or Random Edge.
Voxel
These options are available when Method is set to Voxel.
- Voxel Size
- Specifies the size of the voxels in which to place the points. A smaller voxel size results in more points but slower calculations.
- Maximum Voxel Count
- Specifies the total number of voxels to allow. Helps you to avoid slow performance if you lose track of the number of voxels being created.
- Voxel Mode
-
- Shell Only: Only create voxels on the mesh faces.
- Fill and Shell: Create voxels on the mesh faces as well as inside the mesh.
- Fill Only: Only create voxels inside the shell.
- Voxel Container
- Displays the current voxel bounding box if one exists.
- Create Container
- Creates a voxel bounding box, allowing you to animate your mesh moving through a space while still filled with voxels.
Initial State
These options are available when Method is set to Initial State.
- Initial Transforms
- Displays a list of transforms currently determining the initial state of the MASH points. Points are distributed by ID in order from the top of the list to the bottom and loop if there are more points than transforms. You can middle-drag a transform into this field or right-click to add the selected transform. You can also select any transform in the list and right-click to remove it or show it in the Outliner.
Note: If you do not specify custom transforms then the transforms of the objects being instanced are automatically used.
Paint Effects
These options are available when Method is set to Paint Effects.
- Main, Flowers, Leaves
- Specifies which strokes to distribute along.
- Flood Mesh
- Distributes enough points to fill all enabled strokes, regardless of the current value of Number of Points.
- Paint Effects Strokes
- Displays the current Paint Effects strokes used for distribution. You can middle drag strokeShape nodes or select one and then right-click this field and click Connect to add them.
- Enable Scaling
- Scales the points in accordance with the Paint Effects Strokes.
- Calculate Rotation
-
Paint Effects Strokes and a provided
Up Vector. This is useful for doing things like custom leaves on trees.
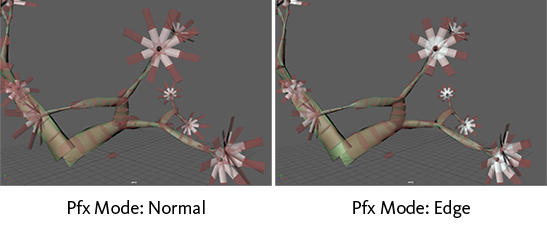
- Pfx Mode
-
Paint Effects Strokes chosen. Options include:
- Normal: Places points relative to each vertex on each stroke.
- Skip last point: Same as Normal, but ignores the final point that would be placed on each curve. Useful when instancing new leaves for a Paint Effects plant.
- Edge: Places points relative to each edge by offsetting by 0.5 in the stroke's local Z axis.
Strength
- Strength
- Fades the node's effect for all the points at the same time.
- Random Strength
- Smoothly fades the node's effect on all the points in a random order.
- Step Strength
- Turns the node's effect off one point at a time.
- Strength Map
- Determines the input file (2D texture, animated texture, etc) that controls the shape of this node's effect.
- Map Projection Axis
- Determines the axis along which the Strength Map is projected.
- Map Helper
- Displays the object being used to interactively place the
Strength Map in the scene. You can right-click the field to create a new helper object (a plane) if none exists. You can also middle-drag a mesh into this field or right-click to connect a selected mesh. If a mesh is already connected, you can also right-click to break its connection or show it in the Outliner.
Note: For the best results, assign the same texture to both the Strength Map and the Map Helper (this automatically happens when creating a new helper object).
- Random Seed
- Allows you to adjust the randomization of object arrangement.
Ramps
- Bias Ramp
- Controls the weighting of the node's translation effect on points over distance from the center.
- Rotation Ramp
- Controls the weighting of the node's translation effect on points over distance from the center.
- Scale Ramp
- Controls the weighting of the node's scale effect on points over distance from the center.