You can override the shading of your objects in two ways:
-
You can override the entire material applied.
For example, if you want to assign a different material to your pavement to make it appear wet or dirty or damaged, you can create a material override to override the shading group. See Override the material applied to the objects in a collection.
-
You can override an attribute of the shader, including an attribute value or connection.
For example, if a blinn shader is currently assigned to your objects, and you want the blinn shader to remain assigned to the objects, but you want to change the blinn's color attribute, you should choose this option. See Create a color override for a collection for an example workflow. You can also add or change any of the attribute connections. For example, you can map any of the shader attributes to a texture. See Connect a network to an attribute using a value override and Override an attribute connection with a connection override.
This functionality is applicable to both Maya shaders and 3rd party shaders.
Identify shaders assigned to each object in the scene
Display the shader assigned to each object in the scene by enabling the Display > Assigned Materials option in the Outliner.
If your object involves per-face shader assignments, then all shaders assigned to the object are listed, and grouped under the heading Materials. See Identify shaders assigned to each object in the scene.
Example applications
Example 1:
If your objects have similar names, you can easily override the material assigned to each of them as follows:
Assume that you have a scene with three windows, you can add all three windows dynamically to the same collection using an expression. For example, if all of your windows have the letters window in their names, you can use the expression *window* to include them in your collection. Then you can create a material override on the collection to override the original material with a new material. See Override the material applied to the objects in a collection.
Now if you add a new building to your scene, as long as its windows also have the letters window in their name, the expression can be reapplied so that the new windows are included in the collection and the material override applied. See Update your render setup when your scene updates.
Example 2:
If you have a scene with 100 objects, each with a different shader applied, and you need to make each of the shaders 10% brighter, you can do as follows:
- Create a collection that contains these 100 objects.
- Select the collection, then select
Relative from the
Add Override drop-down list, and middle-mouse drag and drop the attribute Incandescence from any of the shaders
Attribute Editor to the
Property Editor.
A shaders subcollection is automatically created beneath your object collection, as well as a corresponding Incandescence override.

-
Select the override and adjust the Incandescence attribute in the Property Editor. All of the shaders included in your collection become brighter as a result.
This eliminates the need for you to adjust each shader individually.
Example 3:
If you have a scene with 100 objects, each with the same shader applied, and you need to change the shading on two of these objects, do as follows:
- Right-click your layer and select Create Collection to create a collection that contains these 100 objects so that they are visible in your layer.
- Right-click your collection and select Create Collection to create a subcollection that contains the two objects for which you want to change the shading.
-
Right click this subcollection and select Create Material Override.
Select the override. In the Property Editor, click the
 button to assign a different material; or drag and drop an existing material from the
Hypershade to the
Property Editor.
button to assign a different material; or drag and drop an existing material from the
Hypershade to the
Property Editor.
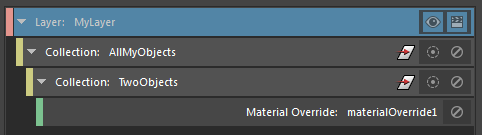
The viewport updates to show that only the two objects that are members of the second collection are assigned the new material.
In this case, because all the objects share the same shader, you cannot override an attribute on the shader as you did in Example 2. Otherwise, all the objects will have the same override applied. You should create a material override and not a shader override, since shader overrides are not collection specific, and are applied to all objects in the same layer that share the same initial shader assignment.
For more information regarding material and shader overrides, see Override the material applied to the objects in a collection.
Example 4:
If you have a scene with 100 objects, each with a different shader applied, and you need to change the shading on two of these objects, do as follows:
- Right-click your layer and select Create Collection to create a collection that contains these 100 objects so that they are visible in your layer.
- Right-click your collection and select Create Collection to create a subcollection that contains the two objects for which you want to change the shading.
- Right click this subcollection and select
Create Shader Override or
Create Material Override.
You can also override an attribute on the shader as you did in Example 2. For example, you can override any attribute such as, Color, Incandescence, and so forth. This is a simple case as compared to Example 3 because each object is originally assigned to a different shader.
Example 5:
If you have 100 characters in your scene, and the characters are all wearing t-shirts that are assigned to different shaders, but you want to map all of these t-shirts to a new texture, you can do as follows:
- Right-click your layer and select Create Collection to create a collection that contains these 100 characters so that they are visible in your layer.
- Select the collection, and select Absolute from the Add Override drop-down list in the Property Editor.
- Select any of your shaders to display its
Attribute Editor, and middle-drag and drop the attribute
Color to the
Property Editor.
A shaders subcollection is created, as well as a corresponding color override.
-
Select the color override and click the
button in the
Property Editor to connect to a new texture.

For more information, see Connect a network to an attribute using a value override.
Example 6:
If you have 100 characters in your scene, and the characters are all wearing t-shirts mapped to one texture, but you want to map all of these t-shirts to a new texture, you can do as follows:
- Right-click your layer and select Create Collection to create a collection that contains these 100 characters.
- With your layer set to visible, select the collection, and select the file node from which you want to map to a new texture.
- In the file node
Attribute Editor, right-click the file path area of the
Image Name attribute and select
Create Absolute Override for Visible Layer.
A file node subcollection is created, as well as a corresponding file texture name override.
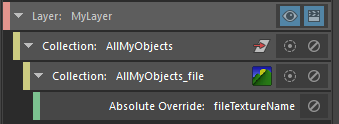
- Select the override. In the Property Editor, click the folder icon to connect to a new texture.