Linear workflows are an approach to shading, lighting, and rendering that offers many advantages over working directly with the original non-linear video values. Color management enables a linear workflow by properly converting colors for input, rendering, display, and output.
However, much of the available information about "linear workflows" actually describes a simplistic "de-gamma and re-gamma" workflow. A proper view transform that prepares color values from the rendering space for display should involve a tone map with a photographic response.
About scene-linear workflows
In the real world, light is linearly additive. This simply means that, if you use two light sources, the total luminance is the direct sum of the contribution from each light.
The algorithms used by almost every 3D renderer work in the same way. Linear workflows acknowledge this fact by ensuring that all color values used in the rendering process are directly proportional to the luminance in the scene. This solves many lighting and shading problems. For example, it is easier to achieve pleasant lighting with a good balance between highlights and shadows, without the need to use tricks like extra lights. In addition, the linear output is appropriate for further processing like compositing, without the need for extra adjustments and corrections.
One of the issues in a linear workflow is that images that have been prepared for display, such as .png files used as textures, are not linear. In other words, the numeric color values are not proportional to luminance. This means that they must be converted, or transformed, before being used in a linear workflow.
Conversely, the rendered result of a linear workflow is linear, and is not suitable for display directly. It also needs to be transformed before it looks correct on the monitor.
Where color management fits in
- On input, a transform is applied to convert images from the color space in which they were saved into the rendering space.
- As you work, the colors of the rendering space are converted by the view and display processing to provide a useful preview in the viewport, Render View, and UV Editor.
- Optionally, you can apply an output transform to the rendered image files to display them in an external viewer.
Dealing with image inputs
The proper way to deal with an input image such as a texture depends on how the image is used in the scene. It also depends on the image itself, including its current color space, its encoding, and its image state (whether its color values are proportional to scene-referred luminance values or display-referred luminance values).
Images used for non-color data should not have any transform applied. This includes bump, normal, and displacement maps, as well as maps used for other attributes such as translucence, specularity, reflectivity, and so on.
For images that are used to represent color, there are several possibilities. Images that are already scene-linear don't need any conversion, except perhaps to convert from the primary colors of the input space to the primary colors of the rendering space if they are different. This includes most high-dynamic-range images, such as OpenEXR, HDR, and some TIFF files.
Images that have been captured with a particular device should have an input transform applied that is specific for that device. This includes footage from digital cinema cameras, and film plates from ADX-calibrated scanners. Other types of scanned film plates typically require some form of log-to-linear transform.
Images that have been prepared for display should have the gamma removed. This includes many common graphics formats including JPEG, PNG, BMP, Targa, and some TIFF files. However it is very important to note that after the gamma has been removed, the color values are linearly proportional to the luminance of the display, not to the luminance of the scene. In some cases it is also desirable to make the values scene-linear by applying an inverse tone map. In other cases, an inverse tone map may create values above 1.0, which are not appropriate for colors used for diffuse reflectance (albedo), transparency, and other maps.
Displaying rendered outputs
To display a scene-linear image, it must be converted for viewing or output. This transformation typically has two steps:
- In the first step, the scene-referred values are converted to a display-referred space. For example, this may involve a tone map to convert colors from a high dynamic range to the [0, 1], as well a change of primaries. The View setting in the Color Management preferences controls the tone map that is applied.
- The second step converts the values for a particular display. This may involve another change of primaries, the appropriate gamma, and encoding as suitable integer values. The Display setting in the preferences determines which primaries and gamma are used to encode the integer values.
3D scenes mimic the real world, in the sense that a very wide range of luminance values is possible. On the other hand, display devices can output a limited range of luminance values, with a maximum value encoded as 1.0. In addition, they are usually viewed under lighting conditions that are much dimmer than an outdoor scene or a brightly lit movie set. For this reason, tone maps are used to compress high-dynamic-range values into the display range, with a photographic response that produces a pleasant image. Tone maps typically apply S-shaped curves that boost contrast and saturation to compensate for the lower dynamic range and dimmer viewing conditions.
Simply applying gamma is not enough to fully prepare a scene-linear image for display. Without a tone map, color values that are above 1.0 remain above 1.0 and get clipped by the monitor.
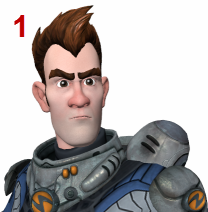
- 1. Properly converted for display
- With color management, the linear output in the rendering space gets properly transformed for viewing.
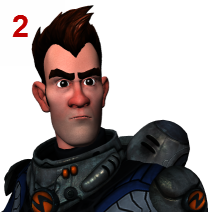
- 2. Without conversion
- Without conversion by the view and display transforms, the image is too dark and details in the shadows are lost.
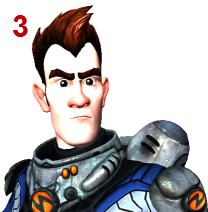
- 3. Badly compensated
- If you increase the exposure to compensate for the darkness of the untransformed image, the highlights get blown out. Even worse, if you increase the light in the scene to compensate, the rendered results will be wrong.