- Select File > Open from the main menu bar.
- Drag an asset from the Asset browser to the Viewer window and select FBX Open > Optionsfrom the menu that appears.
Use the
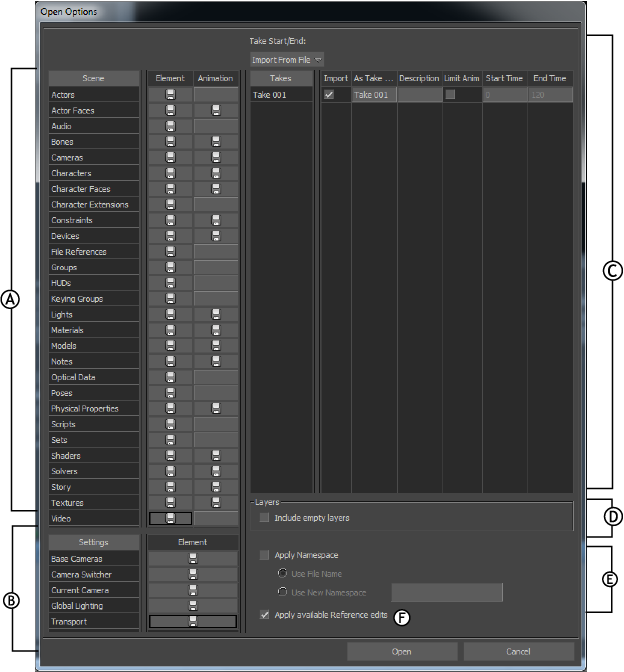
Open Options window to select elements, animation, settings, takes, layers, and Reference edits —if applicable—to load, and to prepend a namespace for all objects included in the incoming file. Under
Elements,
Animation, and
Settings,this icon
 indicates what is loaded, while this icon
 indicates what is discarded when the file is loaded into MotionBuilder.

Open Options window: A. Scene area B. Settings area C. Takes area D. Layers area E. Namespace area F. Reference edits area
Scene
Lists each MotionBuilder asset that you can load from the .fbx file being opened.
The following symbols under Element and Animation indicate whether or not assets are loaded from the FBX file.
| Symbol | Description |
|---|---|

|
Loads the element, animation, or setting. |

|
Discards the element, animation, or setting. |
Settings area
Lets you select the MotionBuilder settings to load from the file being opened.
- Base cameras
- Loads the Producer cameras from the .fbx file. See Producer cameras.
- Camera switcher
- Loads the Camera Switcher from the .fbx file. You must also load the take where the camera switches were set. See Camera switcher.
- Current camera
- Switches the current camera to the current camera specified in the .fbx file. For example, if the .fbx file was saved with the Producer Front camera as the current camera, the scene switches to the Producer Front camera when the .fbx file is loaded. See Making a camera current.
- Global lighting
- Loads the default Global lighting from the .fbx file. The Global lighting consists of the default ambient color and the scene’s fog settings. To view the scene’s Global lighting, select Global Light from the Lights folder in the Scene browser. See Global lights.
- Transport
- Loads the timing options that include the frame rate and playback speed. Timing options are shown in the Transport Controls window. See Timing Controls.
Takes area
Shows all the takes stored in the .fbx file that you are opening. You can also set how the start and end of each take is determined as well as the name given to each take.
- Take Start/End
- Use the
Take Start/End field to select how the start and end of each take is determined. You can choose from the following
Take Start/End options:
- Leave As Is: Leaves the take start and end times unchanged. If you are creating a take, the take start and end times are imported from the file.
- Import From File: Uses the start and end timecodes specified by the .fbx file being loaded.
- Frame Animation: Frames the start and end of the animation for each take.
- Takes
- Shows the name of the take as it was saved in the .fbx file. You cannot change this column.
- Import
- Marks the take for loading. When disabled, the take is not loaded.
- As Take
- Changes the name of the take when loaded.
- Limit Anim
- When enabled, let you select a specific time range of animation to load. Keys outside the selected time range are not loaded.
- Start Time/End Time
- Let's you specify the first and last frames of animation to load.
Use the Take list to select which takes to load from the .fbx file. The Take list is split into the following columns:
Namespace area
Lets you prepend a namespace for all objects included in the incoming file.
- Apply Namespace
- Enable the Namespace options.
- Use File Name
- Uses the name of the file as the namespace for all objects contained within the file.
- Use New Namespace
- Lets you specify a namespace for all objects contained in the file. You need to enter the namespace in the Use New Namespace field. This lets you keep multiple objects with the same name in one scene. See Namespace.
To change the default namespace setting, See Fields and Values preferences.
Apply available Reference edits
When on, reference edits are applied to the objects contained in the opened file.