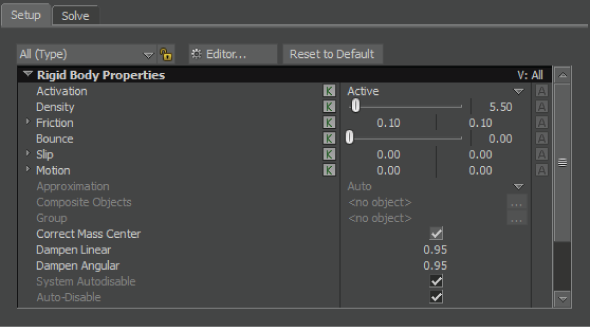
The Rigid Body Setup pane is where you can find generic Physical properties and basic setup information.
he maximum property values for Rigid Body properties are 999999.99 with a minimum value of -999999.99.

Editor button
The Editor button opens the Properties Editor. See Property Editor.
Reset to Default button
Click Reset to Default to restore the Ragdoll properties to their original settings.
Activation menu
Use this menu to set when the collision reaction starts for the object. For example, you can create objects that only react when they are struck.
| Option | Function |
|---|---|
| Active | Collision reaction for the affected object(s) begins when the session is set to Live or when recorded. |
| Active at collision | The affected object reacts only when something collides with it. |
| Passive | The object is not affected by objects colliding with it, but still collides with other objects, it is a passive rigid body. |
You can key and animate this setting to turn the Rigid Body behavior off and on during your animation. See Keyframe (K) and Animate (A) buttons for more information.
Density field
Use this field to set the thickness and mass of an object.
You can key and animate this setting to turn the Density behavior off and on during your animation. See Keyframe (K) and Animate (A) buttons for more information.
Friction (Mu) field
Use the Friction settings to set the surface resistance of an object. For example, use a setting of 0.1 for a smooth object and a setting of 10.00 for a rough object.
Bounce slider
Use the Bounce slider to set the amount the object bounces when struck.
Slip field
Enter values in the Slip field to set the possibility of a solve object sliding off-course.
Use this setting to set how a solve object will move perpendicular to the force. For example, if you had an animation of a car driving around a corner and you assigned a slip value to a tire, it would make the tire skid.
Motion field
Use the Motion field to make the object generate motion without intervention. For example, set on a cube, the Motion setting creates a conveyer belt-like action. X and Y refer to local directions from the object.
Approximation menu
Approximation lets you specify the type of object, or the mesh that to use to approximate the solve. Select Auto, Sphere, Capsule, Box, or Mesh.
Composite Objects
Composite objects let you specify the mesh that you want to use to approximate the solve.
Group menu
This menu provides a list of the available groups from which you can choose an approximation object.
Correct Mass Center option
Activate this option to offset the “Center” or “Center of Gravity” of an object to a given point to represent the center of gravity for an object.
Dampen Linear/Angular
Use the Dampen linear/angular settings to define the clamp value applied to the linear and angular velocity when calculating rolling friction. Because the Physical property does not model rolling friction, it uses a dampening system so that objects can come to rest.
For example, without a dampening setting, a rolling sphere rolls on forever. It is done by scaling linear velocities at each simulation step by dampening factor for all colliding objects.
A value of 1 retains actual velocity. Any value below one decreases velocity, while any value greater increases it.
| Value | Description |
|---|---|
| Linear | Change the Linear Velocity to modify the linear movement of the object. |
| Angular | Change Angular velocity setting to modify the rotational movement of the object. |
Weight linear/angular velocity fields
When a collision occurs with an object, velocities are used to calculate the force of the collision.
Modify the Linear and Angular Velocity settings to override the default transfer of energy that occurs in a collision, for example, to assign more or less collision force to an object than what is already specified in the Physical property.