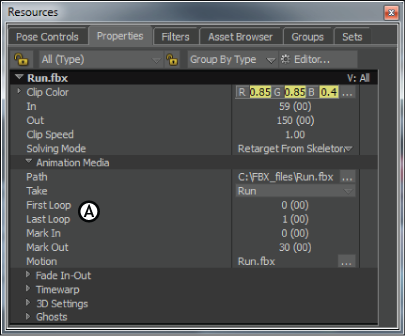
This section describes the settings displayed in the top section of the Asset Settings window Story clips are selected.
Clip Name
The Clip Name field lets you rename each clip. Renaming a clip this way does not change the name of the clip’s .fbx file.
Path
The Path field displays the path of the selected animation, character, camera animation, audio, or video clip. An empty Path field indicates that the selected clip has not been saved.
You can also click the browse (...) button beside the field to locate and load a different .fbx file for the clip.
File Pat
The File Path field displays in the Asset Settings window when an Application Launch command clip is selected. The File Path field lets you choose the application you want to launch when the command clip plays.
You can type the path in the field, or you can click the browse (...) button beside the field to locate the file.

Common clip settings A. File Path field
Clip Content
The Clip Content field lets you assign assets to Hide command and Show command clips. When you drag a Hide Models or Show Models asset from the Command folder in the Asset browser to the Story window, the new command clip that appears displays the name of the command followed by a <No models> message.
To assign a model to a Show Models or Hide Models command clip, select a model from the Viewer window and Alt-drag it into the Clip Content. You can also Alt-drag models from the Scene browser or from the Schematic view in the Viewer window.

Common clip settings A. Clip Content field
Clip Color
The Clip Color settings let you change the color of a selected clip. You can also click the clip’s Color (...) button to open the Color window.
In and Out
The In field lets you determine the selected clip’s In point without changing the clip’s Out point. The Out field lets you determine a clip’s Out point without changing the clip’s In point.
The In and Out fields’ Set buttons lets you change the value of the field to the current timecode.
Clip Speed
The Clip Speed field lets you change the speed of the clip’s animation or video without changing the clip’s In point or Out point.
First Loop
The First Loop field lets you determine at which part of a clip the loop begins. The field uses the local time of the selected clip. You can loop every type of clip except command and constraint clips.
When you use the First Loop field, the first loop can be of a different length than the loops in the rest of the clip.

Looping clip A. First loop B. Mark In C. Mark Out D. Last loop
Last Loop

Properties window A. Last Loop field
Mark In and Mark Out fields
The Mark In and Mark Out fields let you trim the beginning or end of a selected clip. The fields use the local time of the selected clip. The Mark In and Mark Out fields appears for selected animation, character, camera animation, video, and audio clips.
Trimming a clip lets you select a segment of the original animation, audio or video, which you can then loop or scale. Trimming does not change the length of the clip itself and does not permanently remove the ends of clip that are trimmed.
Each field’s Set button lets you change the value of the field to the current timecode.