Generate and export a test build job
This uses the buildstyle to create data that can be used directly on the additive machine. To have the build parts correctly prepared and positioned on the build platform of the machine, the following conditions must be met:
- The buildstyle script sets a machine name in declareMachine() which matches one of the machine entries in the ATU machine manager. This machine must also contain at least one valid platform definition.
- The buildstyle script sets at least one material name in declareMachine().
- The buildstyle script sets at least one layer thickness in declareMachine().
Use the platform setup to arrange multiple copies of the test part on the platform. Each copy can have its own buildstyle parameter set, so you can compare different buildstyle parameter settings.
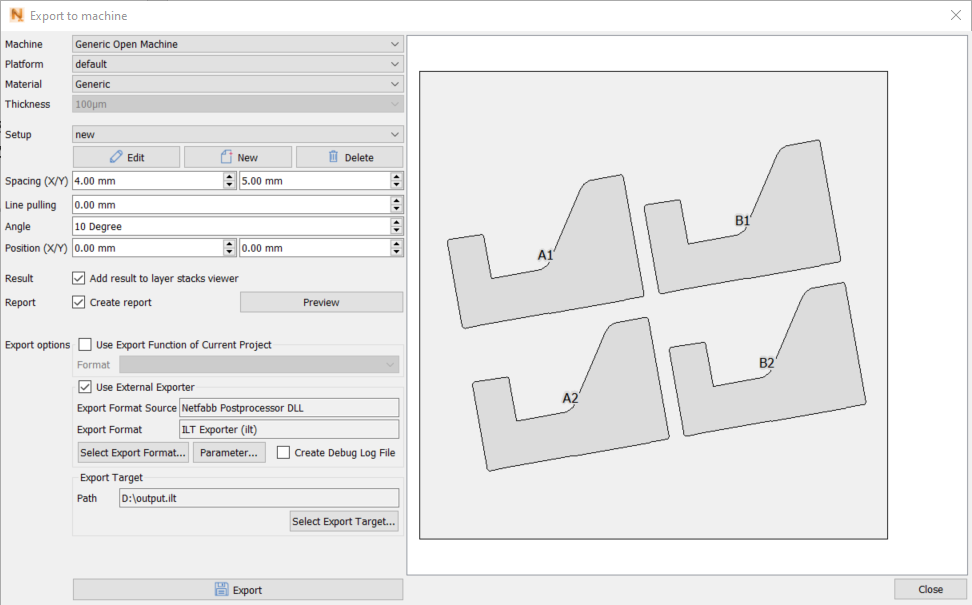
| Machine | Select the machine for which the test build should be prepared |
| Platform | Select one from the list of platform configurations |
| Material | Select one from the list of materials |
| Thickness | Select one from the list of layer thicknesses |
| Setup | Select a setup from the list of available setups. Use the buttons Edit, New and Delete to manage the list of setups. |
| Spacing | The distance between build parts on the platform can be configured in x and y. |
| Line Pulling | Each row is shifted sideways by the given value. |
| Angle | The whole grid of build-parts is rotated by the given angle. |
| Position | The whole grid of build-parts is shifted in x and y by the given values. |
| Result | Independent from the file export, the calculation result can optionally be copied to the layer stacks viewer for detailed inspection. |
| Create Report | A report document can be created in addition to the exported file. This is a PDF document containing an image of the test platform and a list of all parameter variations. Clicking Preview generates and opens this report immediately. |
| Export Options |
An export routine must be selected here which is then generating the export file. If the current buildstyle project has implemented any export options, then these will be available for selection. Alternatively, an external export routine can be selected which may be provided by an exporter module (usually a DLL). [LINK TO EXTERNAL_EXPORTER HELP PAGE (to be done)] |
| Export Target | The output file path and filename can be specified here. |
| Export | Finally, the Export button will trigger the platform calculation and file export. This may take a while to execute, depending on the size of the test. |
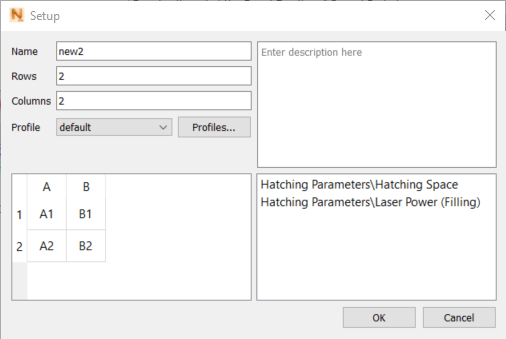
A setup is a two-dimensional array of test-part copies where individual buildstyle settings can be assigned to each part.
Click Edit to open the Setup dialog.
Setup
The setup name and the number of rows and columns can be configured.
Also, a parameter profile can be selected. Choosing a profile initializes all settings with its stored values. All configured parameter variations then override these defaults.
Table cells on the left side represent part duplicates. The cell labels correspond to the part labels seen in the main dialog. Right-click a table cell to open a context menu for creating a parameter variation (see Parameter dialog).
On the right side, the list of buildstyle parameters is shown which are currently used with the setup.
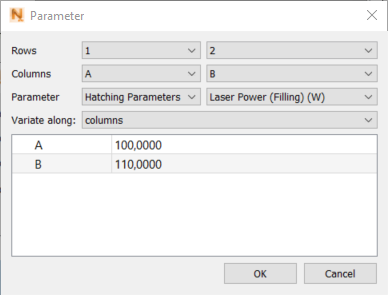
Parameters
In the parameter dialog you configure the rows and columns at which the parameter variation should be applied. The parameter can be chosen from the part related buildstyle parameters. First the parameter group must be selected and then the parameter within the group. Platform-related buildstyle parameters cannot be configured part-by-part. Those values are set by editing the underlying parameter profile. The presented list of parameter values shows the variation along the rows or columns of the test build setup.
Finishing the export
The dialog does not close after the export is done. With this it is possible to create a series of test build files very quickly just by changing some settings and export again.