Click
Play
 to see a looping animation of the simulation results, with color changes to indicate the extent of displacement or temperature change as the part is built. On a drop-down menu, you can select x2, x4 or x8 to increase the play speed by multiples. Click
Loop to repeat the animation over and over; click Play again at any time to stop the action.
to see a looping animation of the simulation results, with color changes to indicate the extent of displacement or temperature change as the part is built. On a drop-down menu, you can select x2, x4 or x8 to increase the play speed by multiples. Click
Loop to repeat the animation over and over; click Play again at any time to stop the action.
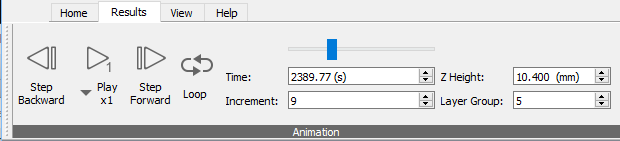
On the time slider, you can click and drag the marker to review specific parts of the animation, or use the Step Forward and Step Backward arrows to move one increment at a time.
The Time entry shows the time associated with the current increment. The up and down arrows can be used to step through the time steps.
The Increment entry shows the current increment number. The up and down arrows can be used to step through the increments, or you can jump to a select increment by typing it into the Increment field and pressing Enter.
The Z Height and Layer Group controls work together, in that pressing the up or down arrow in either field steps you up or down the layer numbers, and displays the corresponding Z height of the build.
Key events
From the log files of a simulation, you can identify significant times, such as when a warning was issued. Make note of the specific time in seconds, then enter that value in the Time field on the Animation panel. When you press Enter, the animation jumps to that point in the build so you can see what was happening at the time.
Understanding increments
When using the Animation panel, the timeline, and the log files to post-process results, it is important to understand what is reported at each increment. During the mechanical analysis, each layer group is typically broken into two increments. The first increment activates the material of the layer. During this increment, the entire layer group is instantaneously activated in a molten state. The second increment is when the entire layer group cools and contracts.
The time between each layer group (increment 2 & 3, 4 & 5, and so on) is a small number controlled with the *TRAN keyword. The small time step is used to simulate a near steady state response from the end of one layer to the start of the next.
When you review the recoater blade log file to identify if, or when, the recoater blade interferes with the model, the results are reported at the end of the second increment in each layer group. This correlates to the time just after the blade recoats the build chamber, prior to the start of the next layer.
Reduced results frequency writing
If a Write results frequency greater than 1 is chosen in the Solver Settings, then the increments will play through just those time steps with results being written. For example for a results frequency of 2, the increments counter will step through increments 1,3,5,7... until the post-process cooldown step. All steps after cooldown will be recorded, no matter the results writing frequency.