- Make a back-up copy of the property map file you wish to customize. This is likely to be the file: C:\Program Files\Autodesk\Navisworks Manage 2015\Quantification\TakeoffPropertyMap.xml, or an Autodesk Navisworks 2014 or 2015 xml property map of your choice. This means you can revert to the original file if necessary.
- Open your model in Navisworks.
- Click
 Home tab
  Select and Search panel
  Find Items
  .
. - In the left navigation pane, click your model (as opposed to individual objects).
- In the Category column, select Element from the drop-down list.
- In the Property column, select Category from the drop-down list.
- In the Condition column, select = from the drop-down list.
- In the Value column, select Walls from the drop-down list.
- Click Export and save the xml file locally.
- Right-click the xml file
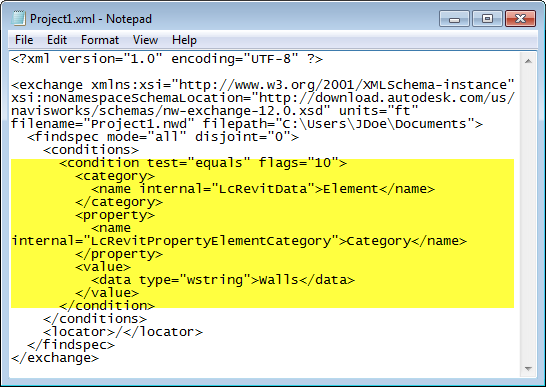
 Open with Notepad or similar text editor. The xml file will look something like this:
- In your xml file, copy the lines of code that correspond to the condition node highlighted in yellow above.
- Open the property map file here: C:\Program Files\Autodesk\Navisworks Manage 2015\Quantification\takeoff_maps\TakeoffPropertyMap.xml (or use a file map template of your choice). Paste your copied text into the property map file (find and replace the existing condition node if it is visible in the file).
- In the property map file, locate the code: <TakeofffObjectMap Name="Wall Map">, change the text Wall Map to any other name you wish to use for the TakeoffObjectMap.
- Save the xml file in the file path: C:\Program Files\Autodesk\Navisworks Manage 2015\Quantification\... If you close and reopen Quantification in Navisworks, your customized properties will be picked up automatically.