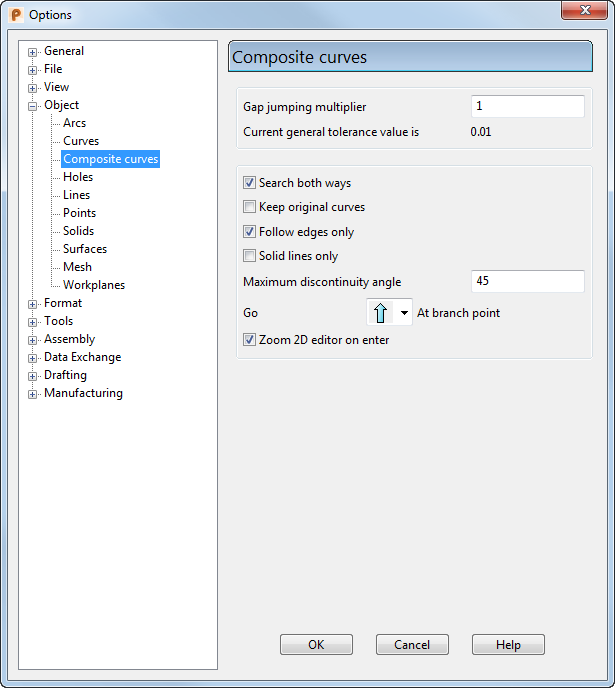
Use the Composite curves page of the Options dialog to control the default settings for adding composite curves to models. This page also contains the setting to zoom in when entering 2D Editing.
To change the composite curve settings:
- Select File > Options > Application Options to display the Options dialog.
- Select the Object > Composite curves page.
- Use the
Composite curves
page to set the options:

- Gap jumping multiplier — Define the gap used to search for suitable paths during composite curve creation. The number is a multiple of the general tolerance and can be changed during composite curve creation. For your convenience, the current value of the general tolerance is displayed below this option.
- Search both ways — Select this option to enable the control panel to select items from the start of the composite curve when it reaches the last item.
- Keep original curves — This option is deselected by default and whole objects selected as part of a composite curve become part of the new composite curve (and can no longer be selected as single items). Items that are partially selected (for a portion of their length) cannot be partly consumed and so a copy of the selected portion is created and used in the new curve, and the original is left untouched. Select Keep Original Curves to copy all objects (whole or partial) to the new curve. The originals remain untouched.
-
Follow edges only — When selecting surface curves to be part of a composite curve, there are two options. You can select either curves only at the edge of the surface or all the curves (at surface edges or patch edges). The latter involves much more work and slows down the searching operation. Because it is also less commonly required, the default is normally to search following surface edge curves only.
If the option is selected, it behaves as deselected when:
- The surface is closed in either direction. If any trimming makes the closed surface appear open, the surface is treated as open.
- The surface is a surface extrusion.
- Solid lines only — This is used in hatching. For further details, see Hatching.
- Maximum discontinuity angle — This angle affects the way the strategy of Discontinuous selects the path to follow at branch points when in Fast forward mode.
-
Go
 At branch point — Select how the toolbar, when in
Fast forward mode, automatically selects items when a branch point is reached:
-
 Straight on — Select the path which is the most continuous (has the smallest change in direction) from the last object selected.
-
 Left — Select the left most path. This is useful when choosing closed loops.
-
 Right — Select the right most path.
-
 Discontinuous — Select the path which has an angle that is less than the
Maximum discontinuity. If there is more than one path which is less than the discontinuity angle, then the path which has the smallest discontinuity angle is chosen.
-
Zoom 2D editor on enter — Define how a composite curve is viewed when using the 2D Editor. The option is selected by default.
Select this option to zoom into the selected composite curve, ready for editing using the 2D Editor, when you select Curve Tools tab > Mode panel > Edit 2D On/Off. Deselect this option to display the selected composite curve for editing using the 2D Editor, but to leave the display zoomed-out.