Use the Mouse page of the Options dialog to control the mouse defaults.
- Click File > Options > Application Options > General > Mouse.
- Control the mouse defaults using the following options:
Mouse Click
- Hit Radius — This is the region (in pixels) around the cursor that recognizes when the cursor has hit an object. Setting it to zero means you must accurately hit the object before you can select it. Setting it to a high value makes it easier to hit an object. However, on complex models, you may have to zoom more often to avoid selecting the wrong object.
Intelligent Cursor
-
Active
— Select this option to enable the
Intelligent Cursor. The
Intelligent Cursor
provides dynamic assistance when you are selecting existing objects and/or positioning new objects. When active,
PowerShape highlights objects and snap points, and generates temporary construction lines as the cursor moves over the model. The
Intelligent Cursor also:
- finds intersections between wireframe items and a surface or solid.
- snaps to the projected intersection of wireframe items and surfaces.
- Show Construction Distances — This is only available when the Intelligent Cursor is active. It provides stepped graduations along objects such as lines and arcs to which the cursor can snap. It displays a dimensional value which changes as the cursor moves along objects. You can then snap to the displayed dimension. The units change per the zoom level. Zoom in to see finer graduations. Zoom out for more coarse graduations.
- Shaded highlighting — Select this option to highlight a shaded object when you move the cursor over it. Deselect this option to never highlight shaded objects.
- Fast rubber-banding — Use this to switch between faster rubber-banding and higher quality graphics. Deselect this option to improve the rubber-band graphics and use the correct construction colours.
- Background Grid — Select this option to use an invisible grid to round any points that are entered using the cursor. The amount that a position is rounded depends on the scale of the view.
- Edge picking — Select this option to select edges of surfaces, solids and wireframe. The edges can then be used instead of a composite curve for creation and editing.
- Drag Move — This allows you to select and move an object. Select this option to move an object to a new position by dragging it with the cursor. Deselect this option to select an object but not move it. This is useful when dealing with complex models, where you do not want to accidentally move objects when selecting them.
-
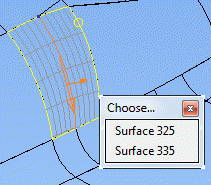
Show Next Selection — This option is used to aid selection of objects that intersect. This displays a dialog showing the name of each selectable object in the model that intersects with the currently selected object.
In the example below, there are two possible surfaces that can be selected when an intersection point is selected:

When you hover over the option, the corresponding item is highlighted. Select the required surface from the list. If no selection is made, the selection options are removed from the screen.
A variant of this, the Next Selection option, is displayed on context menus and is available on editing toolbars. Choosing this option does not immediately display the dialog, but automatically selects the next item in the selection list and then displays the dialog. The shortcut Alt+N also activates Next Selection.
Scroll Wheel
- Items scale factor — Enter a value to set the factor that the items are scaled by for each use of this shortcut.
- Items rotation angle — Enter a value to set the angle that the items are rotated by for each use of this shortcut.